displaying posts 201 to 225 of 408

Pages (17): first .. 8 [9] 10 .. last

Author Subject: Mik's Rallye
mik

Seasoned Pro

Location: Kent

Registered: 17 Feb 2011

Posts: 2,100

Status: Offline

Post #201
Shot 1 and a half cans of Dynax S50 into the sills, A and B pillars.

A pillar through the interior light door switch hole...


both sills through upper and lower rivet holes as well as inside using a grommet hole into the other side of the centre sill panel near where the foam is visible inside the car (above)...


inside sills at rear from inside the car including inside B pillar (after this shot I put on the short nozzle and covered all visible surfaces nearly up to the side strip hight and all seams) and not forgetting both sides of middle sill...

And afterwards some wax dripping out the bottom sill seam with cardboard to avoid rustproofing the driveway.


Now to put the interior back together.

________________________________________

Cherry Rallye SOLD

Posted 7th May 2013 at 22:08
jamiek_uk2000

Seasoned Pro

Location: Llanelli

Registered: 18 Apr 2009

Posts: 1,925

Status: Offline

Post #202
I should have spent my day getting the rest of the interior out of the back and seeing what the other side of my sills are like. Instead I was stuck doing assignments for collage, something which I would rather not be doing

________________________________________

205 GTi Red - G939 RTU - Died!
306 GTi 6 Diablo - Being resurrected! Project Thread

Looking for:
VTS P1 Rack
PR1.2 16"
Posted 7th May 2013 at 22:11
mik

Seasoned Pro

Location: Kent

Registered: 17 Feb 2011

Posts: 2,100

Status: Offline

Post #203
Yeah I know I had to leave work early to sort the car out today, and I've just handed in a university assignment and was having to procrastinate on the assignment to do stuff on the car. Still got the assignment in on time though.

It's getting painted (bonnet, bumper and rear hatch) next week all booked in so I'm on a timetable to get it done.

________________________________________

Cherry Rallye SOLD

Posted 7th May 2013 at 22:41
matt evans

Seasoned Pro

Location: Stourbridge

Registered: 16 Sep 2009

Posts: 2,290

Status: Offline

Post #204
Keep up the good work Mik. The Bilt Hamber stuff is awesome. I've ordered some more for the 206 when i do that over the winter.

________________________________________

1999 Astor Grey GTi-6 OEM+ (now gone...)
2004 Aegean Blue 206 GTi 180 (also gone...)
2006 Skoda Fabia vRS in Sprint Yellow

honestly3k wrote:
Do you wrestle for a living matt? You sound like a monster LOL


owain wrote:
Nothing involving a 306 can be considered worthwhile.

Posted 8th May 2013 at 08:11
coskev

Seasoned Pro

Location: Oswestry

Registered: 01 Nov 2009

Posts: 3,132

Status: Offline

Post #205
Another handy access place I've noticed is threw the rear beam front mounting points in the boot floor, gives you access from above to the section of chassis/inner sill that is along side the tankThumbs up
Very similar section to the 309, and they rot badly thereThumbs down

________________________________________

Red GTB1756 powered Fabia VRS daily driver,LBSC Gti6 eater........

Mac1 ZR R1 kit car build in progress.
Posted 8th May 2013 at 10:47
RetroPug

Seasoned Pro

Location: Leicestershire

Registered: 15 Jan 2013

Posts: 2,473

Status: Offline

Post #206
jamiek_uk2000 wrote:
Instead I was stuck doing assignments for collage, something which I would rather not be doing

Aww come on, stick with it.
LOL

________________________________________

61k miles Ph.1 Diablo '6 Project Thread
Posted 8th May 2013 at 10:54
mik

Seasoned Pro

Location: Kent

Registered: 17 Feb 2011

Posts: 2,100

Status: Offline

Post #207
coskev wrote:
Another handy access place I've noticed is threw the rear beam front mounting points in the boot floor, gives you access from above to the section of chassis/inner sill that is along side the tankThumbs up
Very similar section to the 309, and they rot badly thereThumbs down


Ah excellent, I'll blast some in there before I put things back together.

________________________________________

Cherry Rallye SOLD

Posted 8th May 2013 at 17:27
mik

Seasoned Pro

Location: Kent

Registered: 17 Feb 2011

Posts: 2,100

Status: Offline

Post #208
Got a bit done today...

Painted the new sill section, and the bottom seam with stonechip like the rest of it:


Started on installing the rivnuts inthe sill cover rivet holes:


Here is the tool I'm using, you tighten the bolt at the right hand end and it pulls up the rivnut thread compressing it using a sliding wedge action. It sounds painful but works well. It is a bit fiddly for those of us without a 3rd hand but I'm getting there. Only about 18 to go.

________________________________________

Cherry Rallye SOLD

Posted 10th May 2013 at 23:32
coskev

Seasoned Pro

Location: Oswestry

Registered: 01 Nov 2009

Posts: 3,132

Status: Offline

Post #209
Look good the RivnutsThumbs up

Presume you don't need to borrow my Rivnut tool now then...........Roll eyes

Razz

________________________________________

Red GTB1756 powered Fabia VRS daily driver,LBSC Gti6 eater........

Mac1 ZR R1 kit car build in progress.
Posted 10th May 2013 at 23:36
mik

Seasoned Pro

Location: Kent

Registered: 17 Feb 2011

Posts: 2,100

Status: Offline

Post #210
I thought you said it was shagged? My bad, could have saved me some dosh. Your idea to use rivnuts was better than mine for self tappers though!

________________________________________

Cherry Rallye SOLD

Posted 10th May 2013 at 23:39
coskev

Seasoned Pro

Location: Oswestry

Registered: 01 Nov 2009

Posts: 3,132

Status: Offline

Post #211
Soz for confusion, its prob down to your age tbhBig grin
One of the fittings is broke, but was waiting for you to confirm what size rivnuts you were going to useThumbs up

________________________________________

Red GTB1756 powered Fabia VRS daily driver,LBSC Gti6 eater........

Mac1 ZR R1 kit car build in progress.
Posted 11th May 2013 at 11:24
mik

Seasoned Pro

Location: Kent

Registered: 17 Feb 2011

Posts: 2,100

Status: Offline

Post #212
Dude you're not the youngest on this forum by any means!

Got most of the riv nuts in except for a couple before rain stopped play. The weather forecast was accurate for once.

________________________________________

Cherry Rallye SOLD

Posted 12th May 2013 at 15:07
coskev

Seasoned Pro

Location: Oswestry

Registered: 01 Nov 2009

Posts: 3,132

Status: Offline

Post #213
mik wrote:
Dude you're not the youngest on this forum by any means!


LOL b**chRazz

________________________________________

Red GTB1756 powered Fabia VRS daily driver,LBSC Gti6 eater........

Mac1 ZR R1 kit car build in progress.
Posted 13th May 2013 at 21:31
pugheaven

Seasoned Pro

Location: Fareham

Registered: 17 Dec 2006

Posts: 4,602

Status: Offline

Post #214
Could have just used a bolt with a nut on it, wind the bolt in the riv nut hold the head of the bolt still and tighten the nut, hey presto it compresses the riv nut Smile
Posted 13th May 2013 at 22:26
coskev

Seasoned Pro

Location: Oswestry

Registered: 01 Nov 2009

Posts: 3,132

Status: Offline

Post #215
pugheaven wrote:
Could have just used a bolt with a nut on it, wind the bolt in the riv nut hold the head of the bolt still and tighten the nut, hey presto it compresses the riv nut Smile


That might work with alloy riv-nuts,but not steelNo

Take quite a lot of pressure to compressThumbs up

________________________________________

Red GTB1756 powered Fabia VRS daily driver,LBSC Gti6 eater........

Mac1 ZR R1 kit car build in progress.
Posted 14th May 2013 at 14:16
mik

Seasoned Pro

Location: Kent

Registered: 17 Feb 2011

Posts: 2,100

Status: Offline

Post #216
I did think about trying something like that, but with about 26 of the f**kers to do I thought it would take until next year to do them all that way.

I'm now looking for a painter as I need the bonnet, bumper and hatch painted. I found someone but he said he didn't have an oven or booth so might get bits in the paint.

________________________________________

Cherry Rallye SOLD

Posted 14th May 2013 at 18:37
mik

Seasoned Pro

Location: Kent

Registered: 17 Feb 2011

Posts: 2,100

Status: Offline

Post #217
I am starting to get the car back together, but it will take another couple of days. I was going to get the bonnet, rear hatch and new bumper painted, and got a couple of quotes but with the possibility of a new rear window if the current one gets damaged removing it, the cost is starting to add up so soon after getting the rack, new tyres, sill fixed etc etc etc. Also I just want to drive it after only doing 4000 miles in the last 2 years and spending masses of time on the underside etc. So I am going to rattle can my spare bumper as an experiment (which is currently a mixture of blaze and primer) to make the car semi-presentable for this summer, then get it all sprayed up properly later in the year when my wallet has recovered from the masses of new bits etc.

So, after shooting the inside of the sills with Dynax S50 as seen above, I moved on to the outside of the sills where they will be underneath the sill covers and blasting them with Dynax UC:


First colour coat on the spare bumper offered up to see how good the colour match is. This bumper has loads of surface imperfections and has several coats of paint so it never will be perfect, even after loads of sanding, primer and high build primer but as I've never painted a panel before I'll see how difficult it is to get a good finish. Note how dull and flat the bonnet is. the paint is crazed after a dealer dodgy blow-over some years ago, and needs stripping back to bare metal. I'd love to find a cherry bonnet with good paint.


New rear sill clips which are now NLA from Pug. I've salvaged the old ones which can be re-usd with some new sticky stuff.


...and sill cover back on for the first time in 4 months.


The sill covers are reinstalled with M4 allen flat-head bolts and M5 washers instead of the factory rivets, so that I can un-bolt the covers and hose the mud out every year or so.


I got a new OE sill seal from a Pug dealer with one of the last in stock, it was discounted too. Both the original sill seals were split by people scuffing them with their heels getting out of the car. The passenger side one is a good second hand one from a breaker.


New driver's side sill seal installed:


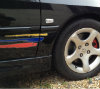
With the C5 alloys now on the car I needed a 17mm wheel brace to suit as OE 306 wheel bolts are 19mm, so got a Citroen one, only £6.50 from the Pug dealer. However it is a different shape so it doesn't fit in the clip and it can't be used to undo the spare wheel retaining screw. If I can be bothered I might get the 306 handle welded to the Citroen head.


Here is my new spare - the worst of my C5 alloys sprayed satin black, need to get a tyre put on it this week.


The lighter weight of the C5 alloys will hopefully compensate for the vast quantities of Dynax wax and all the Electrox zinc primer applied to the car over the last 2 years.


________________________________________

Cherry Rallye SOLD

Posted 19th May 2013 at 18:10
coskev

Seasoned Pro

Location: Oswestry

Registered: 01 Nov 2009

Posts: 3,132

Status: Offline

Post #218
Lucky escape with the sprayer with no booth or oven!!!Shock
Roof would have been covered in bitsThumbs down

Looking good going back togetherCool

Oh yeah,I gave you some dodgy info on waxing inside from the rear beam mounting points sozWhistle
After re-fitting my beam in the daylightRoll eyes you can't access that box section I thought you could.
Looks like the seat bracket retaining bolt holes would let you get your lance in there thoughThumbs up

________________________________________

Red GTB1756 powered Fabia VRS daily driver,LBSC Gti6 eater........

Mac1 ZR R1 kit car build in progress.
Posted 19th May 2013 at 21:30
rich306

Seasoned Pro

Location: Portsmouth

Registered: 09 Aug 2009

Posts: 1,834

Status: Offline

Post #219
I am highly impressed by the work thats gone on here, if only i had the time and a spare vehicle to use for work whilst i stripped my Rallye down and did the same!!

________________________________________

Richies Project Rallye

Electrical work carried out in Portsmouth

jamiek_uk2000 wrote:
You'll need to throw money at the car. Not on parts. Just stand near your car and throw loose change at it, I find this increases performance for a short period of time
- Top Tip!!!
Posted 19th May 2013 at 22:54
mik

Seasoned Pro

Location: Kent

Registered: 17 Feb 2011

Posts: 2,100

Status: Offline

Post #220
Cheers Rich, I'm on a mission to get it finished so I can drive it.

As well as the "ghetto spec" (as opposed to "outlaw spec" Big grin ) front bumper until the end of 2013, having seen this pic of a Rallye with a black bonnet, I'm thinking it looks OK and maybe following suit by stripping the nasty paint off the bonnet and painting it gloss black. If nothing else it will help me see whether I have a talent for rattle can painting. It might also save me some prep time for when I eventually get it painted properly in Cherry Red as the crazed paint will be gone.

________________________________________

Cherry Rallye SOLD

Posted 20th May 2013 at 21:19
mik

Seasoned Pro

Location: Kent

Registered: 17 Feb 2011

Posts: 2,100

Status: Offline

Post #221
"Ghetto spec" front bumper before...


and taking shape while spraying in the garden spray booth...


with the "after" shot to follow later in the week.

________________________________________

Cherry Rallye SOLD

Posted 21st May 2013 at 20:29
coskev

Seasoned Pro

Location: Oswestry

Registered: 01 Nov 2009

Posts: 3,132

Status: Offline

Post #222
Looks ok so far!Thumbs up

How many flies have you got stuck in the paint!!!!Angry

________________________________________

Red GTB1756 powered Fabia VRS daily driver,LBSC Gti6 eater........

Mac1 ZR R1 kit car build in progress.
Posted 21st May 2013 at 21:17
mik

Seasoned Pro

Location: Kent

Registered: 17 Feb 2011

Posts: 2,100

Status: Offline

Post #223
Surprisingly, none at this stage. But we'll see how many flies are around when the lacquer is going on.

________________________________________

Cherry Rallye SOLD

Posted 21st May 2013 at 22:55
mik

Seasoned Pro

Location: Kent

Registered: 17 Feb 2011

Posts: 2,100

Status: Offline

Post #224
I've put all the wheelarch liners back in after waxing the arches.


I installed the undertray I got from ebay complete with all the screws bolts etc...


...but found one of the holes in the subframe for one of the 2 massive bolts at the rear had some weld or something preventing the bolt from being screwed in. So it will have to stay off for now. Seem to be very big bolts simply to hold the back of the subframe in.

I've sprayed the badge surround black as another experiment, and have got another badge on the way as this one has seen better days. The bonnet is still crazed and dull, not to mention the Rallye decal is too high, and I'll sort that next.


And I finished the ghetto spec front bumper. For a repainted blaze bumper that needed a lot of sanding down to get rid of loads of blemishes, and which was sprayed in the garden with rattlecans as an experiment, it has come up very well. It was sanded back after each coat and before the lacquer. Instructions say to wait 2 weeks before sanding back and polishing the lacquer but it still looks pretty acceptable for a temporary job. I did notice just after I got it back together that the gap between the bumper and the wing needs to be tweaked, but that will be a job for another day.

________________________________________

Cherry Rallye SOLD

Posted 25th May 2013 at 00:14
jamiek_uk2000

Seasoned Pro

Location: Llanelli

Registered: 18 Apr 2009

Posts: 1,925

Status: Offline

Post #225
That is far too much to worry about, my car is just concerned with:

A: Will it stay on
B: Is it structually sound (Will the police fine me for it hanging off)
C: Is it worth replacing (i.e. Bodywork = No)
D: Does it improve the handling/performance?
E: Can I drive it without being annoyed to the point of mass murder? (That's why I'm putting carpet back in the rear. I cannot deal with a squeaky Peugeot, just because I saved 2KG removing some carpet)

________________________________________

205 GTi Red - G939 RTU - Died!
306 GTi 6 Diablo - Being resurrected! Project Thread

Looking for:
VTS P1 Rack
PR1.2 16"
Posted 25th May 2013 at 00:18

Pages (17): first .. 8 [9] 10 .. last

All times are GMT. The time is now 01:58

The Peugeot GTi-6 & Rallye Owners Club - ©2024 all rights reserved.

Please Note: The views and opinions found herein are those of individuals, and not of The Peugeot 306 GTi-6 & Rallye Owners Club or any individuals involved.
No responsibility is taken or assumed for any comments or statements made on, or in relation to, this website. Please see our updated privacy policy.