displaying posts 51 to 73 of 73

Pages (3): 1 2 [3]

Author Subject: 205 Mi16 Rebuild/Conversion [Lots of Pictures]
miles

Seasoned Pro

Location: Ringwood

Registered: 28 Dec 2002

Posts: 3,433

Status: Offline

Post #51
For the loom just get some connector's from Vechile WIring Product's and cut the loom down making sure you know what each wire does,
I've always done this and along with making the loom more reliable now as the ends of the wires corrode and cause high resistance.
Also on the water pipes have you bypass the T/B as there's no need to have them connected there just to above the stat housing

________________________________________

306 Rallye Sptint/Race Car, 205 CTI 1.9 8v to name a few

Road, Track and Race/Rally car preparation to your personal requirements,
Full Workshop & Diagnostic Facilities
New and Second parts, from Plugs to Turbo's
We now also carry out Routine Servicing
www.pugracing.com

& FB Page, https://www.facebook.com/PugRacing

Ebay; http://stores.ebay.co.uk/Pug-Racing-Shop

2012/2013/2014/2019 Class Winners at Gurston Down Speed Hillclimb & Joint overall, Class record too along the way,
Posted 3rd Jan 2010 at 07:59
sport1901966

Senior User

Location: Hertfordshire/Epsom

Registered: 17 Aug 2006

Posts: 687

Status: Offline

Post #52
miles wrote:
For the loom just get some connector's from Vechile WIring Product's and cut the loom down making sure you know what each wire does,
I've always done this and along with making the loom more reliable now as the ends of the wires corrode and cause high resistance.
Also on the water pipes have you bypass the T/B as there's no need to have them connected there just to above the stat housing


I like that idea! Do use the weather proof connectors? Is there any chance you know how many wires(ish) there are at the point of the loom in my pic, I'm back in herts now so can't look for myself, and it would be good to get them on order!

Oh yea, the T/B is bypassed, I bought the BBM kit that bypasses it so I had to even if i didn't want to! LOL
Posted 3rd Jan 2010 at 14:36
sport1901966

Senior User

Location: Hertfordshire/Epsom

Registered: 17 Aug 2006

Posts: 687

Status: Offline

Post #53
I'm working on the repairing of the oil temperature guage wiring, the wire broke away from the terminal at the brown plug in the engine bay that links the engine loom to the dash gauges (see pic).


I need to order a new terminal, IIRC this side of the plug is male but I'm away from the car and need to get some ordered. Does anyone know what exactly I need? I'm guessing a 6.3mm blade 'male with latch' as you'll see on the link below about half way down the page? Does anyone know what the cross-sec area of the standard wire is?

Vehicle Wiring Products Link

One more question (I know they just keep coming, please bear with me!) does anyone know how many(ish) wires are in the BX loom at this point, because I wan't to order a multiplug so I can shorten the loom!


Thanks!
Posted 5th Jan 2010 at 13:52
miles

Seasoned Pro

Location: Ringwood

Registered: 28 Dec 2002

Posts: 3,433

Status: Offline

Post #54
The AFM is 5 pin, TDC Sensor is 3 pin, TPS is 3 Pin
On the sensor loom I never use that plug as its a waste of time, Best make a new loom with new connectors inside for the other 2 plug's,
I have the crimps here in both size's as well, Oddly enough!!

________________________________________

306 Rallye Sptint/Race Car, 205 CTI 1.9 8v to name a few

Road, Track and Race/Rally car preparation to your personal requirements,
Full Workshop & Diagnostic Facilities
New and Second parts, from Plugs to Turbo's
We now also carry out Routine Servicing
www.pugracing.com

& FB Page, https://www.facebook.com/PugRacing

Ebay; http://stores.ebay.co.uk/Pug-Racing-Shop

2012/2013/2014/2019 Class Winners at Gurston Down Speed Hillclimb & Joint overall, Class record too along the way,
Posted 5th Jan 2010 at 08:10
sport1901966

Senior User

Location: Hertfordshire/Epsom

Registered: 17 Aug 2006

Posts: 687

Status: Offline

Post #55
miles wrote:
The AFM is 5 pin, TDC Sensor is 3 pin, TPS is 3 Pin


So I could use a 5 way (AFM) and a 6 way (for the left over wires) weatherproof multiplug from VWP, cut the loom all in one place along that loop in the pic. What do you think?

miles wrote:
Best make a new loom with new connectors inside for the other 2 plug's


I don't quite follow you here could you expand?

Thanks for all the help miles! Oh by the way did you get my email about the AFM to TB pipe and TB bracket? I quite fancy a red pipe if you have one? And i'm unsure whether to bother with the bracket if it's no more substantial than my (basic) replacement!
Posted 5th Jan 2010 at 14:00
sport1901966

Senior User

Location: Hertfordshire/Epsom

Registered: 17 Aug 2006

Posts: 687

Status: Offline

Post #56
Could anyone confirm the above? It would be great to get the stuff ordered ready for the next time I can put some time into the car.

Thanks
Posted 7th Jan 2010 at 00:17
sport1901966

Senior User

Location: Hertfordshire/Epsom

Registered: 17 Aug 2006

Posts: 687

Status: Offline

Post #57
Not much of an interesting update but following up on my posts about shortening the loom as per the earlier picture, I investigated to number of wires in the loom at that point.

The wires I found were as below -


Based on this I ordered some connectors from VWP and the associated terminals - a 5 way waterproof multiconnector for the green wires and a 4 way multiconnector for the remaining. I got some other connectors just in case I decided to do it a different way.

I chose the sizes based on the wire OD and cross sectional area info I found on Automotive Electrical Supplies for standard cable.


Also on advice from welshpug! I ordered the crimping tool with green handles from simtek to get the proper folded over tab crimps on non-insulated terminals (see my topic 'what crimping tool?')

I haven't yet been back to the car to begin the shortening, but it won't be done for a while as it's not top of my to do list anyway!
Posted 3rd Feb 2010 at 05:44
sport1901966

Senior User

Location: Hertfordshire/Epsom

Registered: 17 Aug 2006

Posts: 687

Status: Offline

Post #58
Also on the topic of wiring I have made a new connection wire for the oil temp sender to the brown plugs. The old wire had corroded and broken away from the terminal at the brown plug end so I ordered a new blade terminal (as part of the VWP order) and set to work...... I'm stuck away from the car at the moment so any work I can do is very interesting to me! Roll eyes .................. The almost finished product is below, I took advice from a friend and used a dymo label printer and clear heat shrink to label the wire.


Also just to share my excitement Roll eyes .. I bought a shortened AFM to TB hose as part of Stew's (BBM) group buy which I plan on getting fitted this weekend!


Hopefully there should be some updates actually worth reading next week LOL
Posted 3rd Feb 2010 at 06:00
sport1901966

Senior User

Location: Hertfordshire/Epsom

Registered: 17 Aug 2006

Posts: 687

Status: Offline

Post #59
Weekend of the 5th of Feb Update

Friday
Posted 21st Feb 2010 at 14:33
sport1901966

Senior User

Location: Hertfordshire/Epsom

Registered: 17 Aug 2006

Posts: 687

Status: Offline

Post #60
Saturday
Posted 22nd Feb 2010 at 00:02
sport1901966

Senior User

Location: Hertfordshire/Epsom

Registered: 17 Aug 2006

Posts: 687

Status: Offline

Post #61
Sunday
Posted 22nd Feb 2010 at 00:03
sport1901966

Senior User

Location: Hertfordshire/Epsom

Registered: 17 Aug 2006

Posts: 687

Status: Offline

Post #62
Right its been a while since I updated this...... and thats an understatement. I have quite a lot to update so bear with me!

So first of all back to june

4th June 2010

After re-sealing the sump, fitting the new OSF flexi hose and bleeding the brakes, the plan was to take the car out for a test drive to get the oil up to temp and see if it was still leaking. As the car had been sat for a while I did the usual taking off the cam cover and oiling the cams and down the bores, I then turned over the engine by hand then with the ECU disconnected to pressurise the oil system. I started the engine up and all was well. I then refitted the headlights and bumper. I quickly checked all the exterior lighting, the indicators and brake lights were fine but the rest are a bit hit and miss.... more work to do then!

I was all ready for the first drive, got my self comfortable..clutch down... turn the key... and.... engine turns over then the slows, the starter motor clicks and all goes dead. This is followed by lots of smoke from under the bonnet and the unmistakeable stench of burning plastic. I opened the bonnet and was greeted by this....


The bonnet support had closed down on the loom at the branch just after the convoluted tubing earthing the main ECU live feed. Looks like I was to be shortening the excess loom sooner than planned, fortunately I had already ordered all the connectors I needed and had some cable lying around. I had to cut the loom the branching point in the pic below. Conveniently all the AFM wires are green as well as pretty much all the others, needless to say an anal amount of labelling was required before making the cut!


I made a shortened loom template with some old wire; this included the AFM, crank sensor, ignition amp, coil and power distribution block wiring. In my loom I included an inline 25Amp fuse in the main live feed from the distribution block.

The next day I fitted the connectors on the car side of where I cut the loom and plugged everything back in…

Posted 22nd Sep 2010 at 06:13
sport1901966

Senior User

Location: Hertfordshire/Epsom

Registered: 17 Aug 2006

Posts: 687

Status: Offline

Post #63
14th August 2010

Firstly I took off front struts to replace bearings (skf parts from ECP) and rubber buffers (group N ones from BakerBM). I then found that the LH side damper was shot, it seems to have over travelled as the bump stop had disintegrated.


Euro Car Parts sell OE spec bilstein shocks at pretty reasonable price, but I had to get the bump stops separately. I had also bought some Motaquip (OE quality) wishbones to put on. This I couldn’t do until the new shocks had arrived.

The next big job was working out where the big oil leak when the engine is warm is coming from. I suspect it could be the oil filter. Do to the tightness to the rad I actually had to get the bumper and fan housing off and pull the rad forward a bit. Eventually I will fabricate a whole new mounting rail to bring it permanently forward. I removed the oil filter, cleaned up the surfaces and, for the sake of testing, put the ‘old’ (only done a few miles) filter back on.


I had also finally found a replacement 7 way female junior power timer plug for the ignition amp because the old one kept dropping off! I swapped over all the wires and jobs a goodun. I found it on EFIparts.com which is a pretty good site for that sort of thing.

After a trip to the scrap yard I managed to sort a few little problems including getting a new sidelight bulb carrier, aerial and a ton of new dash bulbs.

When I got the new shocks I assembled the struts together and got them back on the car. I had attacked the various parts with a wire wheel and painted them to preserve them.


I then got the wishbones fitted, making sure to bolt up the inner bushes with the hub jacked up to normal ride height. During the fitting the RH headlight lens decided to fall out so I swapped the unit over with one from the scrapyard. Also whilst I was under the car I did a general check of all the subframe mounting bolts calliper bolts etc.

The exhaust that came with the engine when I bought it is in good condition but had a ridiculously loud backbox, I decided to cut it off and use the standard back box. To this I used a short length of the old exhaust pipe to make a joiner section which I welded the silencer to the rest of the exhaust with. I was well pleased with the result; the tail pipe comes out in just the right place, quite a success for my first welding job!


After all that I wired in an ISO plug for a new radio (wasn’t up for spending ridiculous money on a conversion loom from halfords or the like!).

I took the car out for a test drive and the result was bittersweet, exhaust is sorted; I no longer sound like the McDonalds massive. BUT the oil leak remains. After cleaning up the sump and around the oil filter I ran the engine again, watching where the leak originated from. I could see quite clearly it was coming from between the spacer and sump, around where the oil pump mates to the block. At this point I decided to call it a day, the thought of pulling the sump off again was enough to put me off!
Posted 22nd Sep 2010 at 06:13
sport1901966

Senior User

Location: Hertfordshire/Epsom

Registered: 17 Aug 2006

Posts: 687

Status: Offline

Post #64
28th August 2010

The 28th August brought the 3rd attempt at sealing the sump, before this go I did some searching on this site to see what other people had done, I thought I’d list this below as it may help out other people –

• Clean surfaces with petrol/cellulose thinners
• Rub surfaces with fine wet and dry (get really really shiney)

Spacer to block
• Very thin smear of silicone between the plate and the block because that's a close fitting joint
• Can use gasket on this joint as well, although not done at factory

Sump to spacer
• Sump to spacer – 2mm bead/3mm bead
• Using 1 Gasket on sump to spacer – thin smear of sealant on sump, add gasket then thicker smear on top of gasket
• Use gaskets on both joints with smear of sealant
• You can do this without the gasket if you wish..
• Sump to spacer - a thicker application on the gasket which I apply only around the centre and outside edge of the gasket so it doesn't squeeze into the sump (3mm)
• Timing – fit straight onto engine or let sealant start to dry before fitting (~15mins?) and tighten bolts lightly (middle out) wait 2 hours then tighten fully (20Nm)
• Tighten bolts progressively - every other bolt a quarter turn


Sealants
• Sealants - Wynn's gasket maker (sump to spacer)/ ThreeBond 1211 (very thin layer both surfaces/ clear window/bath silicone sealant (sump to spacer)/ Dow Corning RTV silicone


I ended up going with a ridiculous amount of cleaning, sanding the surfaces lightly with 800 then 1500grit then more cleaning with thinners and brake cleaner. I also used the gasket between the sump and block with a smear of Locitite 5910 rtv. I also left the sealant to start curing slightly before assembling, and then waited 24hours to fill with oil. To be certain of not getting oil on any of the surfaces I also took the oil pump pickup off, that way the spacer could be lifted straight on.


I took the car out for the test drive and guess what…. we still have oil leaking….from the same place. At this point I walked away…again.

13th/21st September 2010


I started thinking to myself it’s too much of a coincidence that it’s always the same place, and at that point the joint is above the oil level in the sump. Looking at the leak, it was right in front of the oilway between the pump and block, which has the same surface as the spacer to block joint. This made me suspect the oil is being forced out between the pump and block and through the spacer-block seal (blue circle to green circle in the picture below).


This could be down to three things – the higher pressure spring/gti6 pump setup (although this should be fine), the pump not being clamped to the surface properly, or poor mating of the machined surfaces.

For the sake of eliminating it I swapped the spring over, cleaned the mating surfaces meticulously and put it all back together….still leaking.

I then investigated the bolt lengths using service box to be sure none were bottoming out. I got very confused as neither the bolts that were in the engine when I got it matched the service box diagrams, nor did the bolts in a GTi-6 pump I had lying around. The one thing they did have were spacers, which mine didn’t so I subsequently put some on. This seemed worth doing as there was less than a mm clearance at the end of the holes by my measurements. Before putting it back together I also spoke to Matt from QEP about the problem and he suggested a product called Wellseal, made by Stag, it is a non-curing flange sealant meant for metal to metal joints, it has a treacle-like consistency. I ordered some and used it on refitting the pump. I put the rest of the sump back together with the same anal approach as before (I REALLY wanted it to seal!) and left it.

In the mean time I have decided to rewire the front end lighting as much as possible. I managed to find some terminals from VWP that with some ‘modification’ fit into the original connectors, not ideal but certainly better than the old rotten ones. I used new connectors and the associated terminals where possible (between the main loom and indicator loom and to connect the driving lamps). I also swapped the earths to more reliable ring terminals. I made sure all the connectors were really well sealed to try and prevent corrosion in the future!
Posted 22nd Sep 2010 at 06:14
miles

Seasoned Pro

Location: Ringwood

Registered: 28 Dec 2002

Posts: 3,433

Status: Offline

Post #65
The sumps can be a pain, the goldern rule is alloy sumps = No gaskets and tin sumps with a gasket, I tend to use Wurth RTV and has never failed me yet with just the odd engine rebuild.

________________________________________

306 Rallye Sptint/Race Car, 205 CTI 1.9 8v to name a few

Road, Track and Race/Rally car preparation to your personal requirements,
Full Workshop & Diagnostic Facilities
New and Second parts, from Plugs to Turbo's
We now also carry out Routine Servicing
www.pugracing.com

& FB Page, https://www.facebook.com/PugRacing

Ebay; http://stores.ebay.co.uk/Pug-Racing-Shop

2012/2013/2014/2019 Class Winners at Gurston Down Speed Hillclimb & Joint overall, Class record too along the way,
Posted 23rd Sep 2010 at 04:21
sport1901966

Senior User

Location: Hertfordshire/Epsom

Registered: 17 Aug 2006

Posts: 687

Status: Offline

Post #66
They certainly are I know the bottom of the engine like the back of my hand! Ah that's useful, I'll remember that. The tin sumps are flat bottomed right? If it leaks again and when I can eventually bring myself to do it all again I'll get some of the wurth stuff. Thanks for the input as always!
Posted 23rd Sep 2010 at 04:50
sport1901966

Senior User

Location: Hertfordshire/Epsom

Registered: 17 Aug 2006

Posts: 687

Status: Offline

Post #67
21 Sept 2010 cont

Here are some pics from the wiring of the lighting loom, pretty pleased with the inline joints, feel like I'm, getting pretty handy with the soldering iron! I basically replaced all the old terminals, using old connectors where necessary but new when I could, and cut away and extended any bad wire. I'd have liked to redo the loom fully but it would be a dash out job so this will have to suffice. It seems to be working well.... for now anyway!


After finishing the loom I got it fitted.

I then moved onto testing the latest attempt at preventing the oil leak (using stag wellseal around the pump-to-block mating surfaces)......... and the car wouldn't start.... unbelievable.

Que hours of searching for ignition system problems, there was still definitely fuel. Initially it tried to catch but eventually not even that. I was checking pin outs on the ECU, researching exactly how the ignition components work so I could come up with weird and wonderful ways of testing them (I don't have access to an oscilloscope).

Eventually, whilst getting my Mum to turn the starter whilst I was standing at the engine bay looking for spark, I noticed the alternator tugging on some of the engine loom wiring (shown in the '4th June' update where it had slipped down by the chassis rail. The blades on the alternator had cut through the crank sensor wiring, meaning now control signal to the ignition amplifier meaning no collapsing of the primary coil magnetic field, meaning no spark.

22 Sept 2010

Based on the events of the 21st my wiring skills were to be employed again, I made sure to use adhesive lined heatshrink to be certain of a well sealed and non stressed joint. After making sure everything was connected and plugged in as required I went to start the engine.... Wahoo started instantly, another successful repair!

To ensure this didn't re-occur I set to making an alternator guard that mounts to the intake manifold.


I then started the engine again to see if I had defeated the infuriating oil leak....... It leaked!...... I'm now beyond getting annoyed with it anymore so I packed up and left it, more confused than ever. I am now certain the pump to block seal is fine, I am also pretty confident of the quality of seal between the sump-spacer-block joints is as good as possible. It has to be pressurised oil forcing through the seal.

Going back to one of my earlier pictures -


I am wondering whether oil is forcing its way past the gold plug, this seems to be in the oilway after the oil has left the oil filter.

Has anyone got any thoughts this, its is driving me mad, this same leak has now been there after 4 attempts at resealing the sump/spacer/pump!

Geoff
Posted 28th Sep 2010 at 22:43
russbez

Seasoned Pro

Location: Inverness-Shire

Registered: 19 Dec 2005

Posts: 7,458

Status: Offline

Post #68
sorry to hear about the oil leaks Sad

good effort Yes

________________________________________

TEAM HIGH BOOST SUPERCHARGED RALLYE

My Rallye project thread
Posted 28th Sep 2010 at 20:40
sport1901966

Senior User

Location: Hertfordshire/Epsom

Registered: 17 Aug 2006

Posts: 687

Status: Offline

Post #69
russbez wrote:
sorry to hear about the oil leaks Sad

good effort Yes


Cheers its been a pain in the arse, fingers crossed the plug thingy is responsible and I can get it sorted!
Posted 28th Sep 2010 at 21:17
paul_13

Senior User

Location: Reading

Registered: 10 Dec 2008

Posts: 693

Status: Offline

Post #70
Kyepan on the 205 forum had to take his MI sump off 4 times before he got it to seal!

Tried absolutely caking it in sealant and letting it dry fully before filling with oil?

________________________________________

205 GTI6- Rebuilt engine, lightened flywheel, lightened pulley, 307 hdi brakes, Koni struts on gravel spec springs, 22mm TB's, 24mm ARB, Roll cage, Citreon ZX rear dampers, SL434's, Xsara box, Quickrack, Pipercross enclosed induction kit. Smile

Private work, not a prob Smile
Posted 29th Sep 2010 at 14:09
sport1901966

Senior User

Location: Hertfordshire/Epsom

Registered: 17 Aug 2006

Posts: 687

Status: Offline

Post #71
I've left it a good 24hours plus before filling with oil. I certainly havent been stingy with the sealant, but I want to avoid too much squeezing into the engine on assembly. I'll just go for it next time, if I keep the bead on the outside edge it should be fine I suppose!
Posted 29th Sep 2010 at 19:01
paul_13

Senior User

Location: Reading

Registered: 10 Dec 2008

Posts: 693

Status: Offline

Post #72
Put some on the inner edge, middle and outer edge and might aswell put sealant on the bolts. Worked with me, my 6 sump was leaking.

I have the complete MI top engine bracket and elbow for £40 posted. PM me if interested

________________________________________

205 GTI6- Rebuilt engine, lightened flywheel, lightened pulley, 307 hdi brakes, Koni struts on gravel spec springs, 22mm TB's, 24mm ARB, Roll cage, Citreon ZX rear dampers, SL434's, Xsara box, Quickrack, Pipercross enclosed induction kit. Smile

Private work, not a prob Smile
Posted 29th Sep 2010 at 19:04
sport1901966

Senior User

Location: Hertfordshire/Epsom

Registered: 17 Aug 2006

Posts: 687

Status: Offline

Post #73
Hi all. It's been a very long time since I've posted in this thread as I decided to take a break from the project, between the pressure of finishing my Masters at Uni and being fed up with the oil leak it fell back in my interest. However uni is done and the good weather is (or was) here! Anyway - here goes!

Tuesday 24/5/2011

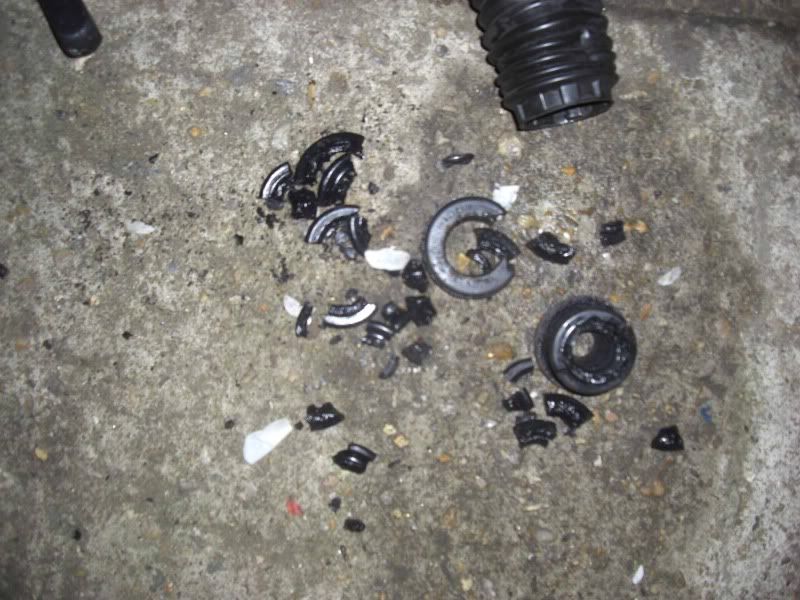
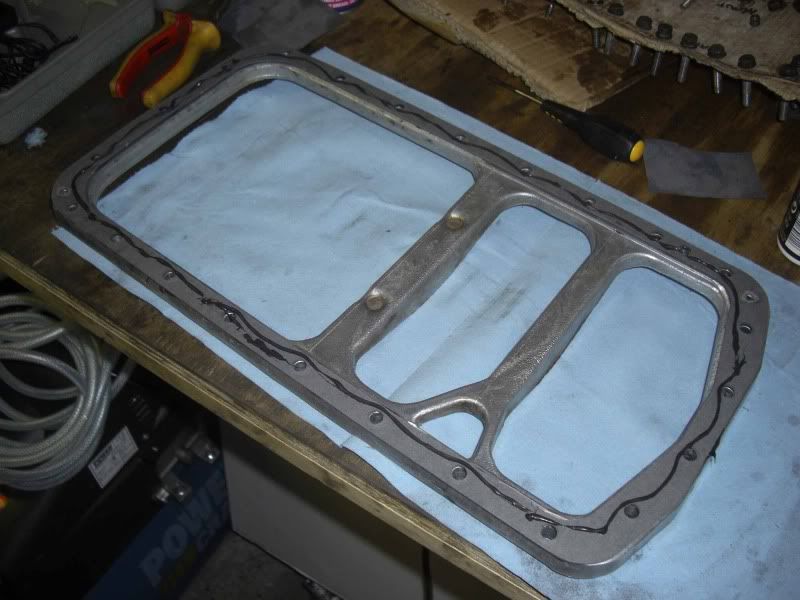
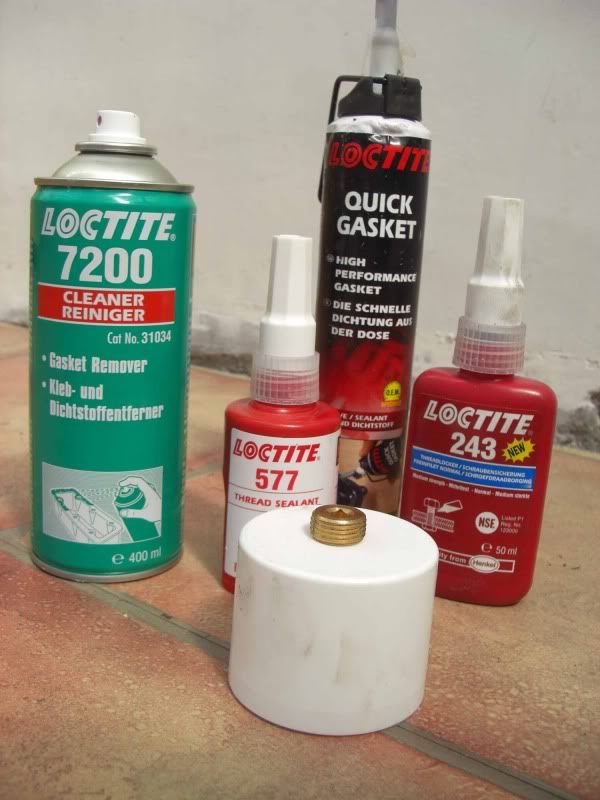
Today was dedicated to the 5th attempt at solving the prolific oil leak. The latest armoury of sealants and gasket removers is shown below.


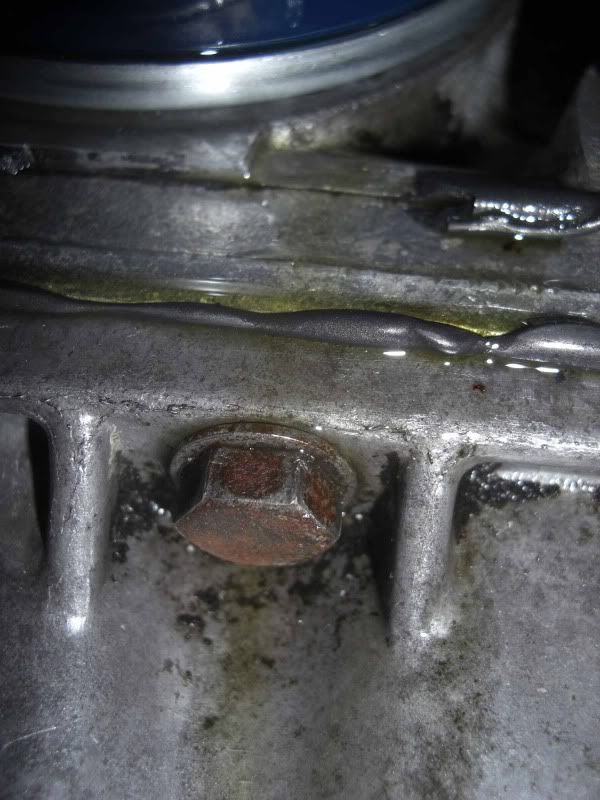
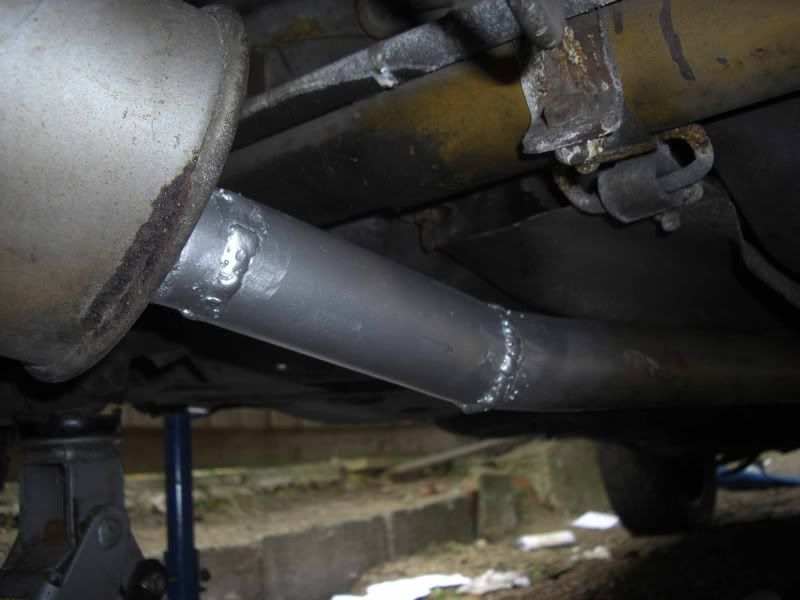
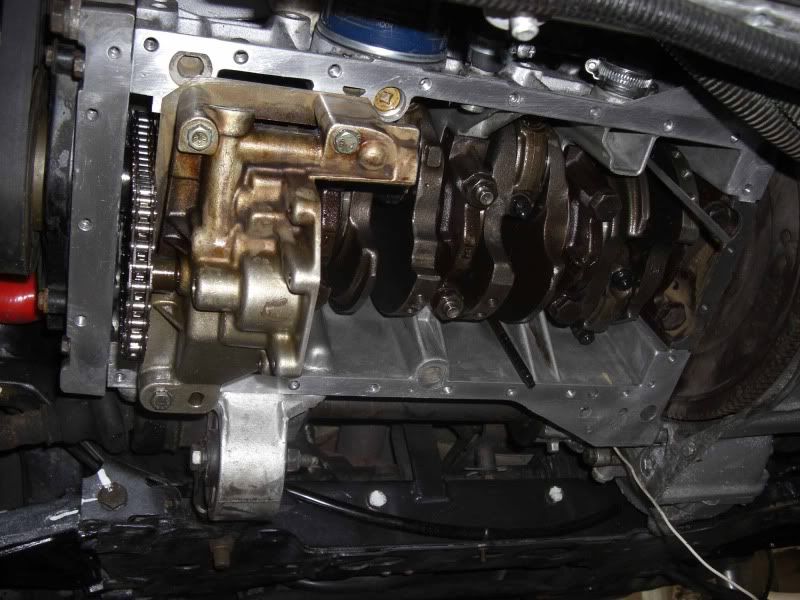
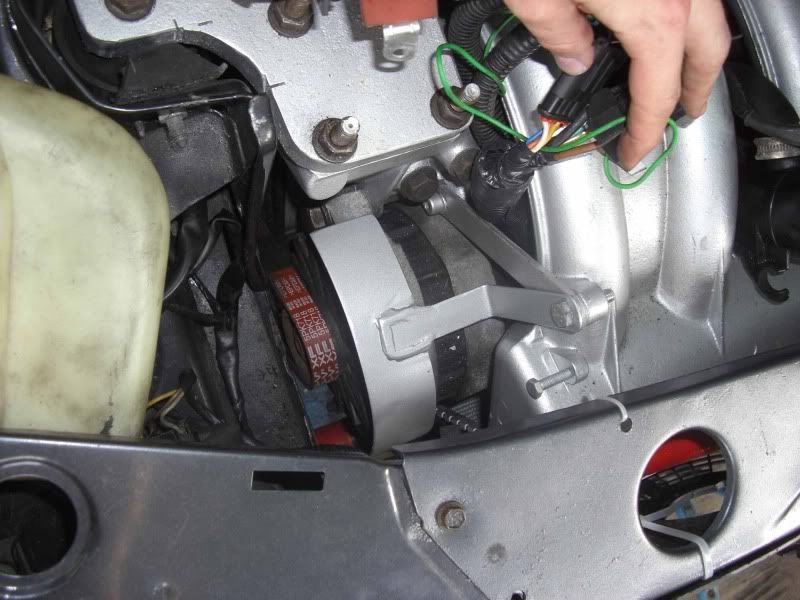
Based on the fact the leak was from the sump-block joint (below the oil filter) which is above the resting oil level line, it had to be pressurised oil forcing it through the joint. At first I thought it may be a poor seal between the oil pump outlet and block oilway connection, caused by using oil pump mounting bolts that were too long or simply a poor seal between the surfaces. This was eliminated by checking the bolt lengths against the thread depths and use of sealant, therefore it seemed it could only be a pressurised leak past the gold threaded oilway core plug positioned after the oil filter. It was changing and sealing this plug that was the task of the day. The sump was removed, followed by the spacer plate. Fortunately the plug can be removed without having to remove the oil pump unit, saving resealing of the oil pump outlet and block oilway joint.


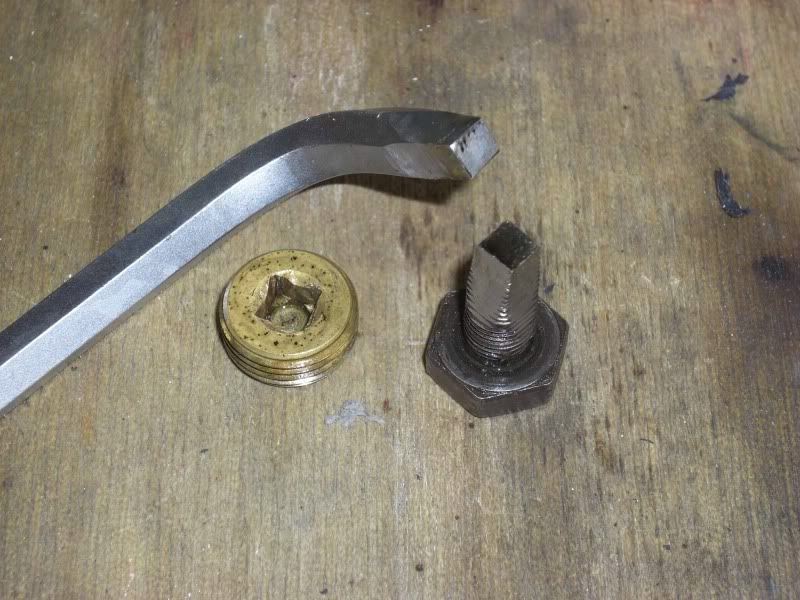
The plug is a 6mm square drive, which I did not have, due to the proximity of the pump to block oilway to the plug a ratchet would not be usable. Instead I took an old ‘L’ profile Allen key and ground the end of the short length into a 6x6mm square section. I also ground an old flywheel bolt thread into a square section to use to run the plug out with my fingers once it was loose.


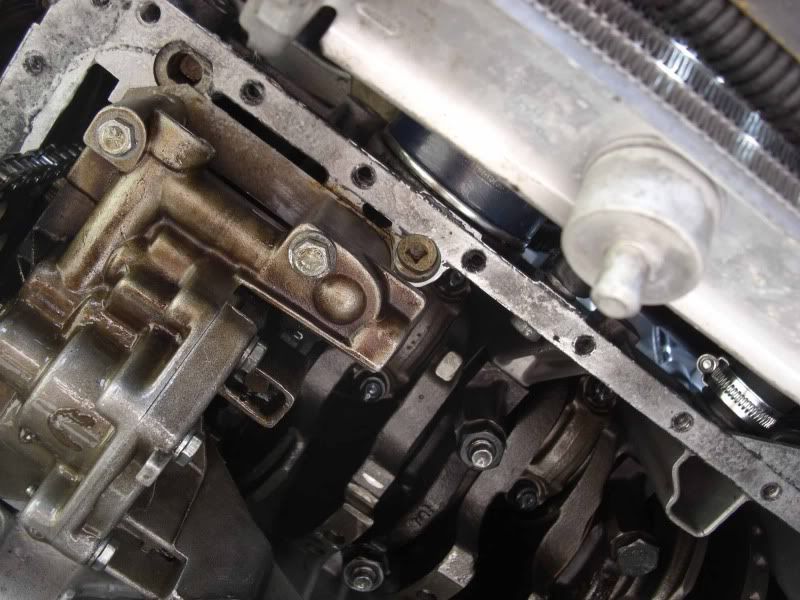
In the meantime I had coated the residual gasket on all the sealing surfaces with Loctite 7200, which dissolves silicon gasket over about 30mins, following this was a simple soft wire brushing and the surfaces were shiny as new.

After removing the plug I had a nagging doubt that a leak past the plug was unlikely, it was very tight, suggesting that nothing had changed since it was first fitted, when presumably it didn’t leak. Even so I then applied some Loctite 577 to the threads which is a dedicated thread sealing compound (its a kind of thick translucent yellow fluid). Before refitting it I made sure the threads in the block were totally clean of oil. When it was back in I refitted the spacer plate (taking off the oil pump to make positioning easier) and the sump. To be totally sure the seal was as good as possible (both the thread seal, which is specified to be at full effectiveness after 24hrs, and the silicon gasket) I left the sump dry for 24hrs.

Wednesday 25/5/2011

Today was mainly filled with odd jobs whilst I left the sealing compounds to cure. These were:

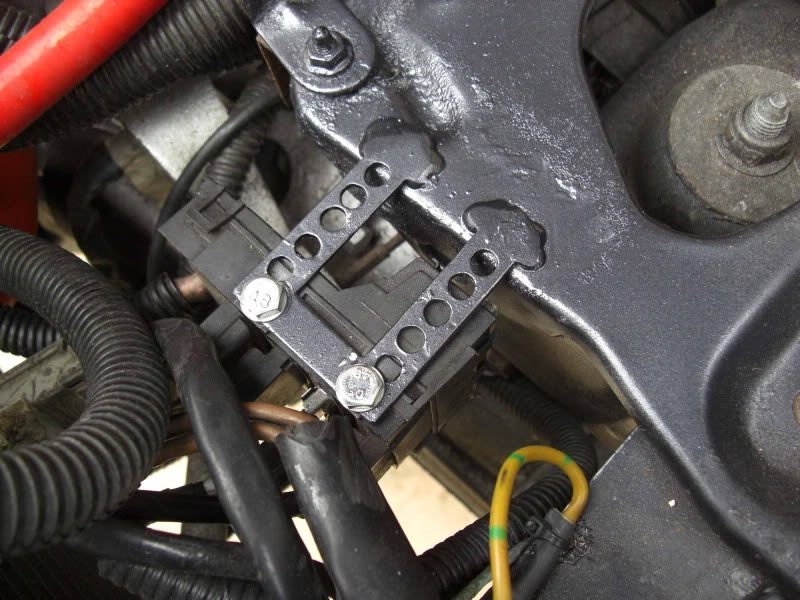
- Make a bracket to mount the power distribution box
- Sorting the fog light bulb
- Replacing the old corroded sidelight plug terminals with new Peugeot OEM ones
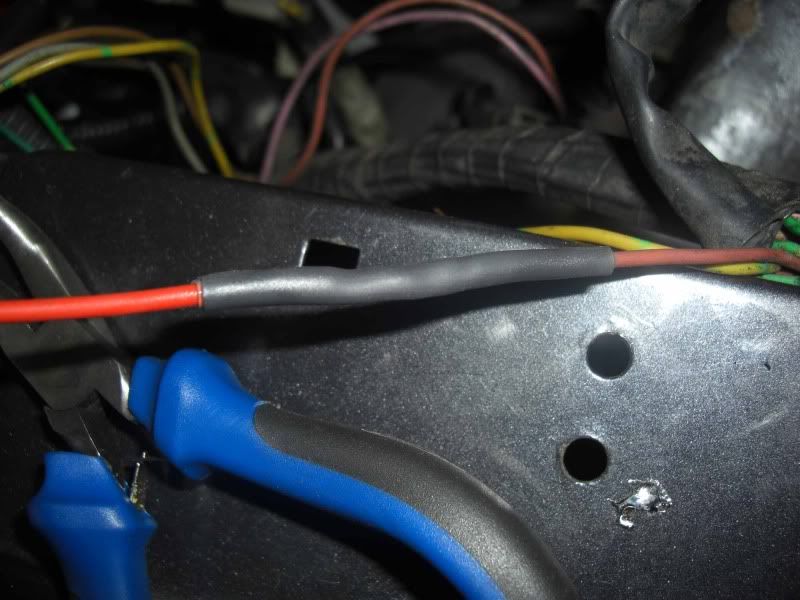
- Sealing (read wrapping in electrical tape) any exposed connectors
- Trimming the flywheel inspection cover I had to fit

The bracket was simply a U shape section of 2mm steel plate, with some holes drilled (no need for excess weight!), welded to the battery tray. Its slightly awkward to get to but was all the wiring would allow, either way it stops the power distribution block simply swinging around so does the job.


The fog light bulb has been a bit of a ridiculous problem, I have concluded someone has fitted a new bulb holder that takes bulbs with offset pins on the base (i.e. 120deg separation as opposed to 180deg). Ultimately this meant I haven't been able to find a bulb that fits, I’m sure it exists but I have better things to do than manual go through all the potential bulbs I can find. A much easier solution was to simply file down on of the pins on a normal fog light bulb, ‘380’ I believe, and fit that in. The fit is quite tight so the connection is more than secure.

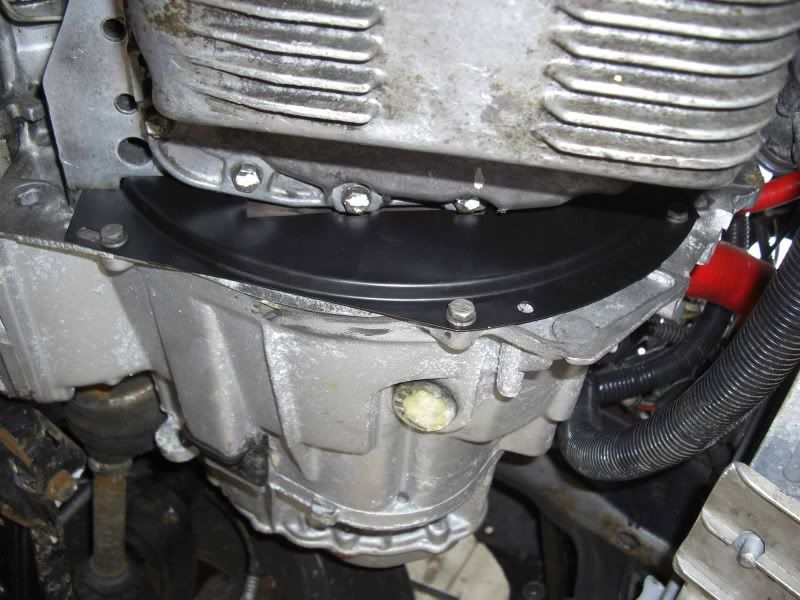
I bought a flywheel cover supposedly for the 1.9 Mi16 but either it wasn’t or it was from one with a different sump. Consequently it didn’t fit so out came the grinder and file, I think I made a pretty good job of it as it goes!


Thursday 26/5/11 – Results of the latest oil leak solution attempt

..................... It didn’t work. I was totally stumped, I was totally confident in my sealing of the sump and I could all but categorically say that the oil pump-to-block and oilway plugs were fully sealed.

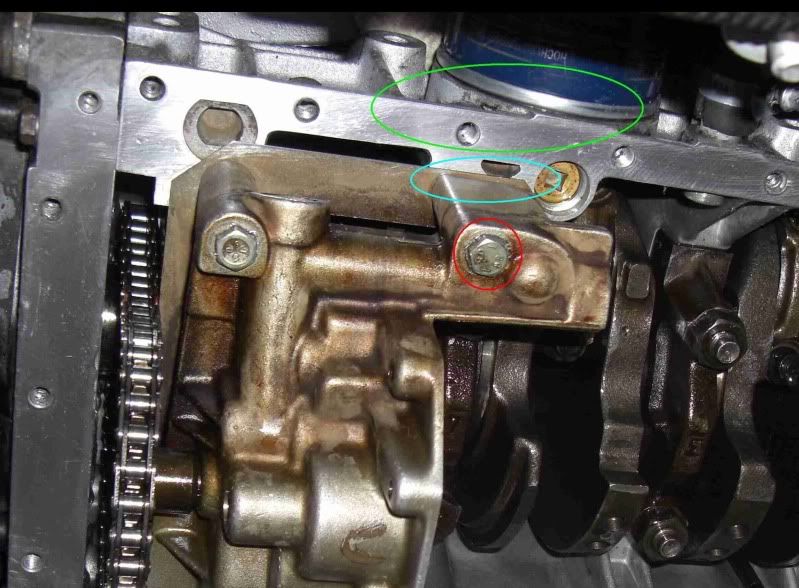
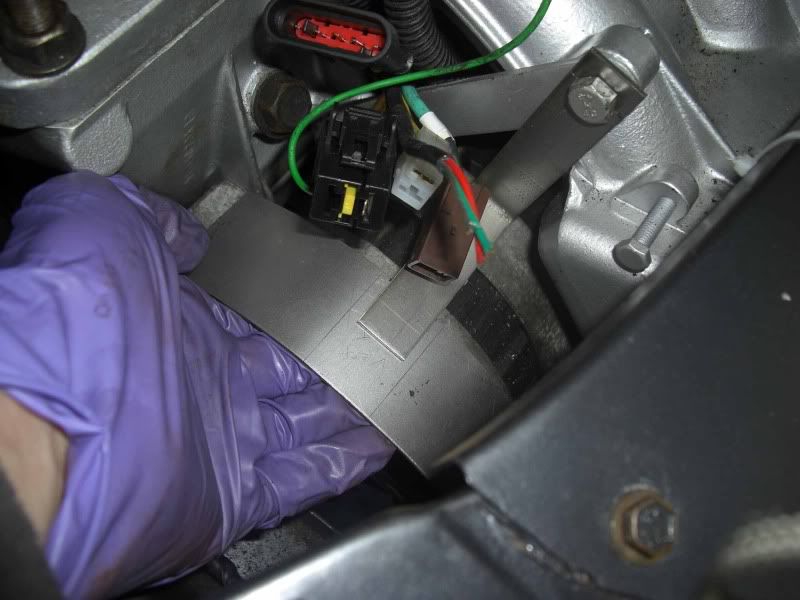
After 5 minutes of quiet contemplation, I had no energy left to be wound up by this particular bane of my life, I got back under the car to have another look. The leak seemed to be exactly as before, coming from the spacer-to-block joint, just under the oil filter. But wait...... I couldn’t see any oil any higher up but I put my finger in the little crevice in the block wall to the left of the oil filter (towards the flywheel) and it came out covered in oil. Oil was pooling in this crevice and eventually spilling over and running down the front of the spacer and sump. The overspill of the silicon sealant from the spacer-to-block joint caused the oil to collect at that joint making it seem as if it was leaking from there. Due to the angle of the engine and lack of space and light there was no way of seeing the oil that had collected in the crevice.

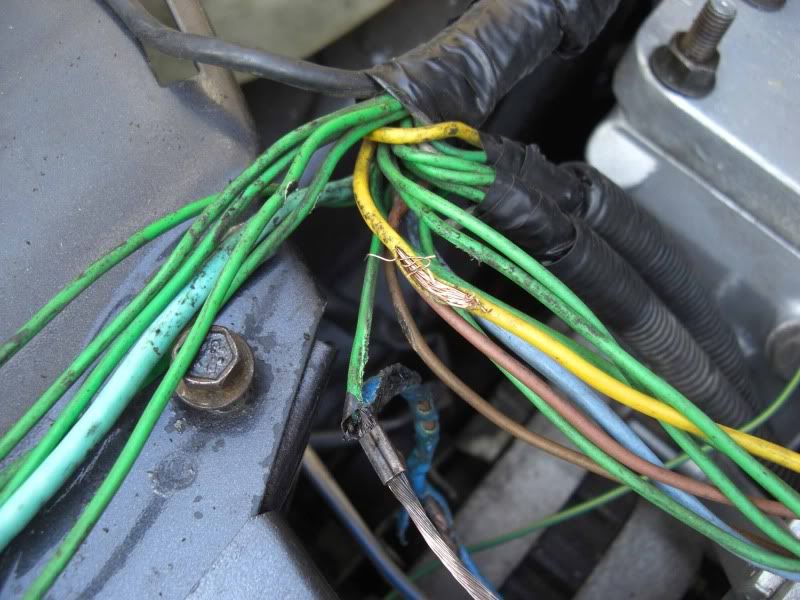
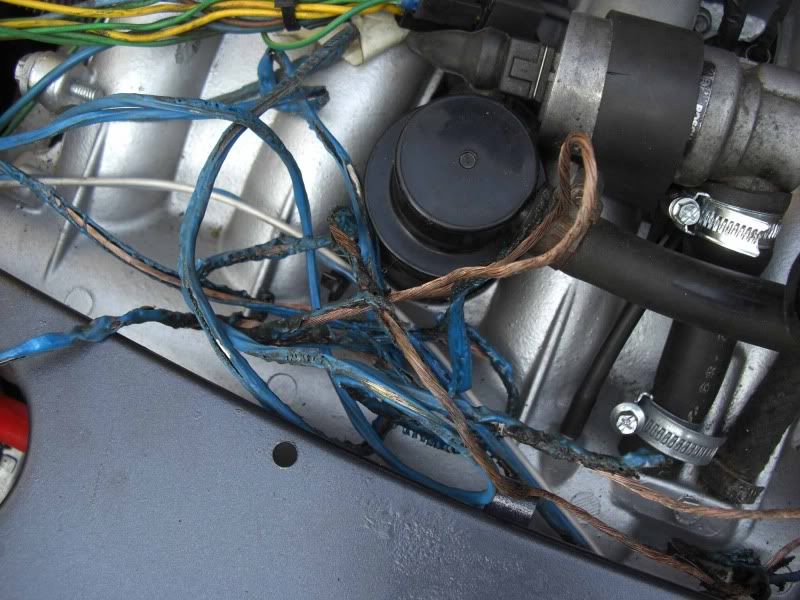
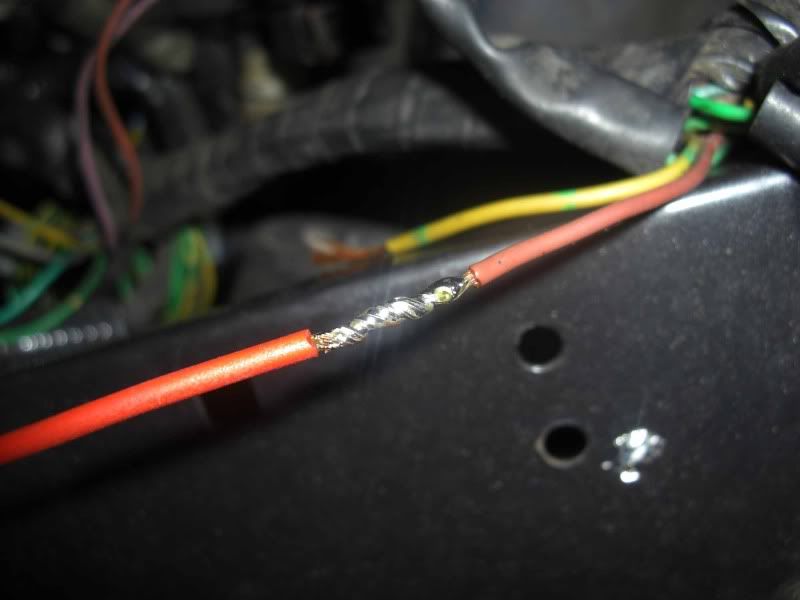
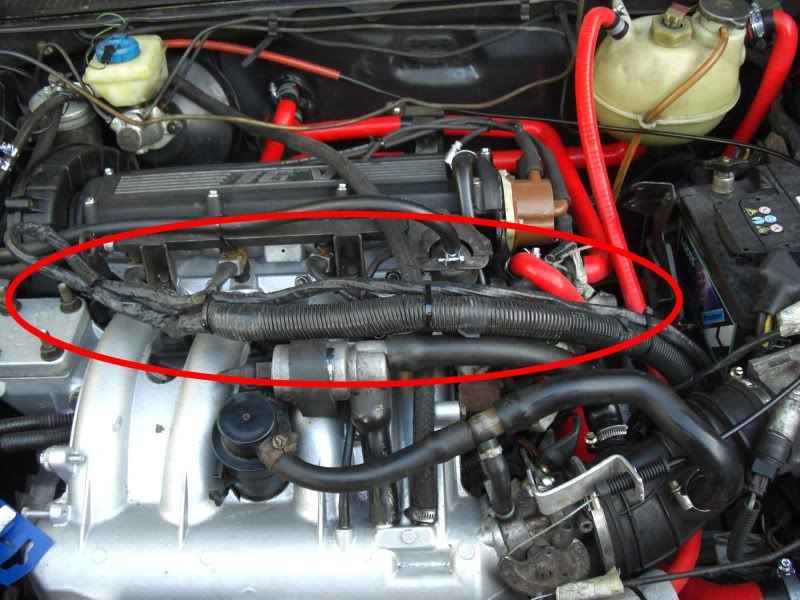
This means the sump isn’t leaking – fantastic......sort of, what a waste of many hours of my life cleaning and resealing that sump! However where is the oil coming from? I cleaned out the crevice, and got rid of the dirt so I could see it slightly better and ran the engine again. After a about a minute I suddenly saw oil appear (using a mirror and torch), my heart sank is it really looked like it had appeared from a tiny (invisible) crack in the crevice. Cue some research into the possibility of TIG welding a repair or use of epoxy. I kept getting told no-one would do it in situ due to lack of access. Now you will all know that after the bumper, fan cowling and radiator are removed the front of the block/oil filter is clear for all to see. To prove this, and investigate further, even get a photo to send to people, I went ahead and removed these parts. After this I could see a very faint trail of oil leading up from the crevice, then a pool of oil in a crevice further up the block. Obviously this suggested there was no crack. Looking above the upper crevice full of oil there was a section of loom that was wet just above the crevice and dry either side, above this there is the aftermarket oil pressure switch attached to a T-piece extension. It was clear the leak was coming from here. After sealing the threads with the Loctite 577 I ran the engine again and it seems the leak is finally fixed.

To say I am pleased is a huge understatement, I’ve been chasing this leak for ages and its really held up the project, thankfully I can now move on with it!
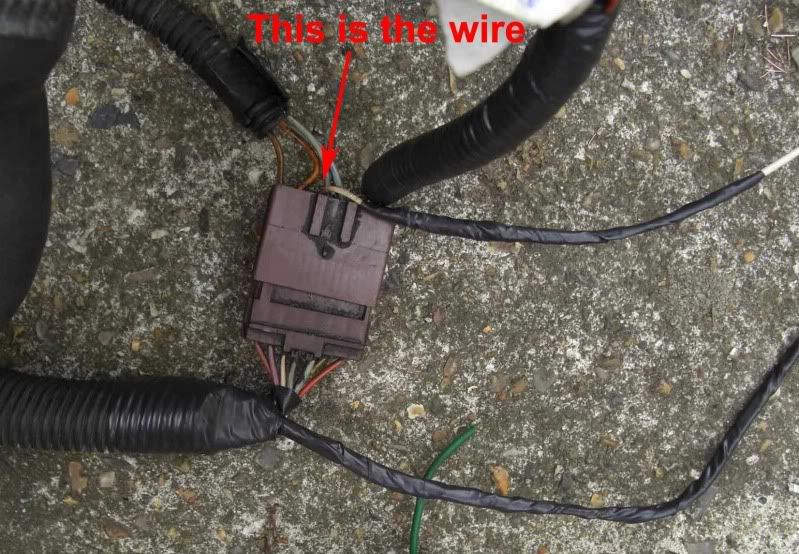
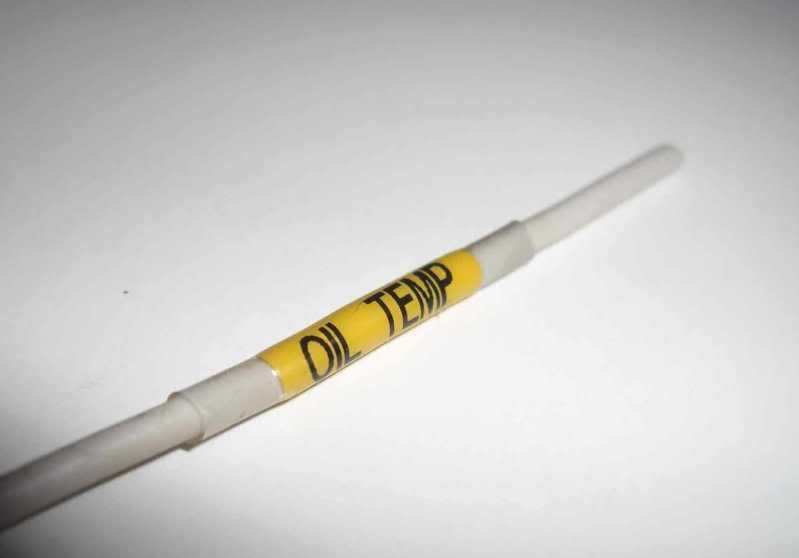
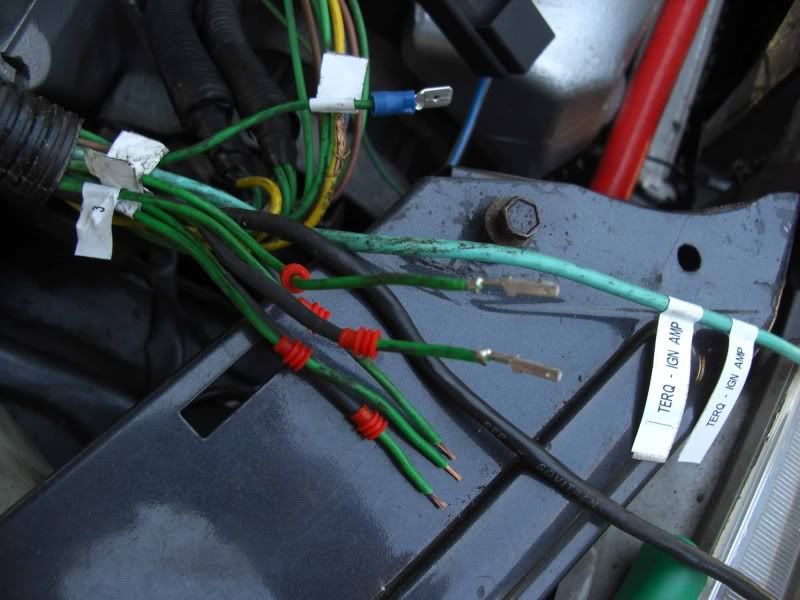
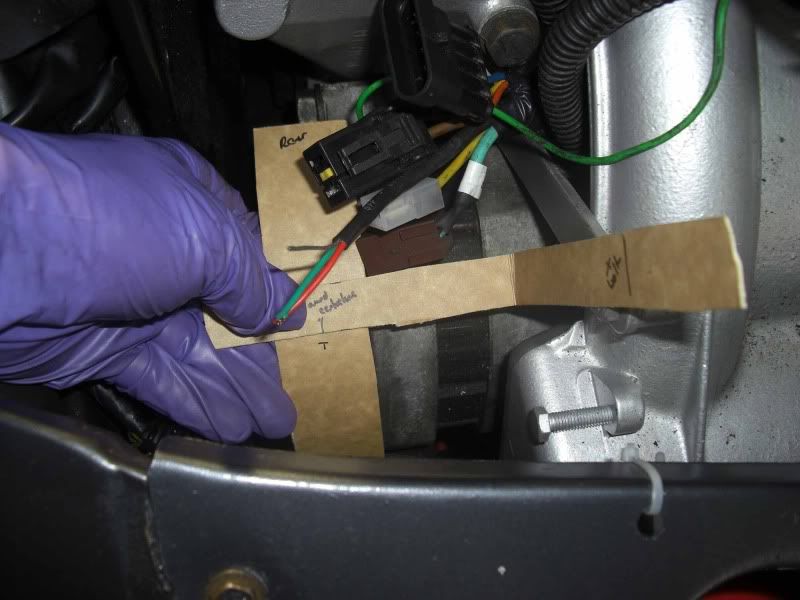
Posted 2nd Jun 2011 at 04:03

Pages (3): 1 2 [3]

All times are GMT. The time is now 08:08

The Peugeot GTi-6 & Rallye Owners Club - ©2024 all rights reserved.

Please Note: The views and opinions found herein are those of individuals, and not of The Peugeot 306 GTi-6 & Rallye Owners Club or any individuals involved.
No responsibility is taken or assumed for any comments or statements made on, or in relation to, this website. Please see our updated privacy policy.