Post #1
It's not a 306 but I thought you might still be interested so I'm bringing my thread on 205gtidrivers for your reading pleasure!Hi Everyone
Welcome to my 205 1.9 8v to 1.9 Mi16 (D6C) conversion, it


|
| Author | Subject: 205 Mi16 Rebuild/Conversion [Lots of Pictures] |
|
Senior User  Location: Hertfordshire/Epsom Registered: 17 Aug 2006 Posts: 687 Status: Offline |
Post #1
It's not a 306 but I thought you might still be interested so I'm bringing my thread on 205gtidrivers for your reading pleasure!Hi Everyone Welcome to my 205 1.9 8v to 1.9 Mi16 (D6C) conversion, it |
|
|
|
|
Senior User Location: Hertfordshire/Epsom Registered: 17 Aug 2006 Posts: 687 Status: Offline |
Post #2
I then set about stripping the bottom end.Sump was easy as the guy I bought the engine from had already had the sump off to investigate the knocking and only put a couple of bolts back in. I also noted the temp sensor wiring had to be cut so I made up a spade connecter when I set to work on the wiring loom. Also plenty of silicone sealant to clean off too, does anyone have any tips for this? I have heard the sumps are difficult to seal up are there any trade secrets to this? After this the oil pump came out, how much is a new one of these - is it worth replacing to be safe? 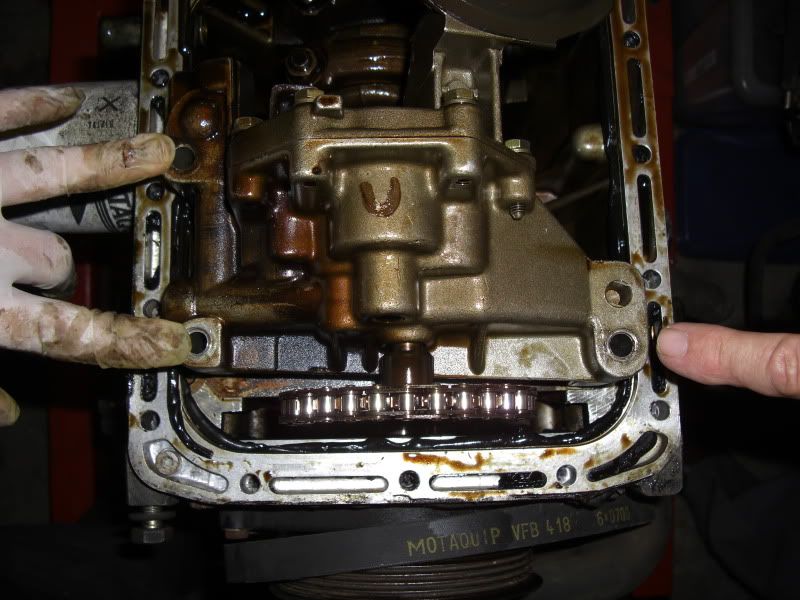 Then the sump spacer came off 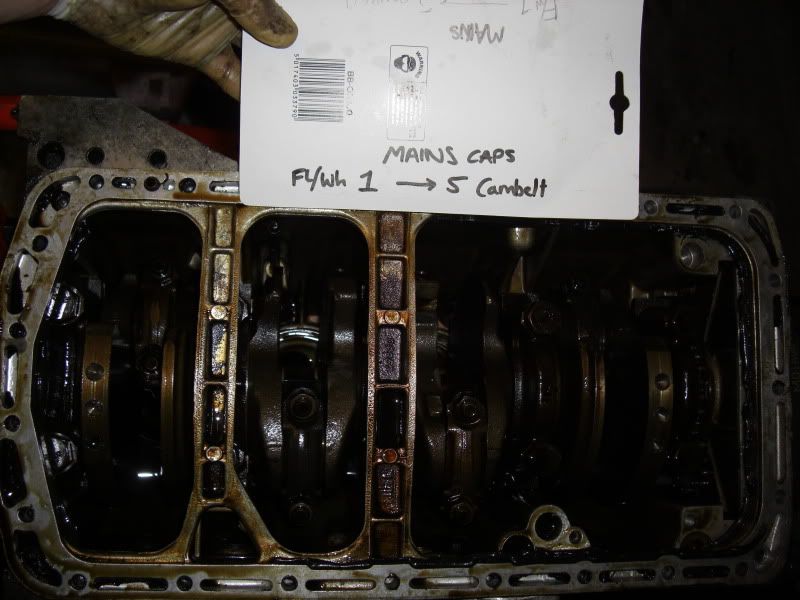 Mains Cap 3 - don't forget the bolts through the side of the block! 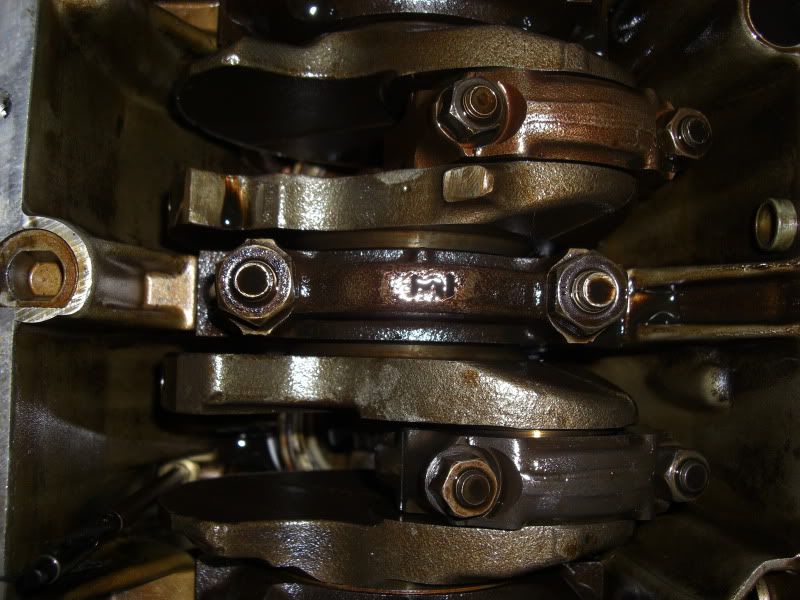 |
|
|
|
|
Senior User Location: Hertfordshire/Epsom Registered: 17 Aug 2006 Posts: 687 Status: Offline |
Post #3
Next up were the rod caps and the evidence of the cause of the knocking.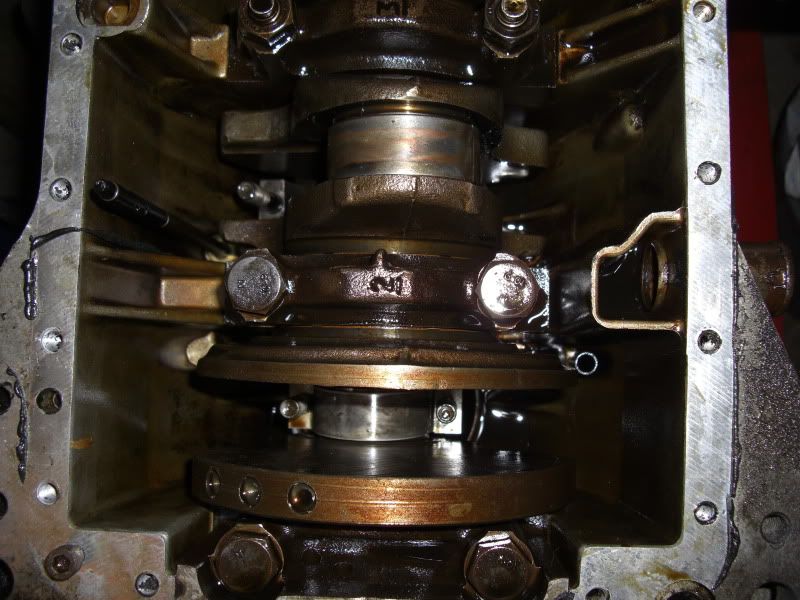 The rod and cap big end surfaces and bearings were ok on cylinder 1 and not too bad on 3 but were not good on 2 and I don |
|
|
|
|
Senior User Location: Hertfordshire/Epsom Registered: 17 Aug 2006 Posts: 687 Status: Offline |
Post #4
After this I took out the crank, I had to use a massive breaker bar with an impact socket after splitting 3 standard ones to undo the crank pulley bolt - I expect being this tight was as a precaution to ensure it doesn't become loose and allow the oil pump drive sprocket to loose friction.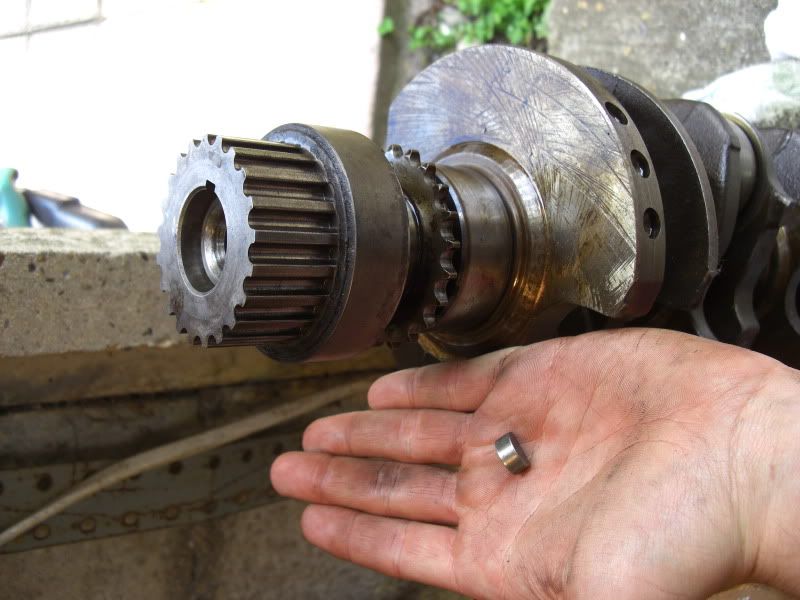 And yes I forgot about the side bolts on the 3rd mains cap blush.gif Based on the state of the bearings the crank will almost definitely need a re-grind but it doesn't look in too bad condition "fingers crossed"! Crank out - 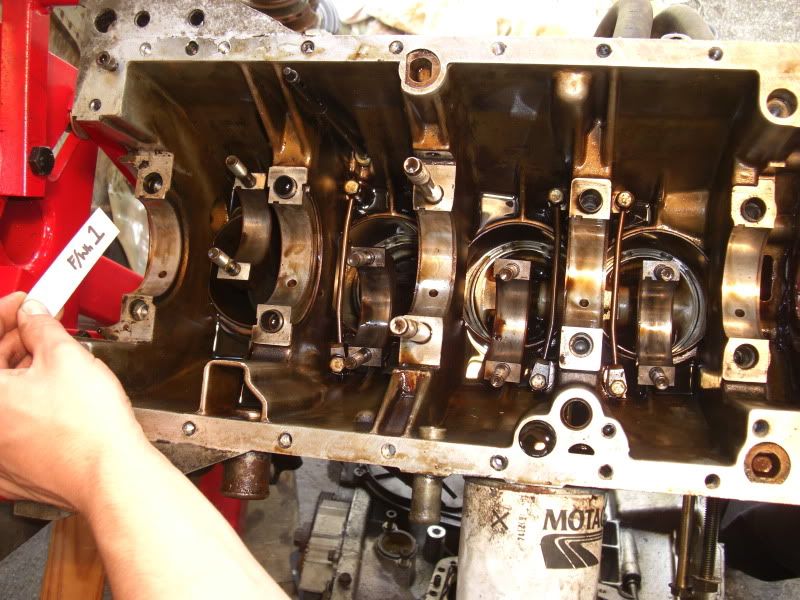 I then got everything else of the block bar the pistons and liners (sensors/tensioners/waterpump etc) 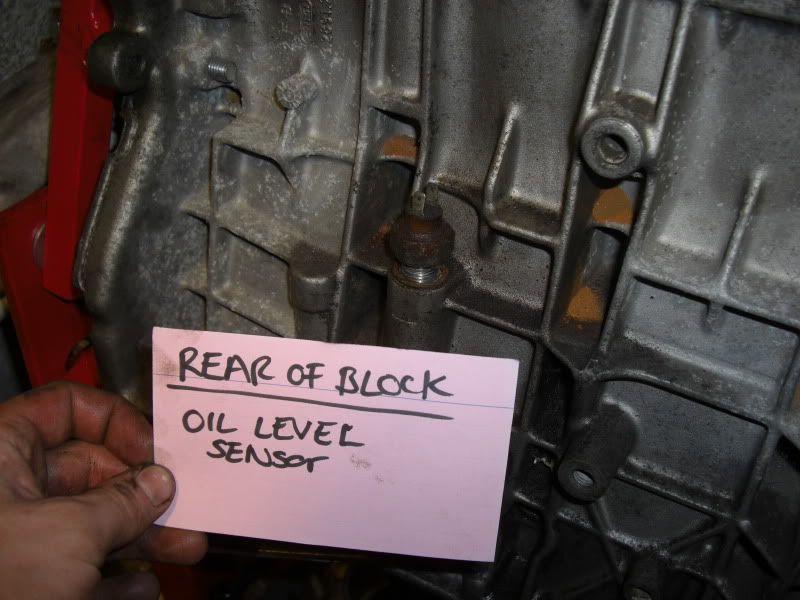 BELOW: Green sender is oil pressure warning light and the one next to it is for the oil pressure sensor, they work by earthing the lights/gauges on the dash 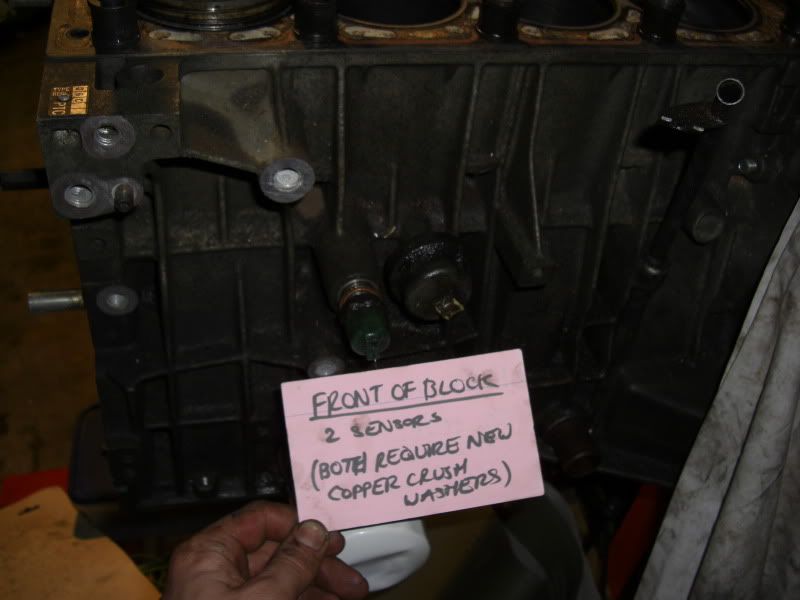 The dipstick tube just pulls out |
|
|
|
|
Senior User Location: Hertfordshire/Epsom Registered: 17 Aug 2006 Posts: 687 Status: Offline |
Post #5
Next job was to strip down the head. Cams seemed in good condition as did the inlet valves and seats (although I am going for three angle seats as part of the rebuild) the exhaust valves had quite a build up of carbon and the sealing surfaces and valve seats were fairly pitted. The inlet guides had no wear whatsoever as I could feel and the exhaust guides were barely any worse.There was a very small amount of corrosion on the gasket face but I think I've been lucky with the engine as its in pretty good condition - or was until the big end problems! One job I hate is removing stem seals although I did seem to get a technique by the 8th or 9th one - put some duck tape around a follower with the sticky side out then slide it into the follower bore to protect it, then, using fat flat headed pliers (longer heads will be better) grip the seal and twist left and right whlst pulling upwards. 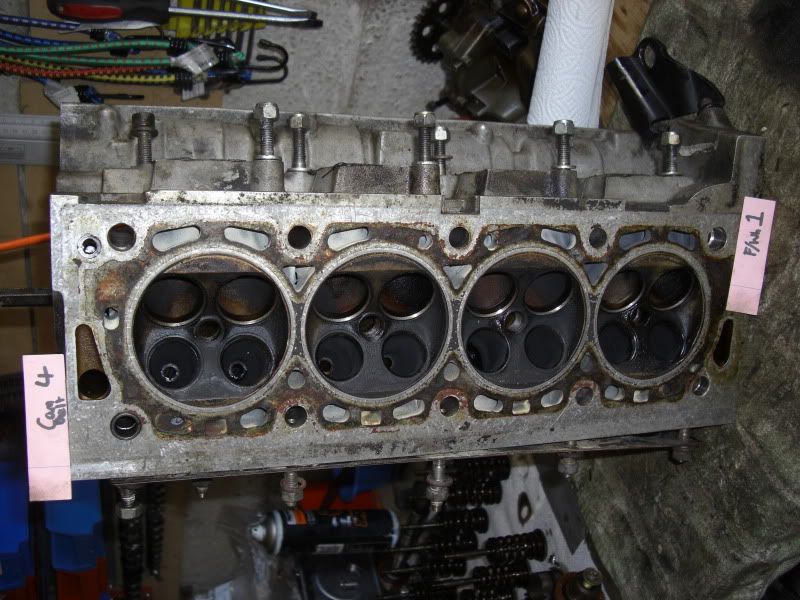 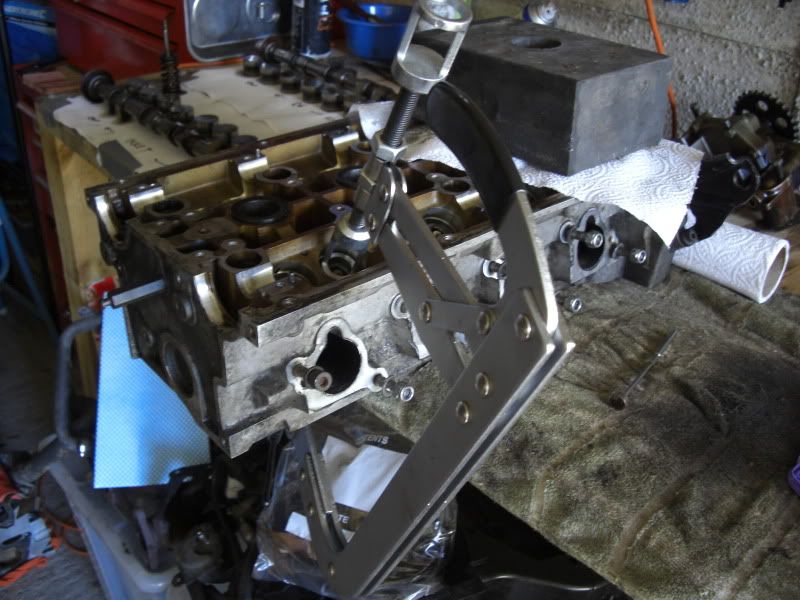 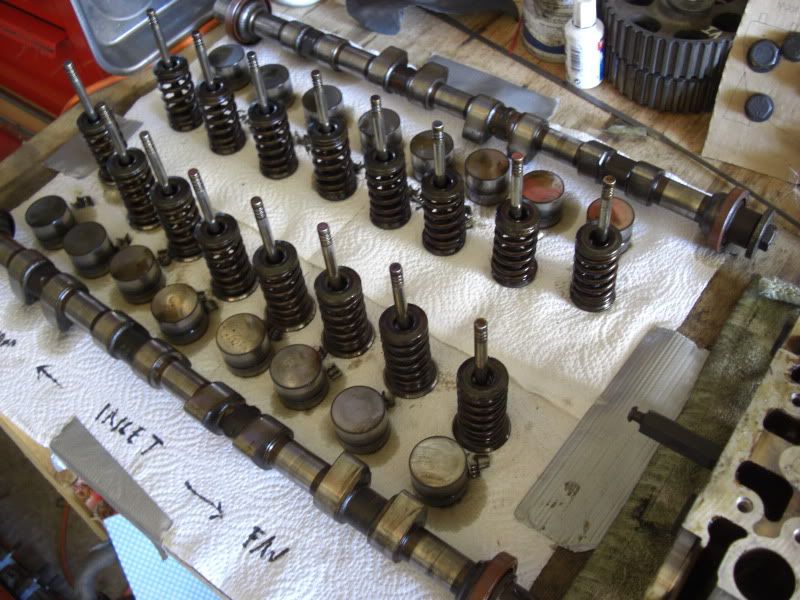 Exhaust Valve 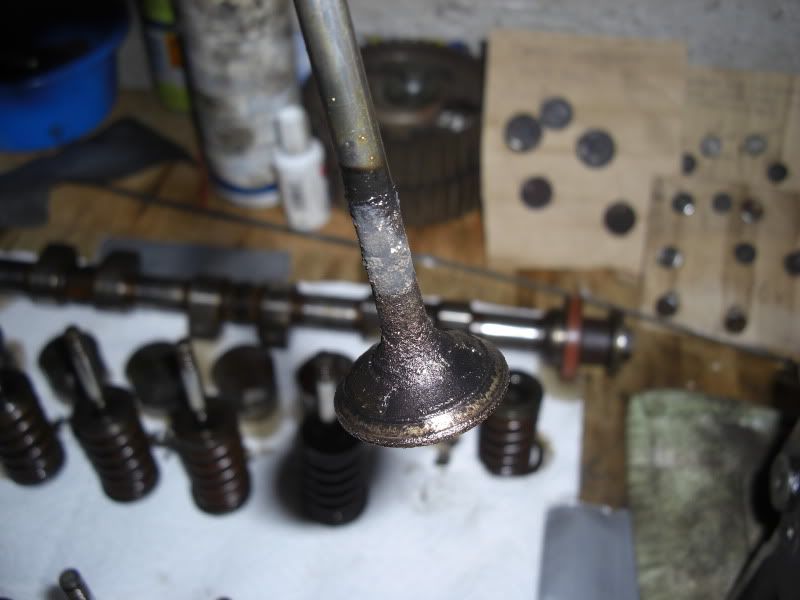 Inlet Valve 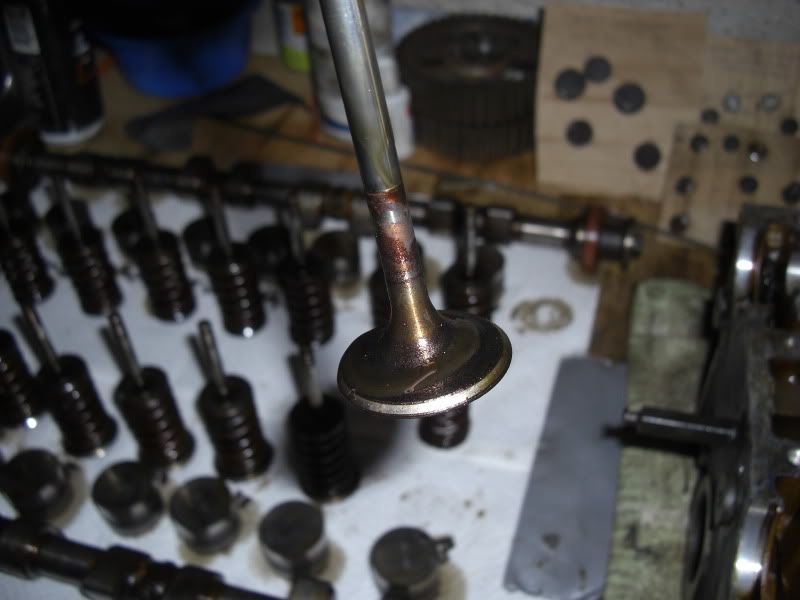 So much for bargin pliers! - 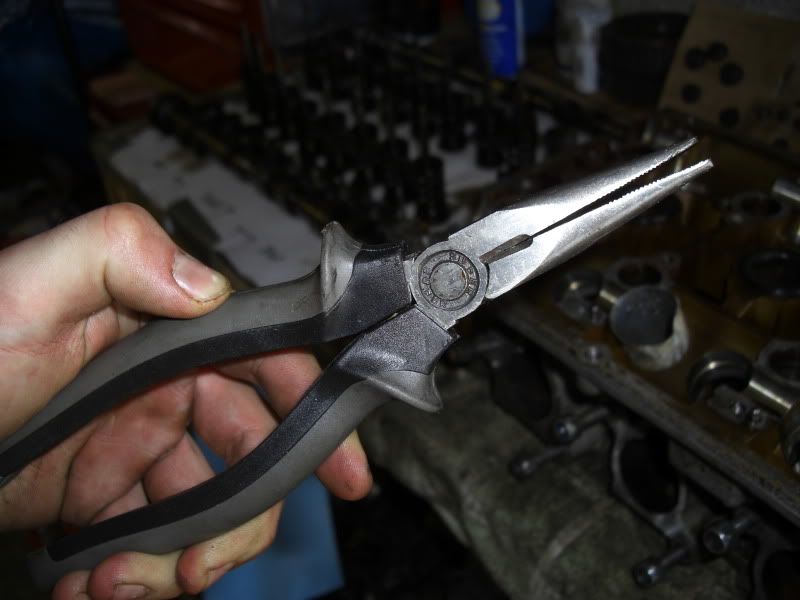 |
|
|
|
|
Senior User Location: Hertfordshire/Epsom Registered: 17 Aug 2006 Posts: 687 Status: Offline |
Post #6
I then thought it would be appreciated if I cleaned the block before it went for machining so I set to it.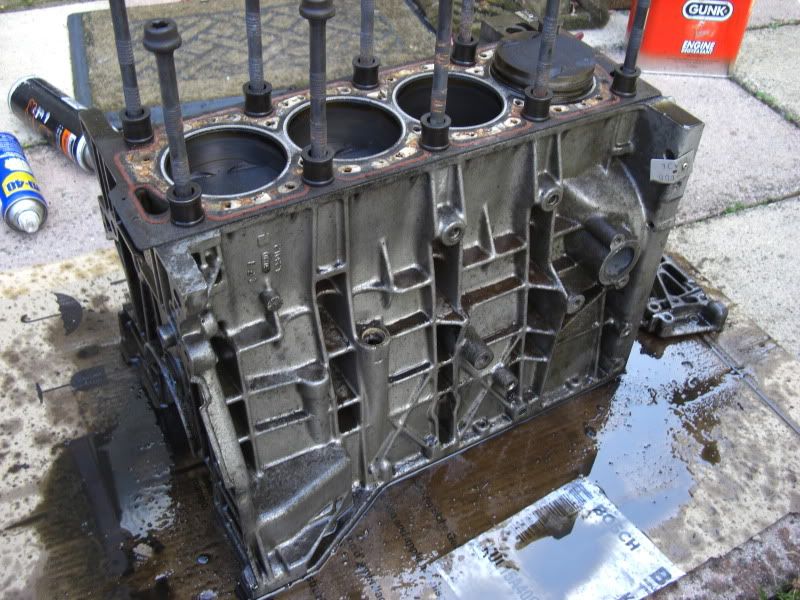 It also seemed a good time to tackle the loom - the key to this was plenty of research, the first thing I learnt was that its a Citroen BX loom (lots of green wires and about 100ft long!). When I got the engine I was given every loom in the car - 3 bin bags full so I had no idea what was what, I decided the best way would be to find out what sensors the ECU requires and label each plug on the loom as to where it goes, I did this by using the CAPS software, it has a diagram of the Motronic 4.1 ECU pin layout and their connections so using a multimeter I set to finding which plugs went to which pins on the ECU, this then told me what wires needed to be connected to the car for the conversion - Fuel Pump 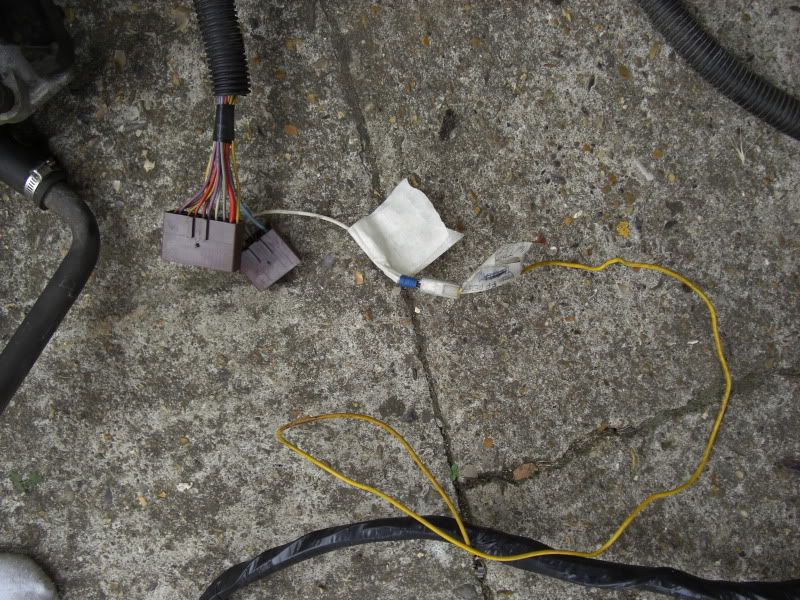 Ignition Switched Live and Tacho - On the ECU loom they both got to a white 2 pin plug (ign live - yellow, tacho - green) - I found an old white female 2 pin plug to fix the 2 wires from the "Dash Sender Loom" 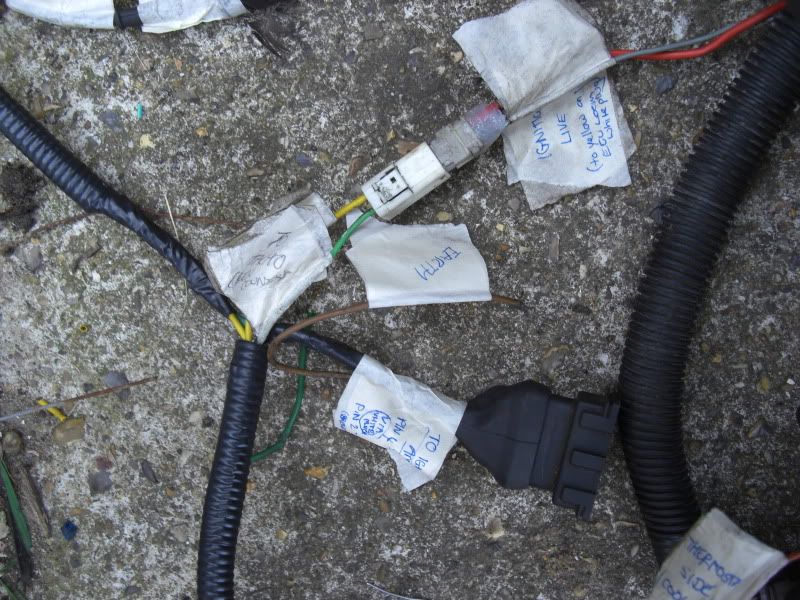 Permanent Live 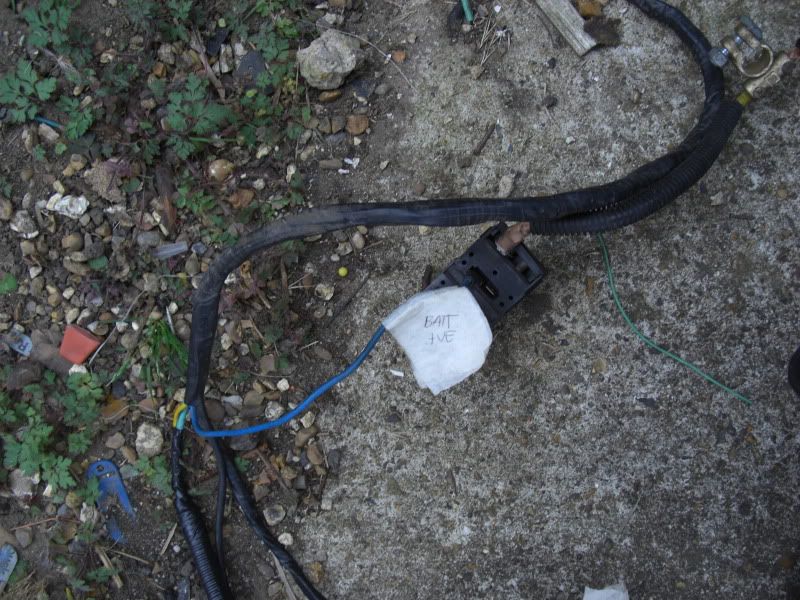 There are 4 looms involved in the conversion - the main "ECU loom" which connects to the "dash sender loom" (via the fuel pump wire, ignition switched live and the tacho wire) and the "injector/cts/icv/tps loom", the forth is the "+ve output and dash sender loom" from the battery to alternator and also contains some of the dash senders (this loom connects to the dash sender loom). Once I had all this figured out I tidied up/repaired the loom where required. Including adding a spade connector to the oil temp sender in the sump. I then test wired all the looms together - 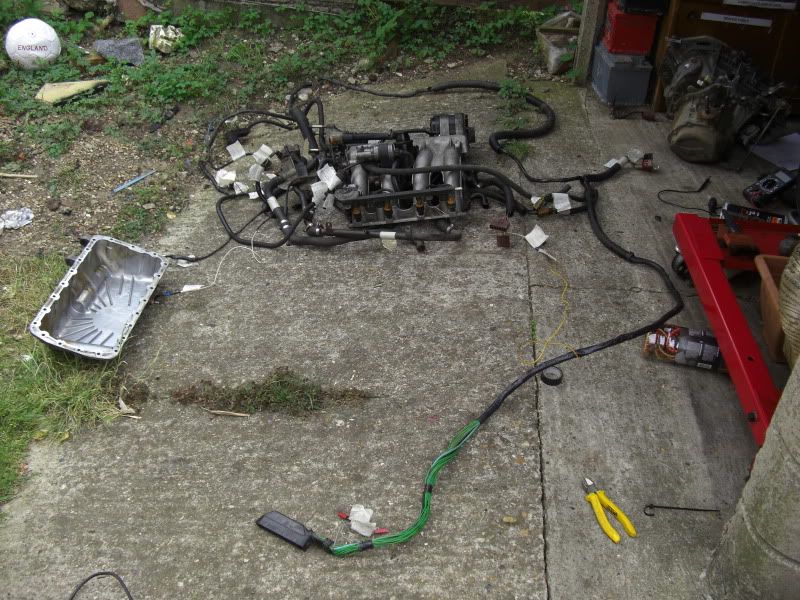 I have many pics of this so feel free to ask if you need anything. |
|
|
|
|
Senior User Location: Hertfordshire/Epsom Registered: 17 Aug 2006 Posts: 687 Status: Offline |
Post #7
As the engine was all stripped it was time to take it off for machining, I'm going for a full rebuild and with that in mind dropped the engine off in bits to be checked over. I turns out I need to new rods, which hopefully I have managed to source courtesy of Miles and I'm waiting for final confirmation that the crank is ok for a re-grind, fingers well and truely crossed!As I've got the 4-2-1 manifold I've requested 3 angle valve seats and also will be fitting ARP rod bolts. For the sake of time and cleanliness I've asked for the head to be re-assembled at QEP but I'll be doing the block myself so any hints tips and pearls of wisdom will be more than appreciated! |
|
|
|
|
Senior User Location: Hertfordshire/Epsom Registered: 17 Aug 2006 Posts: 687 Status: Offline |
Post #8
As the engine side of things is taking care of itself now, and I have the loom pretty much sorted, the next thing I thought I'd do was to make a start on getting the 205 ready. I already had the head off so this reduced the engine removal time, just coolant pipes, alternator etc loom, driveshafts, speedo cable, oil cooler plate, clutch cable and engine mounts and it was free. I then dropped it down and pulled the engine and 'box out underneath. Easy!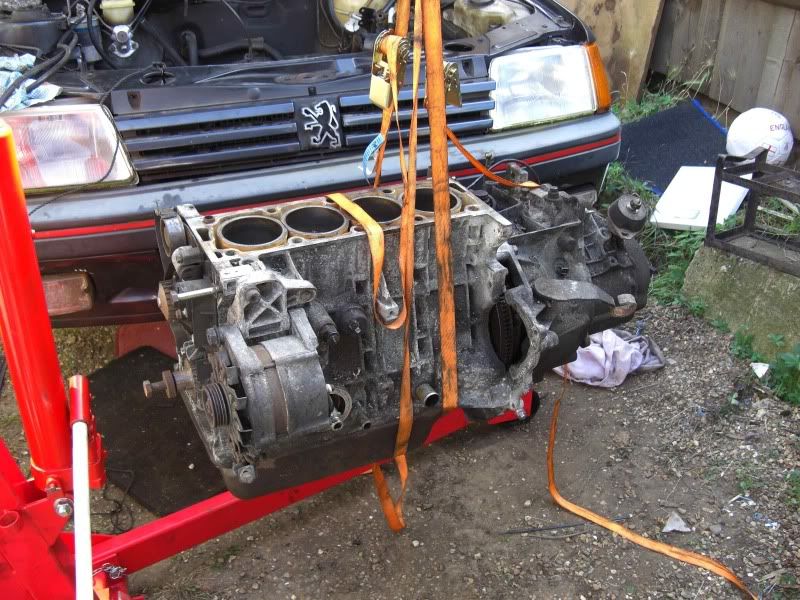 Much emptier bay! 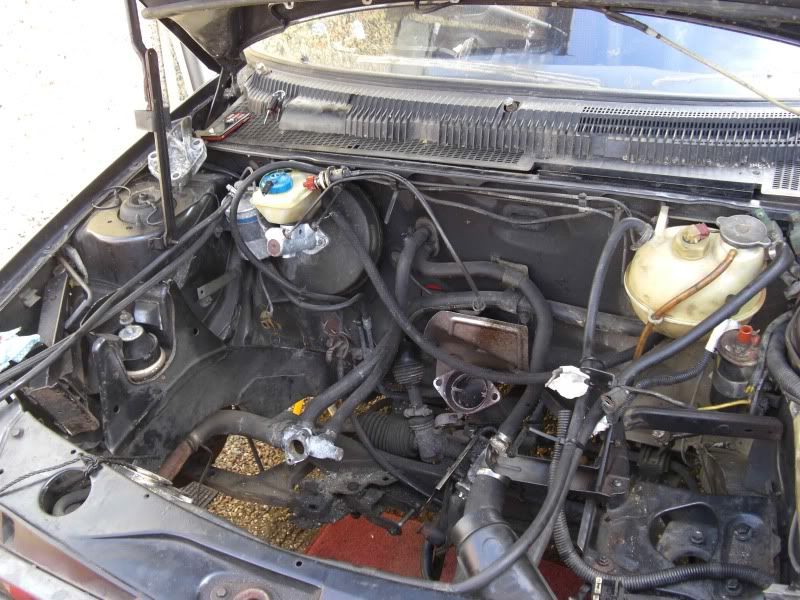 Split the gearbox - wish it was this easy in the car! 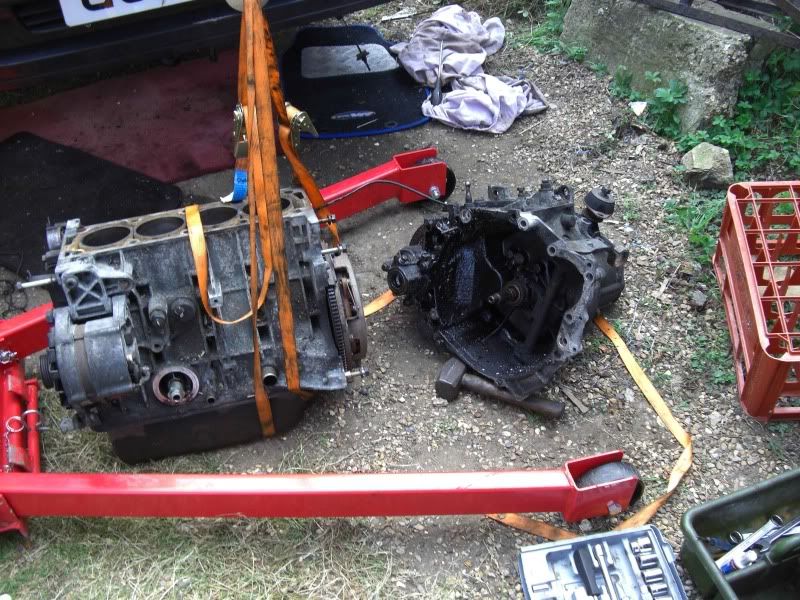 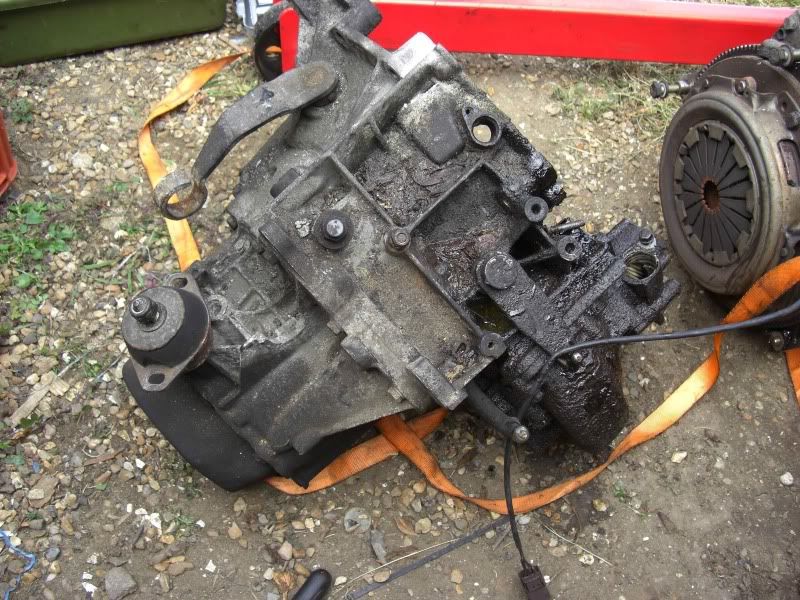 The 'box was covered in crap and took a fair amount of effort to get clean, one of those times when a pressure washer teamed up with Gunk really comes into its own. I have a feeling it's gonna get a lot more use too. 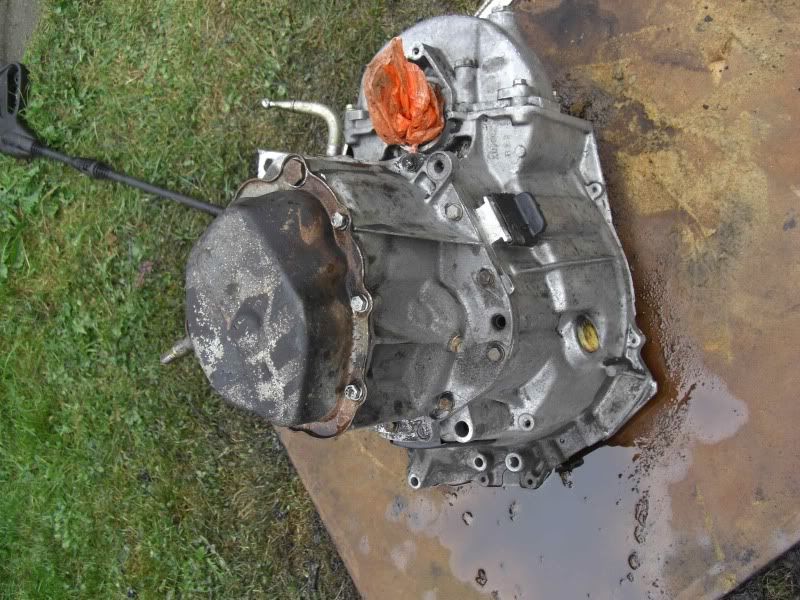 I then decided I'd paint it so I got some hammerite silver smooth from halfords. In hindsight I think I may have wasted my time to some degree due to not taking my time a doing a proper job (impatience is not always a virtue!) although the conditions weren't on my side either. I have a feeling the paint may peel off. Does anyone have any painting/prep tips for gearboxes and engines if I end up having to do it again! Is hammerite the best stuff to use? 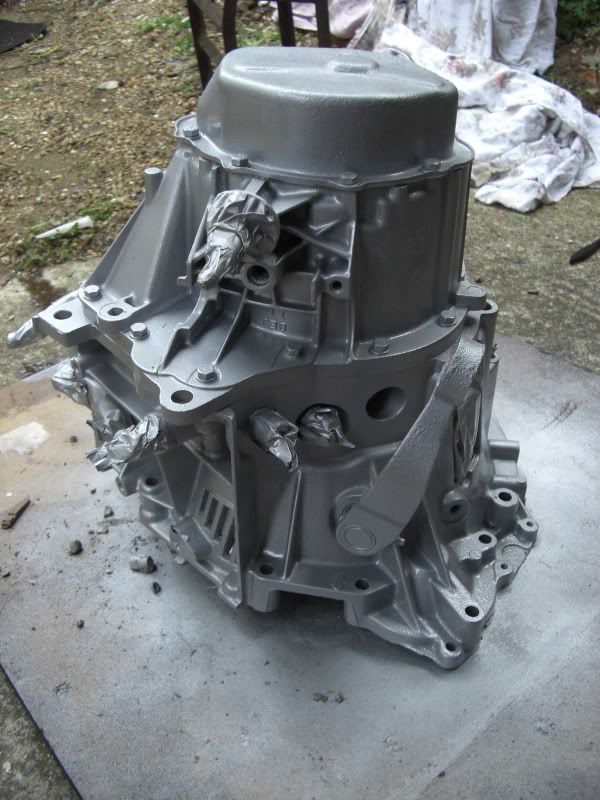 |
|
|
|
|
Senior User Location: Hertfordshire/Epsom Registered: 17 Aug 2006 Posts: 687 Status: Offline |
Post #9
I plan to strip the engine bay down as much as necessary to tidy up any rust and give it all a good clean. I'll also been cleaning up any threads and replacing any bolts that need it, which I expect will be a few!As you may have gathered I am learning my way through this process so any advice/proven methods for dealing with any rust would be more than welcome! With that in mind the next job was bumper off - I hit a few issues through the process that were mainly siezed bolts. The mushrooms on the side brackets were stuck solid so out came the grinder/BFO Hammer. In fact I only undid one bolt the conventional way throughout the whole job! 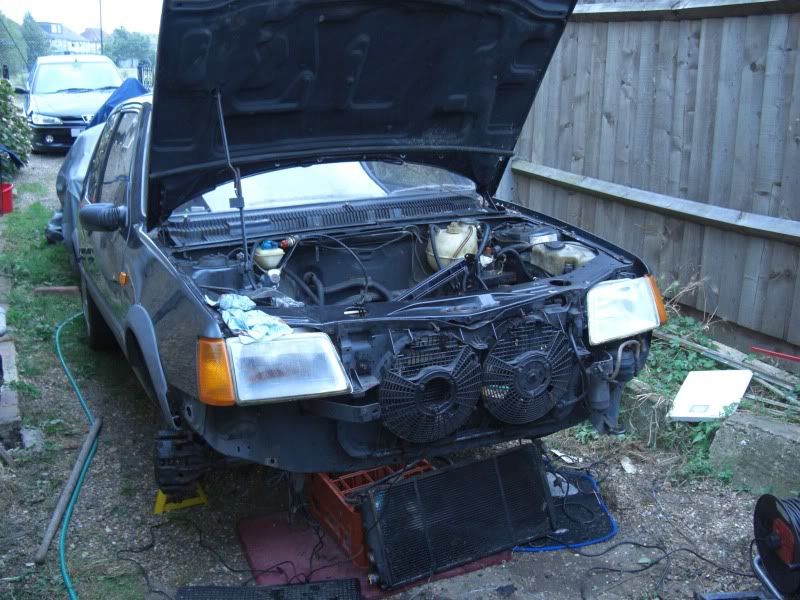 |
|
|
|
|
Senior User Location: Hertfordshire/Epsom Registered: 17 Aug 2006 Posts: 687 Status: Offline |
Post #10
Now for the rad, fan cowling, oil cooler and slam panel.Rad out first - just a case of disconnecting coolant pipes, unclipping wiring from thermoswitch and lifting the clips at the top and out it comes. Next thing is the oil cooler - three nuts need to come off the mounting bracket to the rad cowling, theres also a nut and bolt that holds the oil cooler pipes bracket to the rad cowling. To get the cowling out it's just 2 bolts into the slam panel and unplug the fan wiring, it's easier to now unbolt the slam panel - 4 bolts, 2 at each end, lift it up then pull the cowling forward and out. Here it all is out 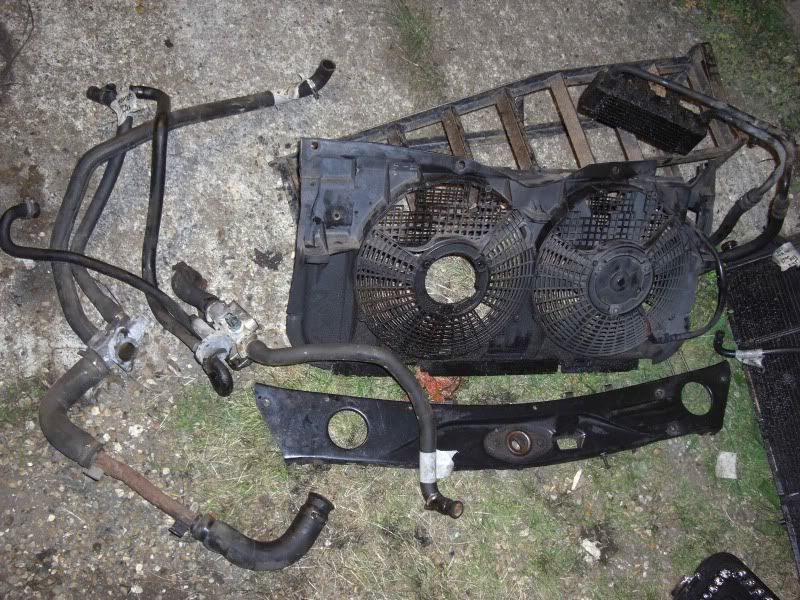 And heres the even emptier bay 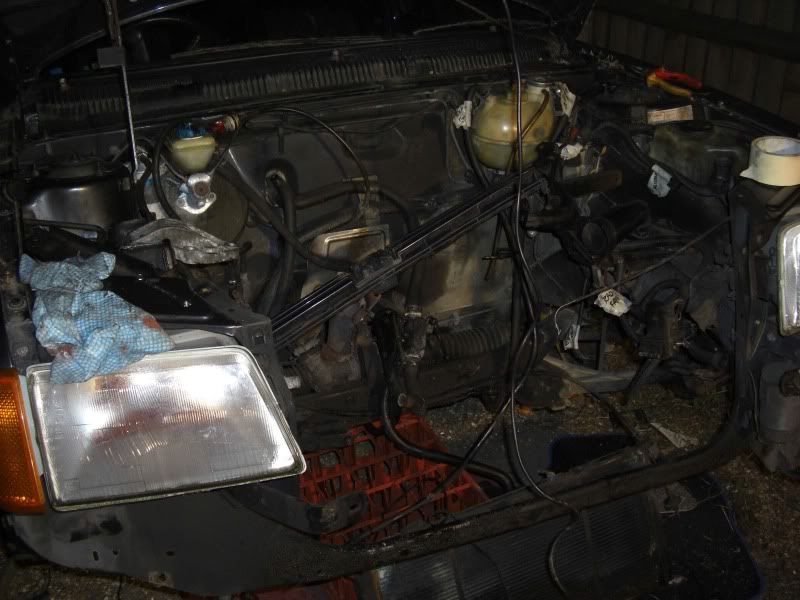 Below are a few pics of the rust I have found, nothing to bad at all which is a result 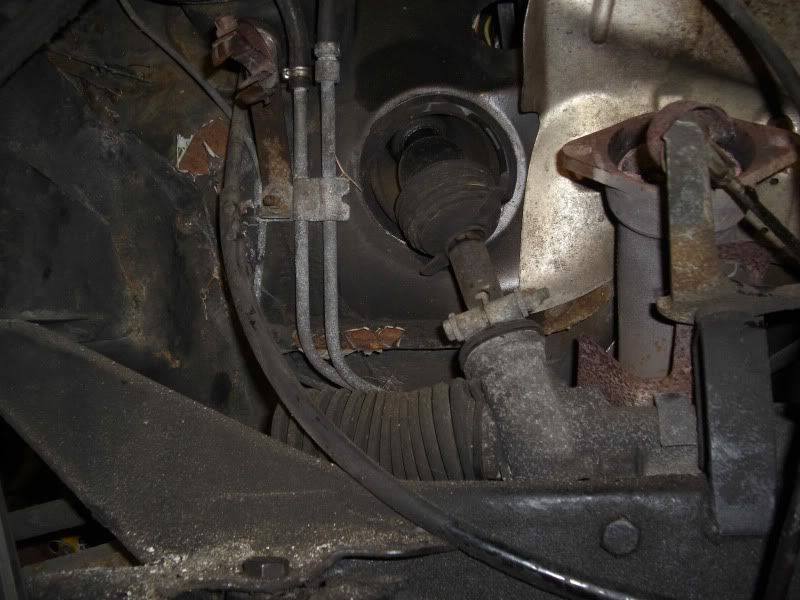 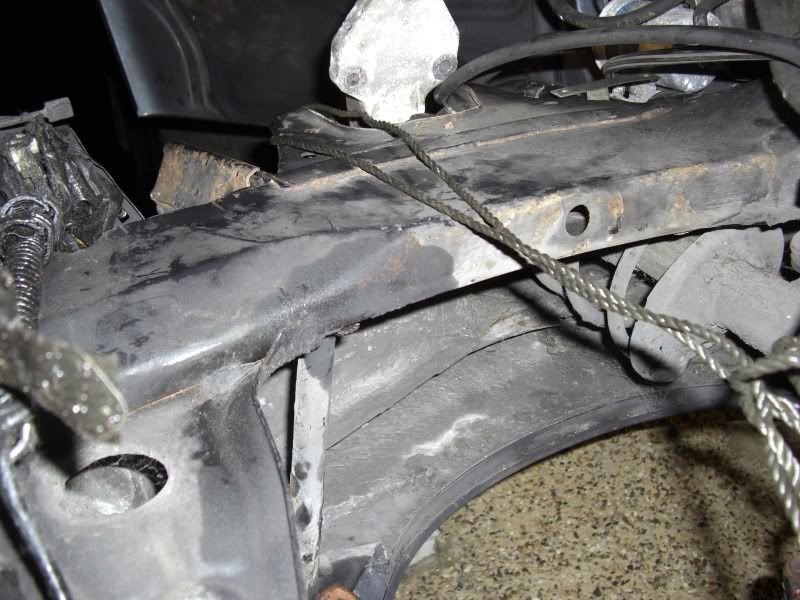 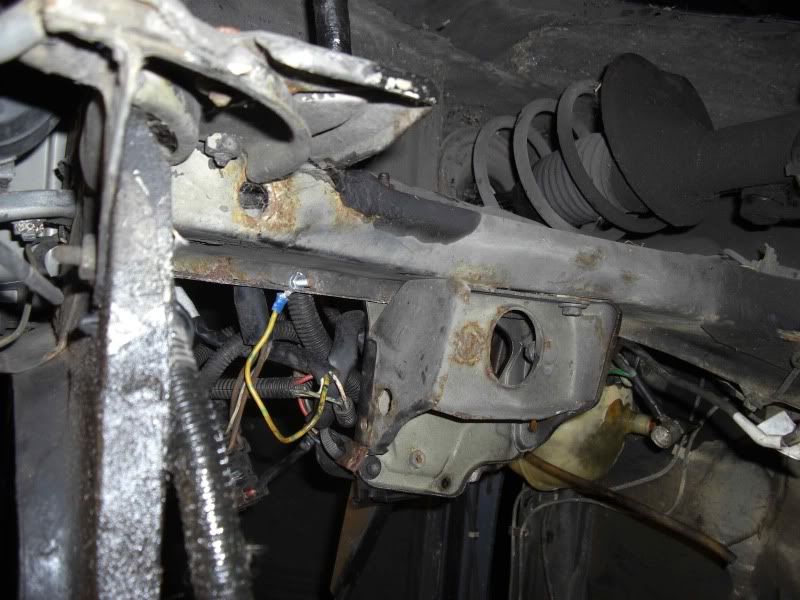 |
|
|
|
|
Senior User Location: Hertfordshire/Epsom Registered: 17 Aug 2006 Posts: 687 Status: Offline |
Post #11
Time for another update!Since the last post I've done more stripping down of the front end - amazed how quick things start coming off once your on a roll, reminiscent of my little RC car! I've taken out the steering rack to give more access for the rust repairs - nice and easy, 2 bolts through the sub-frame, undo the track rod ends, loosen the steering column intermediate shaft clamp bolt and slide out (remember to mark the position of the steering column splines for re-assembly. I also took out the struts complete with hubs/discs etc just because for the sake of 3 top mount bolts a side the resulting access just made life easier. It was then time for a good helping of gunk and a blast with the pressure washer, the result was a very crud free engine bay - much nicer to work with! This did however reveal a few more rusty patches on the subframe so it'll also be getting the rust treatment. To also help access for the rust repair I needed to remove the servo/MC etc. with no engine etc in this was not difficult although getting to the nuts in the footwell is not the easist of jobs. When I got the servo out it seems there has been a master cylinder leak at some point (not the current one as I replaced it recently) and the servo was amazingly full of fluid - probably more than enough to fill the reservoir again. I have most of it out but there is some still left I can't get out. What would you chaps do in this situation - take apart? Replace? Ignore? Anyway, This is my anti-rust arsenal! 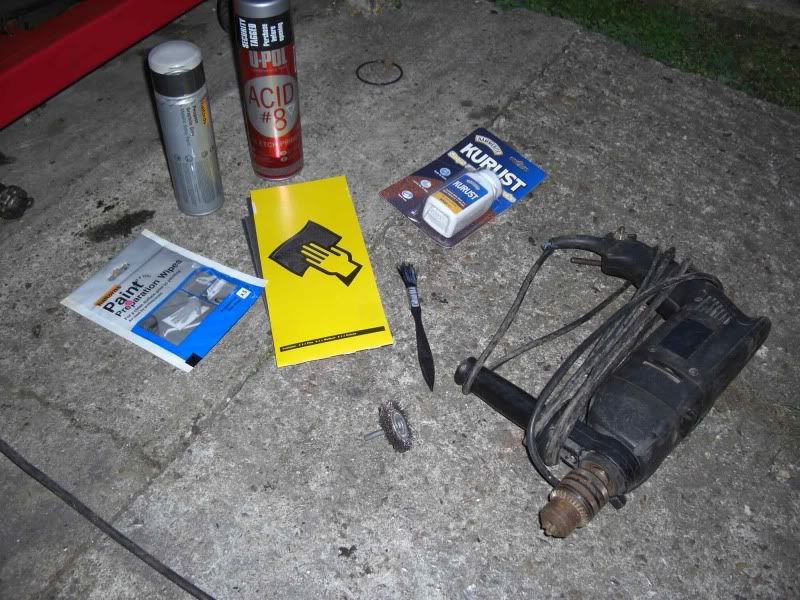 This is something I haven't done before and I'm the first to admit I'm not the most patient with bodywork but I'm pleased with the work so far - finish not being critical as it's the engine bay. My first step was attacking the rust - a mains powered drill and various wire brush attachments made this a fairly easy and very satisfying job. When I had got back to bare metal the next step is the 'conversion coat' (I used Kurust) - this chemically reacts with any rust remaining (even invisible to the naked eye) and forms a solid material that can then be primered onto - dubbed 'black rust' 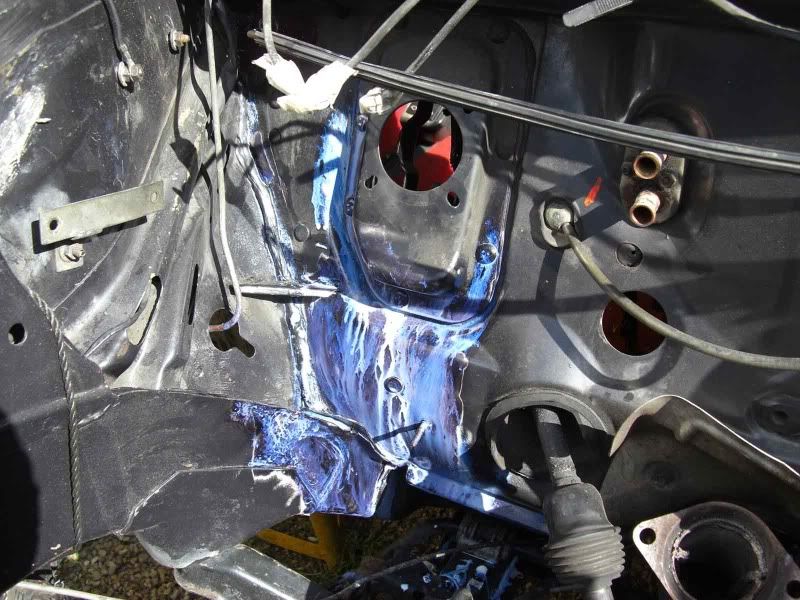 When thats finished doing it's stuff (approx 3 hours) the surface is ready for a sand down with wet and dry in the region of 320 grade then primer. As the panels are galvanised steel etch primer is used, it is also far more corrosion preventing than bog standard primer. I used about three coats at 20min intervals. After leaving plenty of time for it to harden I then gave it a sand down with very wet 1000 grade wet and dry. I dried off the surface and wiped down with panel wipe, let this dry and then went on with the first coat of top coat. - Incidently the halfords graphite grey seems to be an excellent match! - I put 3 coats of this on then finished with a couple of coats of laquer. After a couple of days, for any visible bits with engine in, I will get some really fine wet and dry and sand over the surface then give it a good polish to do my best to remove the 'orange peel effect'. Any input on my method above would be really good, as I've already said this is all a learning process for me so feel free to teach me! The final result - Before 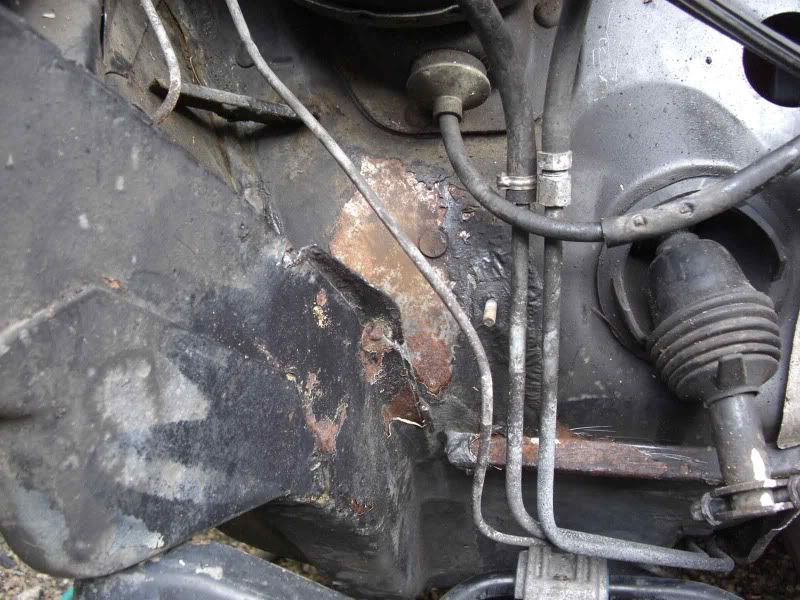 After 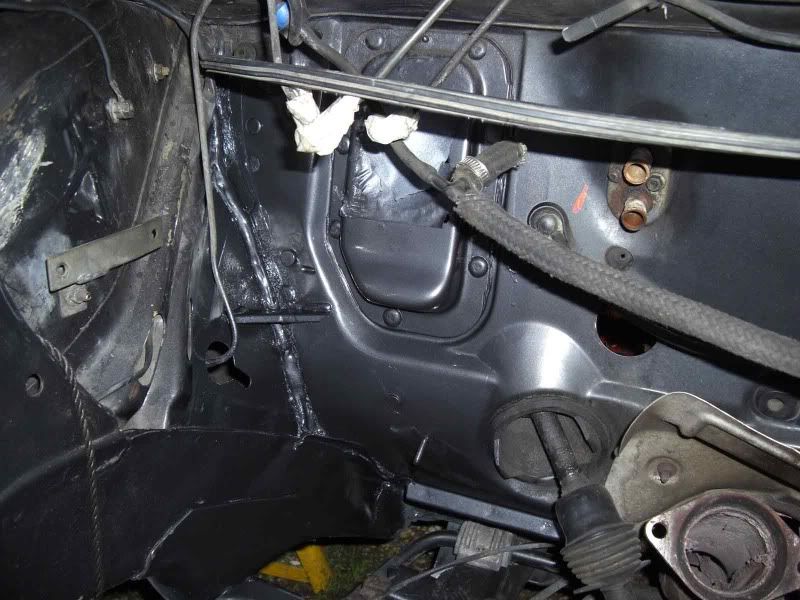 |
|
|
|
|
Senior User Location: Hertfordshire/Epsom Registered: 17 Aug 2006 Posts: 687 Status: Offline |
Post #12
Progress has slowed a bit now - lots of rust treating taking time then I won't have access to the car for a while but I do have a mini-update.I began this project with the intention that I wanted the fitting to be as clean and factory looking as possible, in-keeping with this when I removed the 8v loom and ECU I decided to mod the ecu mount bracket from behind the driver side dash so I could mount the Mi16 ECU in the same place. This was not difficult - I just had to grind off the 2 studs where the front of the 8v ecu was with my trusty dremel  (shown by the position of the top 2 circles which are the bottoms of the studs) - (shown by the position of the top 2 circles which are the bottoms of the studs) -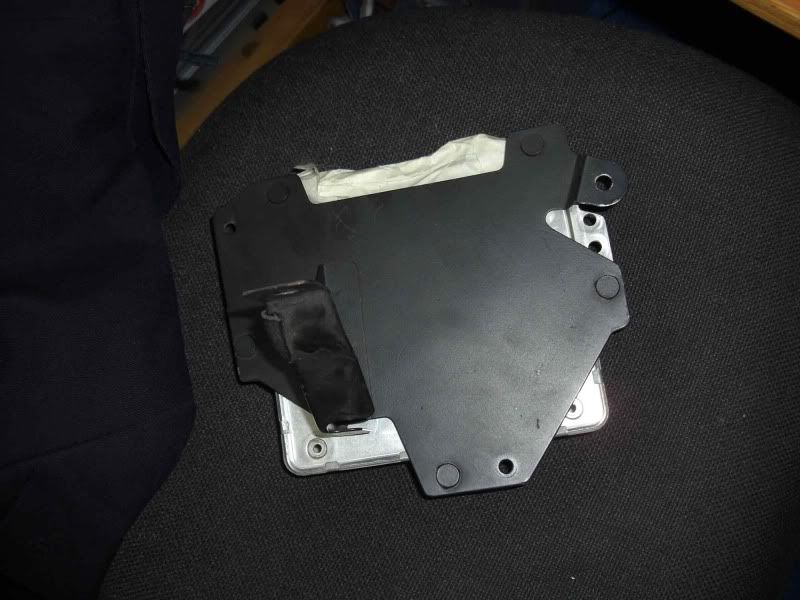 I then drew lines down the side of the 8v ecu when it was in place on the mount to use as references so the Mi ecu would be at the right angle. Using these lines as I guide I found I could use one of the original holes on the Mi ecu mounting flange on one side but would have to cut out a section to allow access to the bracket mounting hole - 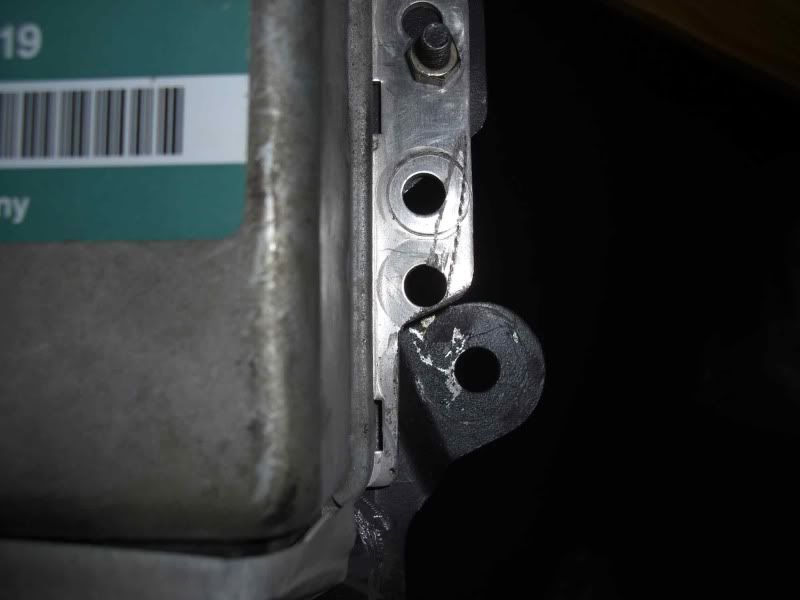 This did mean I would have to cut a slot into the edge of the flange on the other side - 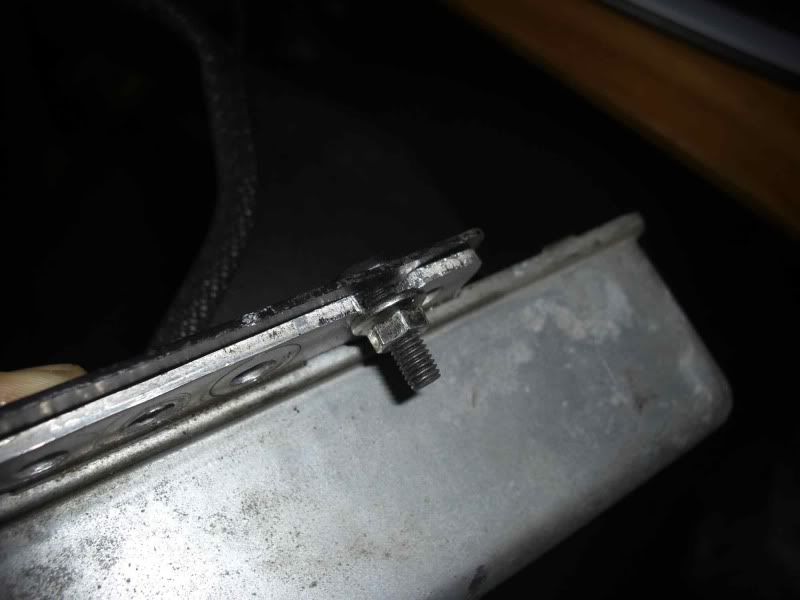 All fixed on - 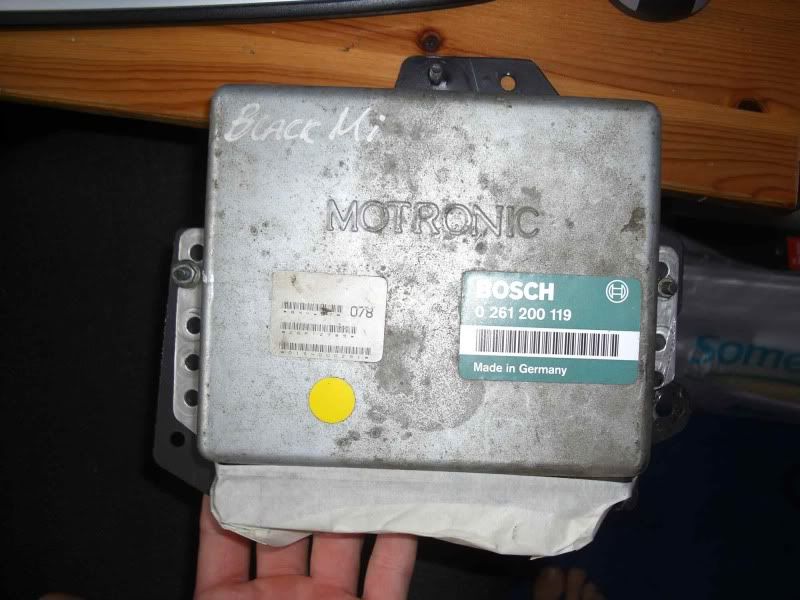 |
|
|
|
|
Senior User  Location: Camelford, Cornwall. Registered: 12 Jan 2008 Posts: 587 Status: Offline |
Post #13
Any more updates with this conversion mate?________________________________________ '00 Astor Grey GTi-6 - Regretfully sold!'89 Onyx Black 205 GTi 1.6 |
|
|
|
|
Seasoned Pro  Location: Ringwood Registered: 28 Dec 2002 Posts: 3,433 Status: Offline |
Post #14
So your the one!!Good write up there, Only thing I would recomend you check is all the solid brake lines, Main area is under the fuel tank as they really do rust badly there and for the sake of a few hours work replacing them it could save you from the worst. ________________________________________ 306 Rallye Sptint/Race Car, 205 CTI 1.9 8v to name a fewRoad, Track and Race/Rally car preparation to your personal requirements, Full Workshop & Diagnostic Facilities New and Second parts, from Plugs to Turbo's We now also carry out Routine Servicing www.pugracing.com & FB Page, https://www.facebook.com/PugRacing Ebay; http://stores.ebay.co.uk/Pug-Racing-Shop 2012/2013/2014/2019 Class Winners at Gurston Down Speed Hillclimb & Joint overall, Class record too along the way, |
|
|
|
|
Seasoned Pro  Location: Kent Registered: 12 May 2008 Posts: 4,783 Status: Offline |
Post #15
Top work.. Good read too!________________________________________ Build Date - 30 September 1997 - Tuesday's car..is full of pace? |
|
|
|
|
Senior User Location: Hertfordshire/Epsom Registered: 17 Aug 2006 Posts: 687 Status: Offline |
Post #16
miles wrote: So your the one!! Good write up there, Only thing I would recomend you check is all the solid brake lines, Main area is under the fuel tank as they really do rust badly there and for the sake of a few hours work replacing them it could save you from the worst. Haha yea you've found me! Matt's away until monday I think then I'm off on hols so the project will grind to halt for a bit. Can't wait to get it all together! Thanks for that, very good advice I'll have a good check while it's up on stands. The car is quite a result really, seems pretty solid, just a bit rough around the edges. The only concern I have is it's had a knock on the front pass side and seems to have bent the headlight panel slightly - 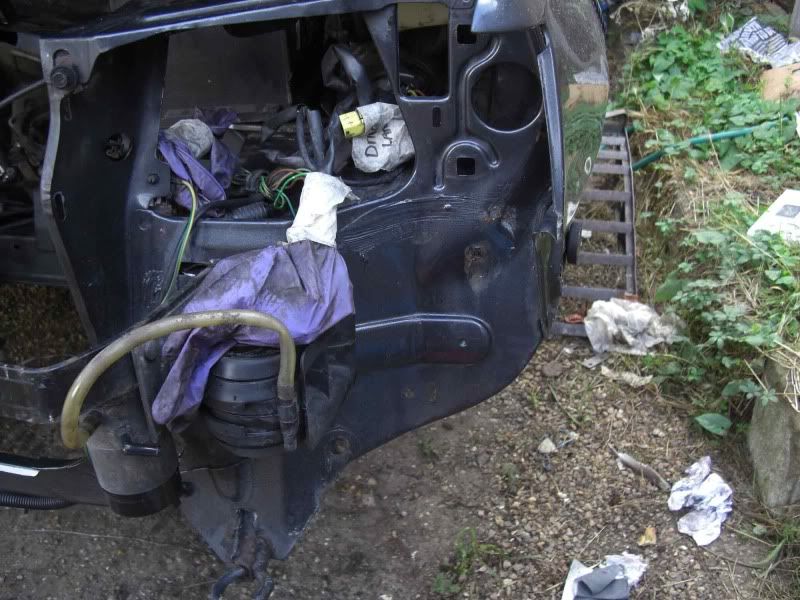 It seems as though I should be able to knock it back into shape though - everything was mounted on it fine. Thanks for the comments guys |
|
|
|
|
Senior User Location: Hertfordshire/Epsom Registered: 17 Aug 2006 Posts: 687 Status: Offline |
Post #17
cahillscornerflag wrote: Any more updates with this conversion mate? Just working through the rust treatment at the moment but as mentioned above I'm off on hols. When I get back I'm hoping the engine will be ready to collect so I'll be re-assembling the bottom end then the full engine (head is coming assembled. Bit nervous about this, I think the key will be making sure I have all the tools/lubricants/sealants etc before I start. On that note can anyone recommend any Assembley Lubricant and silicone gasket for the sump etc also is this the kind of moly grease I want for the headbolts - 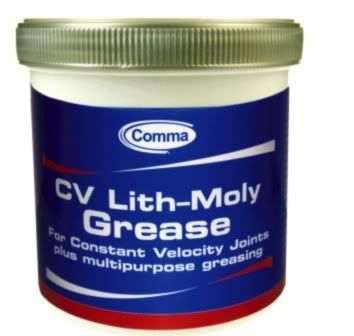 The more tips and advice people have for me the better - trust me I will appreciate it! |
|
|
|
|
Senior User Location: Hertfordshire/Epsom Registered: 17 Aug 2006 Posts: 687 Status: Offline |
Post #18
A couple more minor updates - things have slowed a bit now as I can only work on the car at weekends.The list of things to do now is: - Re-fit steering rack with new track-rod ends (these are well and truely seized, even after blowtorching the life out of them - not really sure what to do here!) - Re-fit struts and wishbones - Remove N/S wing and straighten out the nearside headlight panel - Repair a couple more sheared bolts in the engine bay - Re-assemble dash - Collect bottom end and re-assemble engine - Clean and paint inlet manifold - Fit engine and wiring - Re-assemble front end including replacing bumper mount brackets Itching to get this finished but the end seems quite distant as things stand! |
|
|
|
|
Senior User Location: Hertfordshire/Epsom Registered: 17 Aug 2006 Posts: 687 Status: Offline |
Post #19
I've managed to finish off the engine bay rust repairs and painting so here |
|
|
|
|
Senior User Location: Hertfordshire/Epsom Registered: 17 Aug 2006 Posts: 687 Status: Offline |
Post #20
I then found out that the engine was ready to pick up so made my way to QEP to pick everything up. A quick plug for Matt at QEP he really couldn't have been more helpful spending ages going through the ins and outs of putting the engine together and any useful tips. When I got the parts home I got stuck in with swapping the pistons onto the in-spec rods I sourced and then fitting the ARP bolts into the rods.Bits - 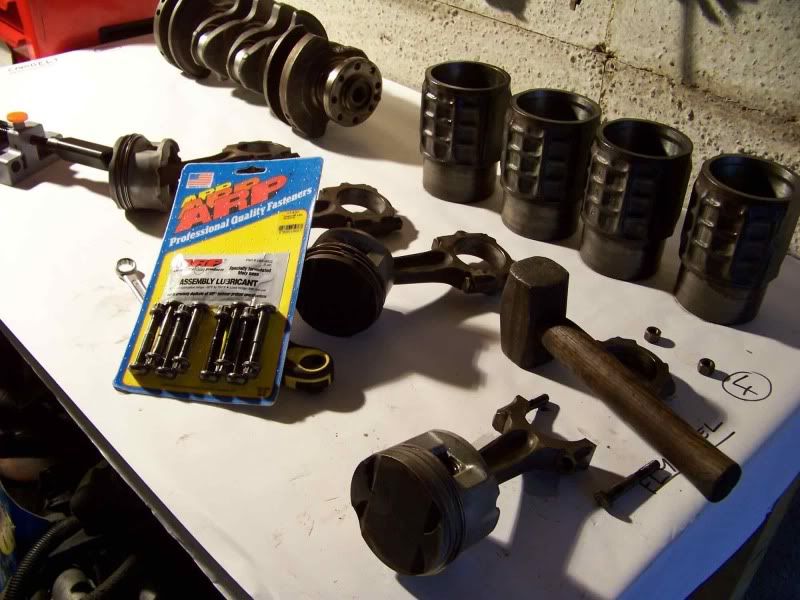 Honed Liner  Getting the spring clip out to get the pins out is a right battle but got there in the end! 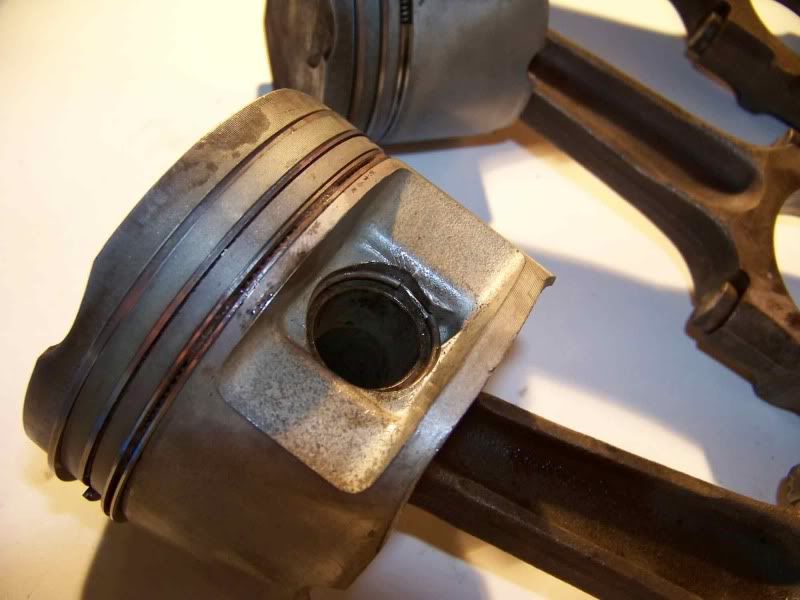 Just tap the old bolts out with a hammer and then fit the new bolts the same way... Easy! 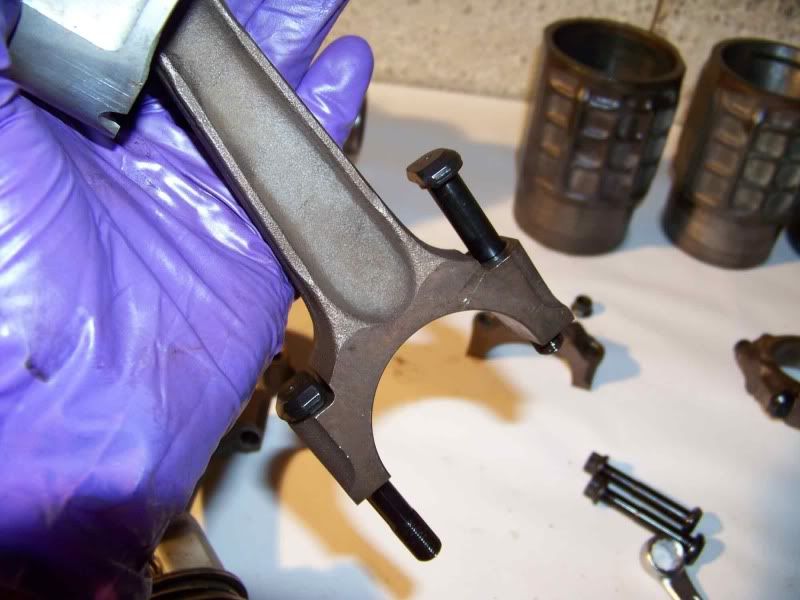 The only problem (a big one!) came when I got to measuring the liner protrusion, I hadn't done this before and I was using a straight edge and feeler gauges, but even still I could feel majour variations in the clearances, between liners and between the block surface. A trip to QEP later to double check and I'm now having to get the block decked and the liners skimmed, more money!!!  |
|
|
|
|
Senior User Location: Hertfordshire/Epsom Registered: 17 Aug 2006 Posts: 687 Status: Offline |
Post #21
Most recent job was repairing the sheared/broken bolts and the nearside wing earth point - I took it all apart cleaned it up then put a bit of grease around to disperse water and then sealed it with a freezer bag! 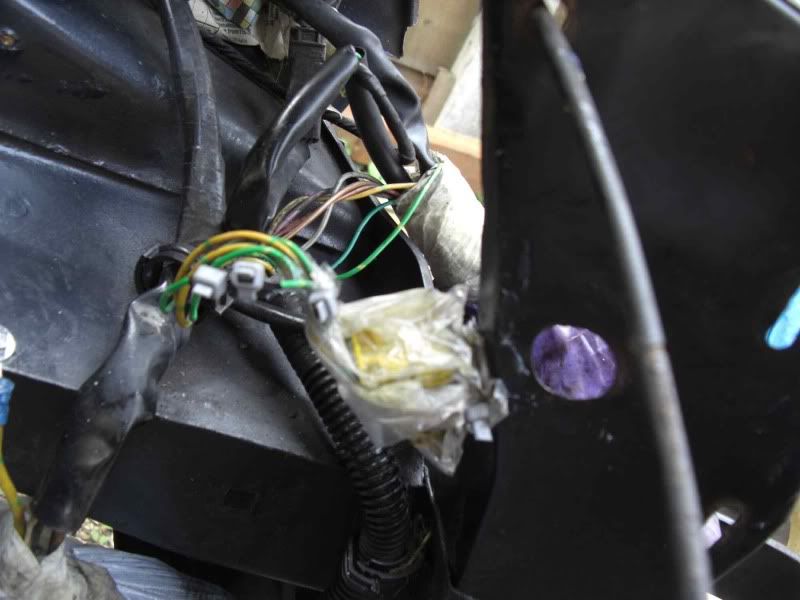 Coolant pipe bracket - I ground the original stud down to the bulkhead then drilled a hole right next to it, painted then riveted the bracket to the new hole 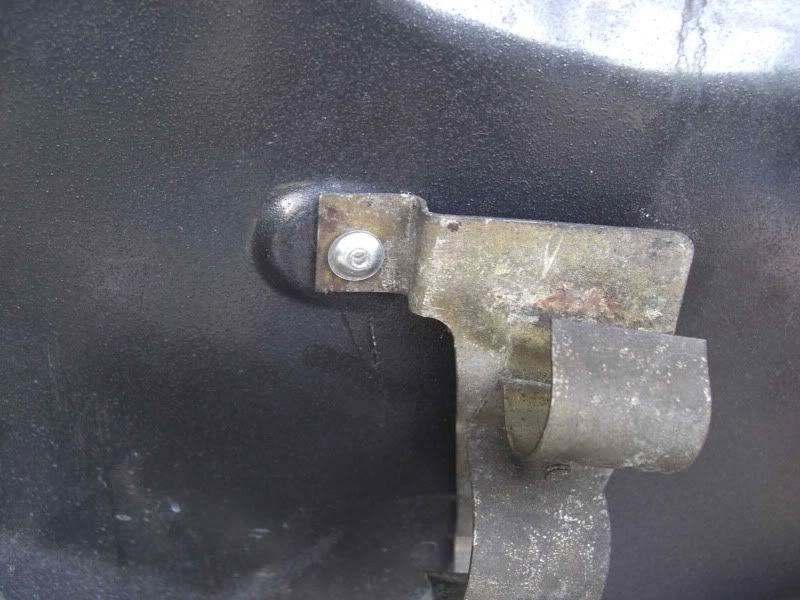 Offside wing coolant pipe/bumper bracket mounting bolts 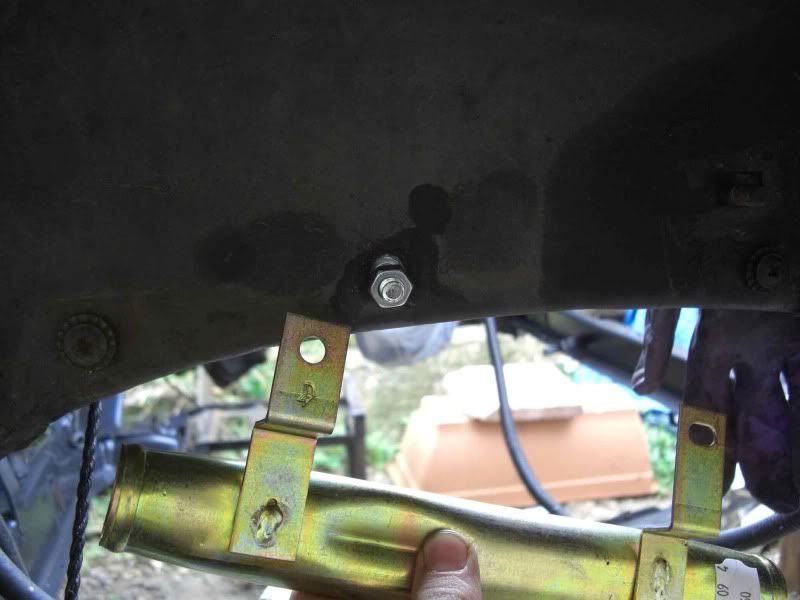 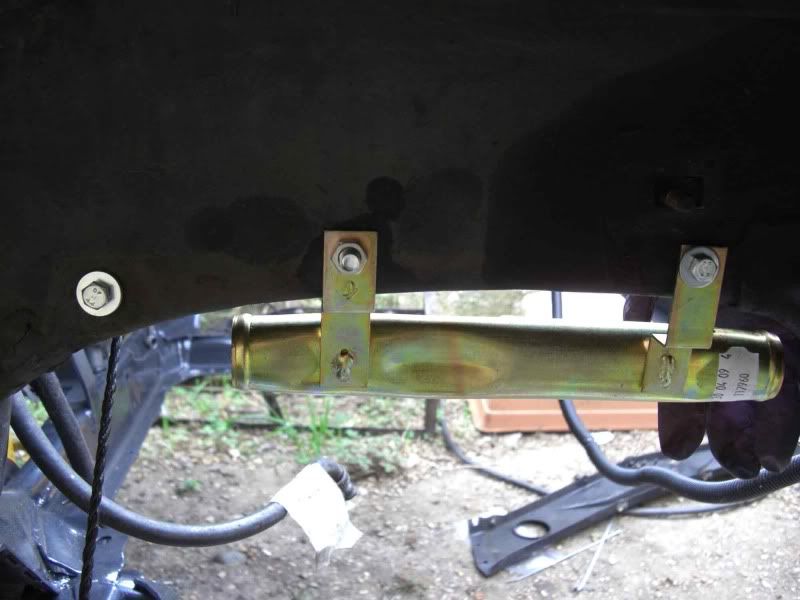 More updates soon... I hope!!! |
|
|
|
|
Seasoned Pro  Location: In the garage..... Registered: 08 Oct 2007 Posts: 1,192 Status: Offline |
Post #22
GSF for the water pipe?________________________________________ Built on 25th November 1998... That was a Wednesday..... Thank God it wasn't a Friday!RIP - Pete Sims |
|
|
|
|
Capt Pedantic  Location: Bigend, Wales. Registered: 27 Mar 2007 Posts: 25,817 Status: Offline |
Post #23
looks like it by the part number sticker.________________________________________ need a part number? get on here - http://public.servicebox.peugeot.comBring on the Trumpets. |
|
|
|
|
Senior User Location: Hertfordshire/Epsom Registered: 17 Aug 2006 Posts: 687 Status: Offline |
Post #24
welshpug! wrote: looks like it by the part number sticker. Good eyes, thats the one! |
|
|
|
|
Newbie Location: Bridgend Registered: 30 Sep 2009 Posts: 1 Status: Offline |
Post #25
Sport, I don't suppose you have sourced new mounting bolts for the front bumper yet have you? taken the rear bumper off myself and can't find any replacement bolts for the ones I had to grind off.Cheers.... Great job by the way!! |
|
|
|
The Peugeot GTi-6 & Rallye Owners Club - ©2024 all rights reserved.

Please Note: The views and opinions found herein are those of individuals, and not of The Peugeot 306 GTi-6 & Rallye Owners Club or any individuals involved.
No responsibility is taken or assumed for any comments or statements made on, or in relation to, this website. Please see our updated privacy policy.