displaying posts 1 to 25 of 35

Pages (2): [1] 2

Author Subject: Top mount FAQ piccies :unsure
justinaccurate

Seasoned Pro

Location: Cov

Registered: 29 Apr 2006

Posts: 14,425

Status: Offline

Post #1
I have been annoyed by a creak that I suspect from reading threads here is my top mount bearings. I dont mind having a go at stuff; I was worried that the spring compressors would be expensive but having seen they are about a tenner am thinking this might be a job I could have a go at...

But the top mount FAQ has all the pics missing. Sad

Dont suppose anyone has them or a link to a guide on how to do this job

Or anyone that knows the job wanna spend an afternoon helping me do mine while i make tea / pour beers Big grin
Posted 20th Feb 2009 at 02:31
dr-evil

Senior User

Location: Crewe

Registered: 20 Oct 2006

Posts: 901

Status: Offline

Post #2
The spring compressing will be a two man job - esp. if you have spax springs - 'cause the jaws on the compressors will skid on the f*ckin rock'ard paint and try to kill you every ten seconds !!! Second person will need to hold the compressors while you wind them in and out (alternate between the two (or more) evenly).

If you've got stock springs don't worry they are a piece of p*ss. Just grab as much spring as possible 'cause they are very long and will leave enough pressure in the remaining coil to make reassembly a swear-fest.

Are you just replacing the bearing or you buying a 'complete' top mount kit (pugs top mount kit doesn't include the spring pan) ? As long as you keep track of the order that everything came off in and put it back that way (with new bits of course) - then you'll be fine - oh and remember the thick washer that sits on the top of the damper rod - its easy to forget while your sorting the order that the rest of the mount go's back on in Smile

________________________________________

Cad Monkey will work for chocolate biscuits....I'm not kidding
Posted 20th Feb 2009 at 05:04
gilesy

Seasoned Pro

Location: Greenwich - in that London

Registered: 03 Apr 2006

Posts: 5,133

Status: Offline

Post #3
I'd like someone to make up a "can work on helicopters but can't really do cars" guide for me on this!!
Posted 20th Feb 2009 at 14:32
greenbelt

Seasoned Pro

Location: How's Life In London?

Registered: 23 Apr 2006

Posts: 1,961

Status: Offline

Post #4
Loosen the big strut top nut. You will need a 7mm allen key or similar to hold the rod and a deep offset spanner, 21mm I think.


The usual stuff under the car, loosen wheelnuts, jack up car, wheel off, remove top droplink nut and free from shock mounting point


Change sides Laugh

Remove brake caliper and disc and the brackets for the abs/brake lines so that instead of this


You have a bit of space to work


Now comes the tricky bit where you have to compress the springs.
I find it easiest to jack from the bottom of the balljoint and then attach the spring compressors when they are under quite a lot of tension. If the car starts to move off the axle stands you are in big trouble. BE CAREFUL and don't overdo it! Sorry, no pics for this bit as I was a bit preoccupied Roll eyes

Soak the whole area around the bottom of the strut and the pinch bolt with wd40. Remove strut pinch bolt. Freeing the strut is quite easy if you use a large chisel and a BFOH


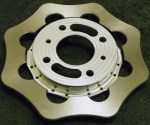
When the bottomof the strut is free, undo the three smaller nuts in the engine bay to free and remove the complete strut. You should be looking at something like this.


You might need to compress the springs a bit to get the top mount cradle and bearings free. Just be careful, you dont want it bouncing around off the walls while you duck for cover. Remember the order that everyting came off the strut when putting it back together.

If you f*ck it up, don't blame me Thumbs up

________________________________________

Standard Black 6
Black HBSC6 Smoke
Posted 20th Feb 2009 at 16:02
gilesy

Seasoned Pro

Location: Greenwich - in that London

Registered: 03 Apr 2006

Posts: 5,133

Status: Offline

Post #5
Top bombing...I like it! Still haven't cashed your postal order!!
Posted 20th Feb 2009 at 16:18
greenbelt

Seasoned Pro

Location: How's Life In London?

Registered: 23 Apr 2006

Posts: 1,961

Status: Offline

Post #6
And I still haven't fitted the second chock yet Laugh

________________________________________

Standard Black 6
Black HBSC6 Smoke
Posted 20th Feb 2009 at 16:22
lukejenks101

Seasoned Pro

Location: Bristol

Registered: 15 Mar 2008

Posts: 5,694

Status: Offline

Post #7
justinaccurate wrote:
I have been annoyed by a creak that I suspect from reading threads here is my top mount bearings. I dont mind having a go at stuff; I was worried that the spring compressors would be expensive but having seen they are about a tenner am thinking this might be a job I could have a go at...

But the top mount FAQ has all the pics missing. Sad

Dont suppose anyone has them or a link to a guide on how to do this job

Or anyone that knows the job wanna spend an afternoon helping me do mine while i make tea / pour beers Big grin


I could supply you a pair of genuine pug top mounts inc bearings for

________________________________________

PS3 I.D - jenkers101

Live i.d - Lukejenks1201
Posted 20th Feb 2009 at 16:31
justinaccurate

Seasoned Pro

Location: Cov

Registered: 29 Apr 2006

Posts: 14,425

Status: Offline

Post #8
bloody hell greenbelt - fair play Thumbs up

Luke - arent these about 20 quid from gsf? Are the genuine ones that much better? Unsure
Posted 20th Feb 2009 at 17:49
lukejenks101

Seasoned Pro

Location: Bristol

Registered: 15 Mar 2008

Posts: 5,694

Status: Offline

Post #9
Dunno, but i paid

________________________________________

PS3 I.D - jenkers101

Live i.d - Lukejenks1201
Posted 20th Feb 2009 at 19:35
dr-evil

Senior User

Location: Crewe

Registered: 20 Oct 2006

Posts: 901

Status: Offline

Post #10
Don't forget to undo the 18mm on the front of the wishbone so you can move it down off the strut.

________________________________________

Cad Monkey will work for chocolate biscuits....I'm not kidding
Posted 20th Feb 2009 at 20:38
justinaccurate

Seasoned Pro

Location: Cov

Registered: 29 Apr 2006

Posts: 14,425

Status: Offline

Post #11
In the end I bottled it and had carl do this job. A quick drive round the block and he said it was the drivers side top mount.

To be fair I think its a pretty difficult job to do, after watching him I think I wouldn't have been able to do it.

Carl did it slightly differently to the way in the FAQ. Dunno if i'll get in trouble for giving away trade secrets Ninja He left the caliper and disc on, hammered the hub off the strut, then undid the 3 bolts holding the strut in the engine bay, removed the drop link, then with the strut off he compressed the spring, undid the bolt off the top and swapped over the mount (2 man job to hold it in place and quickly do the nut up a bit)

Even though my springs were replaced at the last MOT, the strut did not want to come free of the hub, I dont think I would be confident whacking away on my car Unsure. Then the drop link died (bolt siezed) and needed to be replaced.

Anyway - problem solved, i'm sure I'll have literally dozens of trouble free motoring miles before the next problem Roll eyes Laugh
Posted 10th Apr 2009 at 13:52
sixygti2

Seasoned Pro

Location: Tunbridge Wells

Registered: 21 Apr 2007

Posts: 2,778

Status: Offline

Post #12
So how long did it take carl to do it all?

I will be atempting this today...i think...and am glad to read you dont have to remove calipers and disks!

Also have balljoints and droplinks to fit too

________________________________________

Still watching you...
Posted 10th Apr 2009 at 13:33
justinaccurate

Seasoned Pro

Location: Cov

Registered: 29 Apr 2006

Posts: 14,425

Status: Offline

Post #13
I suppose it was about 45 mins-1 hour, but the real time saver was that his air gun worked the spring compressor...
Posted 10th Apr 2009 at 13:52
buzzbrightyear

Seasoned Pro

Location: hiding all receipts for car

Registered: 09 Jul 2008

Posts: 11,894

Status: Offline

Post #14
dr-evil wrote:

Are you just replacing the bearing or you buying a 'complete' top mount kit (pugs top mount kit doesn't include the spring pan)


hi, does the spring pan nead changing ????

________________________________________

andrew315rawson@live.co.uk
Moonstone phase 7 gti6
My Project thread: http://www.306gti6.com/forum/showthread.php?id=119992&page=1
Posted 9th Oct 2009 at 17:48
willygti

Seasoned Pro

Location: Exeter

Registered: 08 Oct 2007

Posts: 5,024

Status: Offline

Post #15
You don't need to compress the spring before you take the shock off the car.. you can remove the whole shock with top mount as one. Just undo the bolts which clamp the suspenson leg to the hub and pull the hub down Wink

________________________________________

Team Ducati 748
2003 Subaru Impreza STi
Posted 10th Apr 2009 at 16:08
phillipm

Seasoned Pro

Location: Rotherham

Registered: 15 Oct 2006

Posts: 20,607

Status: Offline

Post #16
^That's the way I do it, far quicker.

________________________________________

- Bespoke rollcages/additions/adjustments. Half cages right up to complete custom spaceframes - MSA/FIA spec, CDS, ROPT, T45, etc - PM me
Email me!
Custom-made polybushes available - need an odd size or fitment? - anything from batch work to one-off pieces.
Posted 10th Apr 2009 at 16:10
willygti

Seasoned Pro

Location: Exeter

Registered: 08 Oct 2007

Posts: 5,024

Status: Offline

Post #17
Amateurs Smug

________________________________________

Team Ducati 748
2003 Subaru Impreza STi
Posted 10th Apr 2009 at 16:12
sixygti2

Seasoned Pro

Location: Tunbridge Wells

Registered: 21 Apr 2007

Posts: 2,778

Status: Offline

Post #18
Got this done yesterday, and yes getting everything fixed back onto the shock was indeed a swear fest for me, in the end got the passengers side done ok, with help from a mate, then he left and the drivers side didnt go so well for me.
In the end the whole spring decided to come off so i had to start from scratch. And my mate came back to help again Laugh

Anyway, its all done and just listening out for any more creaks/knocks from it now.

Thanks to everyone who has posted up guides on this work, it made it so much easier for me. Now its done, i can see it is actually quite a straight forward job, but you never know til you do it

________________________________________

Still watching you...
Posted 11th Apr 2009 at 21:35
greenbelt

Seasoned Pro

Location: How's Life In London?

Registered: 23 Apr 2006

Posts: 1,961

Status: Offline

Post #19
The first time is always the worst

Next time it will be a doddle and you can take the short cuts the 'experts' suggest Roll eyes

________________________________________

Standard Black 6
Black HBSC6 Smoke
Posted 12th Apr 2009 at 00:39
sixygti2

Seasoned Pro

Location: Tunbridge Wells

Registered: 21 Apr 2007

Posts: 2,778

Status: Offline

Post #20
Yes

One thing i did notice though when I was trying to attach the pan and top mount to the strut, the strut rod kept dropping under its own weight, which made it quite frustrating when trying to bolt everything on!

Is this normal or is it knackered?

________________________________________

Still watching you...
Posted 12th Apr 2009 at 17:15
daveyboy

aka Jim Davey

Location: Southampton

Registered: 01 Oct 2007

Posts: 8,648

Status: Offline

Post #21
Normal unfortunately, was there any oil leaking from the seals?

________________________________________

R H Davey Welding Supplies. I sell new and used welding equipment in the Hampshire area. I take on welding jobs in the evenings, ally casting repairs are one of my specialities but I can weld pretty much anything. PM me with your requirements.

Some of my services: (See my for sale threads)
Engine mount/chassis repair
Solid Beam Mounts BACK IN PRODUCTION
Harness bars
Posted 12th Apr 2009 at 17:23
sixygti2

Seasoned Pro

Location: Tunbridge Wells

Registered: 21 Apr 2007

Posts: 2,778

Status: Offline

Post #22
No dont think so. will double check later though.

Where can you buy standard shocks and springs from?

________________________________________

Still watching you...
Posted 12th Apr 2009 at 17:31
jonnie205

Seasoned Pro

Location: Bicester

Registered: 10 Apr 2005

Posts: 4,146

Status: Offline

Post #23
yeah i leave caliper and all that on just undo the strut pinch bolt and knock hub off struts, undo drop link and 3 nuts on top mount and its off
Posted 12th Apr 2009 at 17:38
jamie192

Regular

Location: ryde

Registered: 14 May 2008

Posts: 180

Status: Offline

Post #24
i changed my top mount over without even compressing the spring or taking it out. thats an even quicker way to do it, i must be a pro! Razz Didnt take brakes or anything off just the wheel.
Posted 15th Apr 2009 at 16:41
cahillscornerflag

Senior User

Location: Camelford, Cornwall.

Registered: 12 Jan 2008

Posts: 587

Status: Offline

Post #25
Resurecting an oldish thread... I started replacing the struts and springs after one snapped, for my new billies and eibachs today, I followed this faq as it's related, got to the part where you have to remove the strut from the hub, I 've removed the pinch bolt (b*stard thing) but i cannot for the life of me get the strut out. Am I missing something? Most of you fella's are saying it should just come out with little force, I've had the mallet out and WD40 on it for the best part of the afternoon and still no joy. Is there a specific way to remove the strut? I hope that all made sense as it proper twistin my melon LOL
Knew i should've paid some one to do it.

________________________________________

'00 Astor Grey GTi-6 - Regretfully sold!
'89 Onyx Black 205 GTi 1.6


Posted 1st May 2009 at 02:10

Pages (2): [1] 2

All times are GMT. The time is now 15:51

The Peugeot GTi-6 & Rallye Owners Club - ©2024 all rights reserved.

Please Note: The views and opinions found herein are those of individuals, and not of The Peugeot 306 GTi-6 & Rallye Owners Club or any individuals involved.
No responsibility is taken or assumed for any comments or statements made on, or in relation to, this website. Please see our updated privacy policy.