displaying posts 1 to 25 of 35

Pages (2): [1] 2

Author Subject: My Peugeot 306 Rallye (XT) Project.
shabusta

Regular

Location: Australia

Registered: 10 Sep 2015

Posts: 244

Status: Offline

Post #1
Hello all, first post..... Unsure

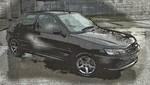
I bought my first car, a 2001 Peugeot 306 N5 Rallye, after some research, i was told it is a re-badged 306 XT,
it has the XU10J4R 2.0 16v engine (99 kW; 132 hp).

after a quick test drive i was sold! drove it home that weekend Cool
a few months after i started looking at what i could upgrade / modify.

i have made some bad decisions but hey what is being young for,
that brings me here, i am after all the knowledge and advice this forum has,
so that i can get my baby back to being the amazing car she was engineered to be,
i know that knowledge and advice is here, i have read many a post about others experiences and projects so in short help me fix what i screwed up and what i haven't yet googled.


I did make a really good post but it got lost when i pressed submit Dunno
so apologies for being all over the place.

shabusta has attached the following image:

Posted 10th Sep 2015 at 12:53
shabusta

Regular

Location: Australia

Registered: 10 Sep 2015

Posts: 244

Status: Offline

Post #2
My reason for taking apart a perfectly good car is i want experience and knowledge,
my excuse is rubber ages, parts rust, things break.

this car lived the first 14 years of its life near the coast and that salt, and age is showing,
at least in my unprofessional opinion.

the current plan is:

- Brake pads Thumbs up
- brake rotors Thumbs up
- clean / paint hubs, hammerite? Thumbs down
- clean / paint calipers, hammerite? Thumbs down
- wishbones Thumbs up
- poly bushes all over Wink
- lower ball joints Thumbs up
- drop links Thumbs up
- SPAX RSX, suspension should have got more knowledge before getting these /? Thumbs up
- inner / outer tie rods Thumbs up
- remove / clean sump... i know the alternator Unsure Thumbs down Thumbs down
- remove spare tire and cage Thumbs up
- clean / paint under body, hammerite? Thumbs down
- remove / clean / paint rear bars, hammerite? Thumbs down
- Poly shock stops Dunno
- Poly Rear Beam Mount Tensioning Kit Thumbs down
- SPAX RSX rear shocks Thumbs up
- oil, air, fuel filters Thumbs up
- spark plugs Thumbs down

probably more..... if anyone has something i should / must add to this list please please tell me.
how do you add multiple photos? all i see is the single photo upload option.

as seen below CV and Hub being held up by jack and supported by some rope. No

shabusta has attached the following image:

Posted 22nd Dec 2015 at 21:37
shabusta

Regular

Location: Australia

Registered: 10 Sep 2015

Posts: 244

Status: Offline

Post #3
Spax RSX compared to stock 306 suspension, new top mounts on RSX.

EDIT:

for those looking for weight specs, these include the top mount.

1 X OEM = 7.1KG
1 X RSX = 5.8KG

shabusta has attached the following image:

Posted 19th Sep 2015 at 11:31
shabusta

Regular

Location: Australia

Registered: 10 Sep 2015

Posts: 244

Status: Offline

Post #4
work to be done, remove remove remove.

shabusta has attached the following image:

Posted 10th Sep 2015 at 12:59
shabusta

Regular

Location: Australia

Registered: 10 Sep 2015

Posts: 244

Status: Offline

Post #5
Rear end... badly rusty or just surface rust?

shabusta has attached the following image:

Posted 10th Sep 2015 at 13:00
shabusta

Regular

Location: Australia

Registered: 10 Sep 2015

Posts: 244

Status: Offline

Post #6
from top left, Meyle outer tie rods, drop links, inner tie rods, on wish bone is Meyle, the other is Swag.

can anyone tell me how to get the bushes out / off?

shabusta has attached the following image:

Posted 10th Sep 2015 at 13:04
shabusta

Regular

Location: Australia

Registered: 10 Sep 2015

Posts: 244

Status: Offline

Post #7
Poly Bushes: Exhaust, front wish bone, lower engine mount, rear wish bone, torsion kit, bump stops.
braided brake lines just because i could and a short shifter for the same reason.

looking back now i shouldn't have got black series bushes? but i got a great package deal...

shabusta has attached the following image:

Posted 10th Sep 2015 at 13:07
shabusta

Regular

Location: Australia

Registered: 10 Sep 2015

Posts: 244

Status: Offline

Post #8
First thing i did was get lower and upper strut braces, they made a huge difference to body role.
not sure if this was just them or because i don't have much rubber left on the bushes.

shabusta has attached the following image:

Posted 10th Sep 2015 at 13:10
heliosphan

Senior User

Location: UK

Registered: 14 Sep 2007

Posts: 948

Status: Offline

Post #9
The arches, back plate and OE strut look to be in outstanding condition compared to some on here and many UK vehicles in general for that matter. I guess climatic conditions and proximity to the marine realm are relative. LOL

The car looks nice. Good luck with it and keep the thread updated with many pictures. Smile
Posted 10th Sep 2015 at 13:29
aaron6

Seasoned Pro

Location: On the sofa in maidstone

Registered: 16 May 2006

Posts: 5,840

Status: Offline

Post #10
I got that same suspension kit. Works well. Just don't have them on max hard setting as you may as well use solid bar...

________________________________________

See the sheer power and might of the lesser known burrowing owl.


Posted 10th Sep 2015 at 13:33
shabusta

Regular

Location: Australia

Registered: 10 Sep 2015

Posts: 244

Status: Offline

Post #11
I was hoping for that, but forums have a varied mix of too much suspension to as you say works well,
probably just becasue i have this one and not the other, i am still on the opinion i should have got one of the Bilstein kits,
but i haven't driven it yet.

updates will be slow until late October, end of University session, and i work full time No not a good mix.
Posted 10th Sep 2015 at 13:39
mocinim

Seasoned Pro

Location: The Darkside of bedford :)

Registered: 09 Jan 2015

Posts: 2,307

Status: Offline

Post #12
shabusta wrote:
Rear end... badly rusty or just surface rust?


Thats not rust thats just some brown stuff collecting here and there i took my brake shields off mine when i first got it didnt need to un bolt anything they just fell away when i looked at them

Looks pretty good down there looks like an original back box as well

Are you oe shocks bilsten b4 (black ones)

________________________________________

BLACK RALLYE - phoenix
WHITE RALLYE - valliant

http://public.servicebox.peugeot.com/

https://www.gov.uk/check-mot-history
Posted 10th Sep 2015 at 14:22
shabusta

Regular

Location: Australia

Registered: 10 Sep 2015

Posts: 244

Status: Offline

Post #13
there was enough rust to drill out the Torx screws and hammer off the rotors,
to be honest i would actually have no idea, how can i check?
Posted 10th Sep 2015 at 14:32
mocinim

Seasoned Pro

Location: The Darkside of bedford :)

Registered: 09 Jan 2015

Posts: 2,307

Status: Offline

Post #14
Are the bottom of the struts domed or are they inset
peugeot ones look like one piece dome bilstein look like inserted welded caps at the bottom

________________________________________

BLACK RALLYE - phoenix
WHITE RALLYE - valliant

http://public.servicebox.peugeot.com/

https://www.gov.uk/check-mot-history
Posted 10th Sep 2015 at 14:43
shabusta

Regular

Location: Australia

Registered: 10 Sep 2015

Posts: 244

Status: Offline

Post #15
I'll let you be the judge.

shabusta has attached the following image:

Posted 10th Sep 2015 at 16:14
mocinim

Seasoned Pro

Location: The Darkside of bedford :)

Registered: 09 Jan 2015

Posts: 2,307

Status: Offline

Post #16
They dont look like peugeot ones to me not a pro on the various different models but they do look alot like my b4 bilstein ones there slightly better than peugeot i get better stability have tried a few reacon there the best whilst keeping it looking original as in not lowering it

________________________________________

BLACK RALLYE - phoenix
WHITE RALLYE - valliant

http://public.servicebox.peugeot.com/

https://www.gov.uk/check-mot-history
Posted 10th Sep 2015 at 23:03
mik

Seasoned Pro

Location: Kent

Registered: 17 Feb 2011

Posts: 2,100

Status: Offline

Post #17
That car doesn't look rusty. That disc backing plate looks as though it would clean up well with a strip and repaint. I'd give everything a good clean and have a close look for rust but I don't think you'll find much on that car.

I wouldn't use Hammerite though - get some zinc primer and paint black or body colour over that. Much better.

________________________________________

Cherry Rallye SOLD

Posted 11th Sep 2015 at 18:35
RetroPug

Seasoned Pro

Location: Leicestershire

Registered: 15 Jan 2013

Posts: 2,473

Status: Offline

Post #18
That's got to be the cleanest original rear disk shield I've ever seen.

________________________________________

61k miles Ph.1 Diablo '6 Project Thread
Posted 11th Sep 2015 at 20:55
shabusta

Regular

Location: Australia

Registered: 10 Sep 2015

Posts: 244

Status: Offline

Post #19
mik wrote:
That car doesn't look rusty. That disc backing plate looks as though it would clean up well with a strip and repaint. I'd give everything a good clean and have a close look for rust but I don't think you'll find much on that car.

I wouldn't use Hammerite though - get some zinc primer and paint black or body colour over that. Much better.


I know nothing about painting or rust, if you have the time could you tell me the best process to get the best results in my case? and a quick intro to other methods?
Posted 14th Sep 2015 at 04:52
mik

Seasoned Pro

Location: Kent

Registered: 17 Feb 2011

Posts: 2,100

Status: Offline

Post #20
First step would be to get a power washer and clean all the grime off underneath so you can see what you have got and go from there.

The 306 is mostly galvanised underneath (with the exception of some of the chassis rails) so it doesn't rust easily. You can tell it is galvanised as the paint flaking off on wheel arch lips, big stone chips etc has a grey colour underneath with a whitish powdery substance which is zinc oxide (it sacrifices itself to protect the steel). You don't use road salt in Oz which is hugely damaging to cars here in the UK, so your car will not have much rust unless it has spent time parked in the sea.

One thing to watch is underseal, rust can start underneath if it is falling off through age or damage, and the underseal traps water and keeps the metal wet which speeds up the rusting process. Best to remove unsound underseal (i.e. stuff that is bubbled and moves if you prod it), clean up and reseal with new stuff.

The best way to deal with rust is to clean it off back to bare metal using rust removal gel and a drill with a wire brush in it or similar, and then paint it with zinc primer. This is time-consuming and can be a pain in areas underneath with limited access. Once the zinc primer has gone off overpaint with your choice of top coat. In my case I used stone chip paint and body colour enamel over the top of that. Check out my project thread and many others for details. Zinc primer really works - I bought new disc protectors 3 years ago and painted them with zinc primer and silver over the top. I removed one last week and it is totally clean with no rust on it at all.

Once the paint etc has well cured you could spray clear wax over the entire underside and engine bay. I did this and also sprayed cavity wax in the box sections, chassis rails and sills. Not sure whether you would need to bother with that in your climate, maybe if the car is not garaged.

The only other reason you might get rust is through idiots jacking the car in the wrong place. This caves in the box section and/or dents the floor as the French metal is thin and the floor is not designed to support the weight of the car. The paint will be breached, rust will get a foothold and it will not be long before you get a hole. I rant about this regularly! Only jack the car on the front subframe, rear axle tube or the reinforced sill jacking points. There is a particular place where people love jacking the 306 which looks nice and strong but isn't at all. Quite a few 306s (including mine) have had these box sections repaired for that reason.

________________________________________

Cherry Rallye SOLD

Posted 14th Sep 2015 at 12:23
shabusta

Regular

Location: Australia

Registered: 10 Sep 2015

Posts: 244

Status: Offline

Post #21
Thanks Mik appreciate the advice, i'll have to save that for when i get to a painting stage....

for now, my assignment killed me so i decided to start breaking things Whistle oops...

i got the front upper grill (?) off and i think broke a few clips, if anyone can lend some advice on how to remove all body panels or if there is a thread already for this a link would be amazing.

found this quite humourus https://www.youtube.com/watch?v=YMhSOIc0J0c

shabusta has attached the following image:

Posted 14th Sep 2015 at 14:53
shabusta

Regular

Location: Australia

Registered: 10 Sep 2015

Posts: 244

Status: Offline

Post #22
continuing on my path of destruction, I finally (almost) have the wish bone off the left side!!!

does anyone have advice for getting the main bolt off of the rear bush?
either my wrench was too big or i just cant manage to fit it over the nut under and over the 'K' frame.

to my main problem, the front bolt, from memory i am stuck in the middle,
the ratchet just keeps spinning the bolt but no progression, any tips on how to get this one out,
this wouldn't be a problem if i didn't have the lower strut brace.

and for bonus marks any tips for removing the right side bolt, using a CV joint on the ratchet i got to the same issue,
but the sump will get in the way again... and i really do not want to remove the sump... yet.

shabusta has attached the following image:

Posted 14th Sep 2015 at 14:48
welshpug!

Capt Pedantic

Location: Bigend, Wales.

Registered: 27 Mar 2007

Posts: 25,817

Status: Offline

Post #23
if the bolt has come out that far then you just need to pull the bolt out.

________________________________________

need a part number? get on here - http://public.servicebox.peugeot.com

Bring on the Trumpets.

Posted 14th Sep 2015 at 15:36
shabusta

Regular

Location: Australia

Registered: 10 Sep 2015

Posts: 244

Status: Offline

Post #24
welshpug! wrote:
if the bolt has come out that far then you just need to pull the bolt out.


any tips on getting a grip on the bolt? no idea what i can fit into the braces tube, or something to grab the exposed bit?

Victory!!!! but not without its mistakes and to be a little ashamed...

shabusta has attached the following image:

Posted 16th Sep 2015 at 07:05
shabusta

Regular

Location: Australia

Registered: 10 Sep 2015

Posts: 244

Status: Offline

Post #25
and a bottom up shot

shabusta has attached the following image:

Posted 14th Sep 2015 at 16:20

Pages (2): [1] 2

All times are GMT. The time is now 20:07

The Peugeot GTi-6 & Rallye Owners Club - ©2024 all rights reserved.

Please Note: The views and opinions found herein are those of individuals, and not of The Peugeot 306 GTi-6 & Rallye Owners Club or any individuals involved.
No responsibility is taken or assumed for any comments or statements made on, or in relation to, this website. Please see our updated privacy policy.