displaying posts 276 to 300 of 404

Pages (17): first .. 11 [12] 13 .. last

Author Subject: Red Rallye S529 OAN
Ben_W

Formerly gpm

Location: Lutterworth

Registered: 01 Sep 2007

Posts: 2,941

Status: Offline

Post #276
Had a shocker of a day at work again so came home and decided to go and twirl a few spanners in anger and take the front subframe off. Been meaning to do it for a while and planning on doing a bit of grinding at the weekend to clean some more of the underside off so went outside and got busy.

The beginning…


Hubs off, suspension legs off etc. Then onto those bloody mounting cups on the inner arches/chassis legs. Passenger side cracked off very easily and came out without any fight at all.


Drivers side was a swine. Plenty of undoing, doing up again, etc. Took the subframe off, thinking I'd be able to brace the cup and undo the bolt further. No such luck, seized solid.


Healthy application of wd40 (not ideal but all I had), subframe back on, two 13mm bolts bolted back and and then more undoing, redoing, undoing etc. Eventually it gave in and came out. Subframe back off.


Little bit of rust here, think it's where I bare metalled earlier but didn't get with electrox. This bit is still pushed in and needs pulling out. Not sure how I will pull it out. Thinking about drilling a hole into a strip of metal, welding a nut on, sliding the strip into the hole on the pushed in bracket and attaching a slide hammer……


Where the cup fixes to the chassis leg….


Should be able to get in here and clean up quite a bit….


So the mounting cups have gone into the electrolysis tank, will see how they clean up but not holding my breath. Unfortunately, the cups are NFP.


I shall get my parts man on the case as I think I'll be looking to replace. Interestingly, Servicebox shows a gasket between the subframe and body, part number 7 on the diagram but no number 7 on the parts number list…..odd.

Thats all for tonight. Was knackered by the time I was done this far so hot shower, cold beer and dinner cooked by the wife…..

________________________________________

Cherry Red Rallye .... On going OEM spec resto

China Blue GTi6 .... Weekend toy

Black 208 GTi .... Wife's car now

Silver BMW 550i.... The executive missile

Posted 18th Aug 2016 at 22:34
mocinim

Seasoned Pro

Location: The Darkside of bedford :)

Registered: 09 Jan 2015

Posts: 2,307

Status: Offline

Post #277
If you come across some spare cups will gladly take a pair or two chap

________________________________________

BLACK RALLYE - phoenix
WHITE RALLYE - valliant

http://public.servicebox.peugeot.com/

https://www.gov.uk/check-mot-history
Posted 18th Aug 2016 at 22:53
welshpug!

Capt Pedantic

Location: Bigend, Wales.

Registered: 27 Mar 2007

Posts: 25,817

Status: Offline

Post #278
number 7 are for auto models iirc, the subframe is spaced down slightly.

if you leave your vin number out of the search and just go in for 306 you'll see the annotations that say which models parts are used on.

________________________________________

need a part number? get on here - http://public.servicebox.peugeot.com

Bring on the Trumpets.

Posted 18th Aug 2016 at 23:02
Ben_W

Formerly gpm

Location: Lutterworth

Registered: 01 Sep 2007

Posts: 2,941

Status: Offline

Post #279
Cheers Mei, I'll have a look! Andy, I'll see what I can do.

________________________________________

Cherry Red Rallye .... On going OEM spec resto

China Blue GTi6 .... Weekend toy

Black 208 GTi .... Wife's car now

Silver BMW 550i.... The executive missile

Posted 18th Aug 2016 at 23:26
Ben_W

Formerly gpm

Location: Lutterworth

Registered: 01 Sep 2007

Posts: 2,941

Status: Offline

Post #280
As usual Mei, bang on. Parts man on the case for 6 of the cups Andy.

________________________________________

Cherry Red Rallye .... On going OEM spec resto

China Blue GTi6 .... Weekend toy

Black 208 GTi .... Wife's car now

Silver BMW 550i.... The executive missile

Posted 18th Aug 2016 at 23:30
mocinim

Seasoned Pro

Location: The Darkside of bedford :)

Registered: 09 Jan 2015

Posts: 2,307

Status: Offline

Post #281
Ben_W wrote:
As usual Mei, bang on. Parts man on the case for 6 of the cups Andy.

Superb cheers fella

________________________________________

BLACK RALLYE - phoenix
WHITE RALLYE - valliant

http://public.servicebox.peugeot.com/

https://www.gov.uk/check-mot-history
Posted 18th Aug 2016 at 23:38
Ben_W

Formerly gpm

Location: Lutterworth

Registered: 01 Sep 2007

Posts: 2,941

Status: Offline

Post #282
Cant beat a good, well connected parts man.....cups found!

________________________________________

Cherry Red Rallye .... On going OEM spec resto

China Blue GTi6 .... Weekend toy

Black 208 GTi .... Wife's car now

Silver BMW 550i.... The executive missile

Posted 19th Aug 2016 at 16:34
mik

Seasoned Pro

Location: Kent

Registered: 17 Feb 2011

Posts: 2,100

Status: Offline

Post #283
Superb work. It reminds me I need to have a good look underneath mine and see how it is holding up 3 years later, and one day need to get the engine out as there will be places in engine bay I couldn't get to.

________________________________________

Cherry Rallye SOLD

Posted 20th Aug 2016 at 08:07
Ben_W

Formerly gpm

Location: Lutterworth

Registered: 01 Sep 2007

Posts: 2,941

Status: Offline

Post #284
Are you sitting comfortably? Then I'll begin……Smile

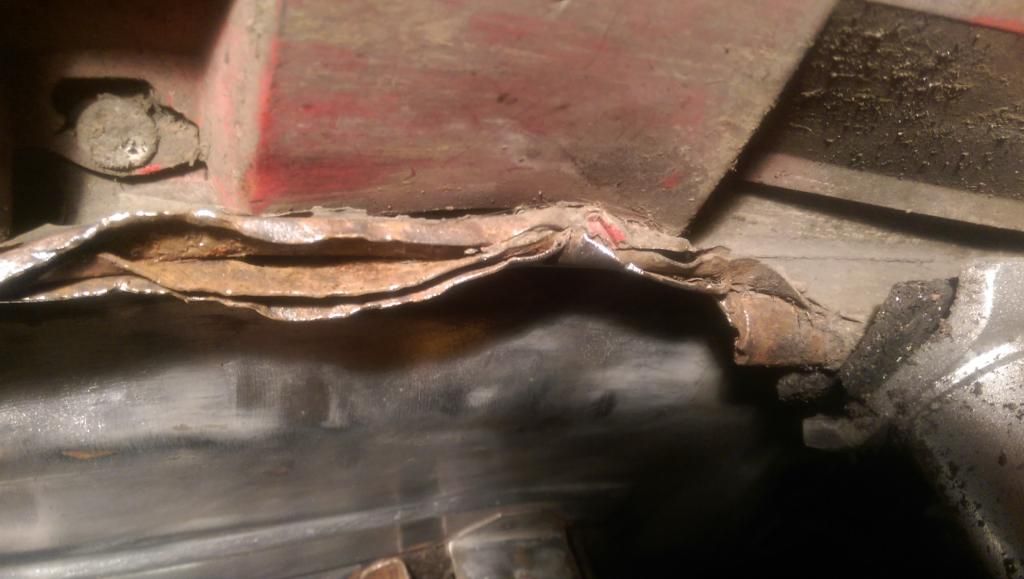
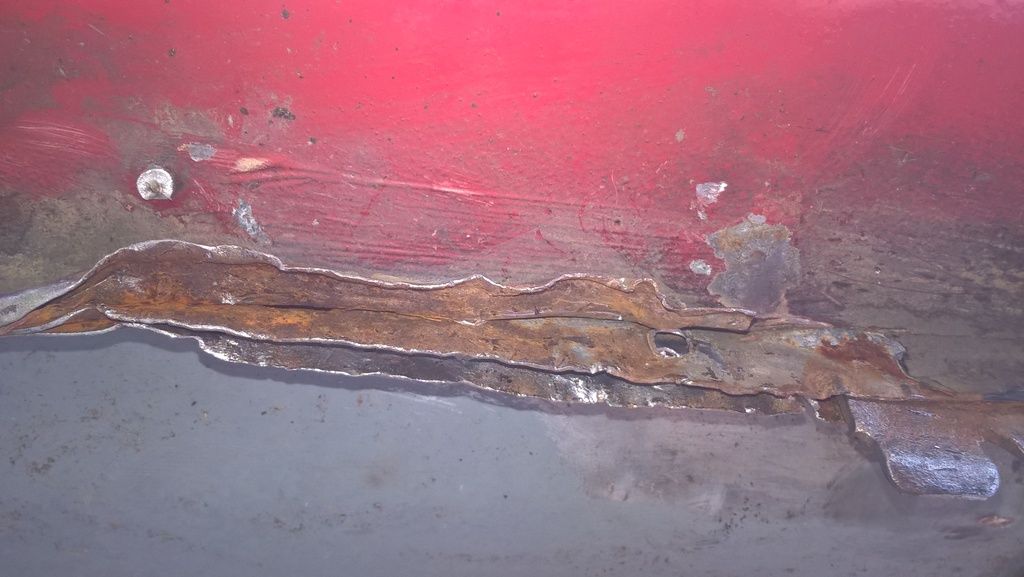
Anyone remember this horror?


Unfortunately, despite my very best hoping and talking nicely to it, it hadn't gone away. On that basis, I decided I'd better force it to go away….

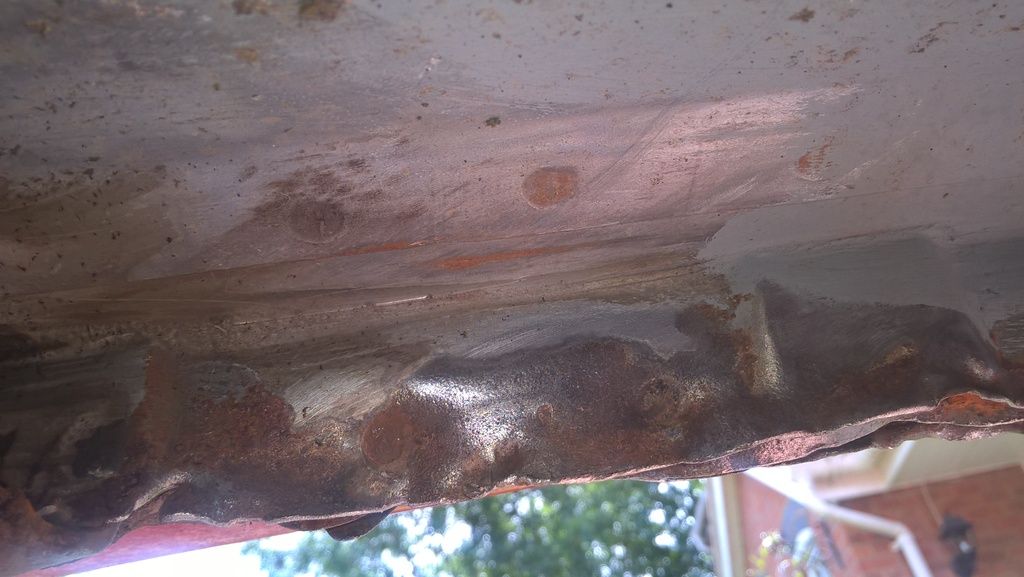
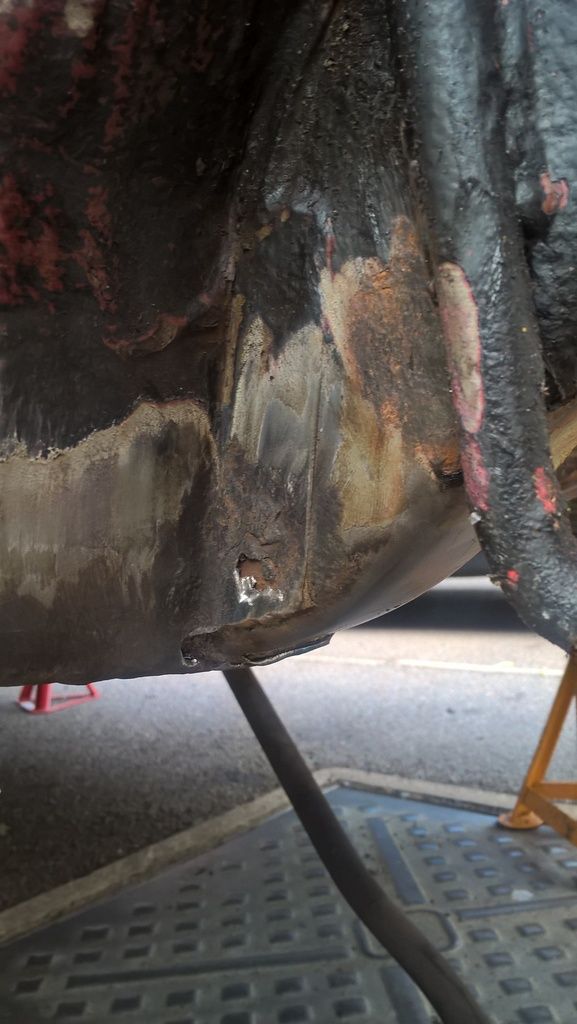
Got under and started off by having a good look to figure out a plan of attack. As previously mentioned, this section has three sheets of metal, which all come together and fold under, effectively sealing the floorpan and sill together. They don't take to kindly to an errant trolley jack. Having has a good look, I thought the best plan of action would be to drive the three sections apart, clean up any rust, straighten them out and then reposition them as they should be. Easy enough in principle…

Out came the tools and got busy. It became immediately apparent the layers weren't coming apart without a fight. I had my suspicions why so got the grinder/wire brush going and confirmed what I thought.


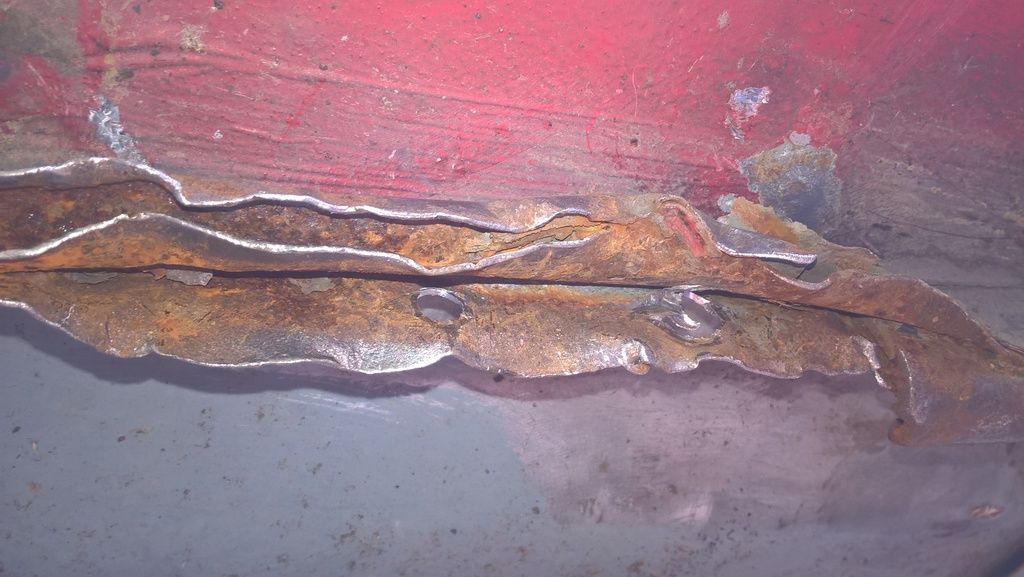
Spot welds. I shouldnt have been surprised really. Haven't got a spot weld drill bit but got out a normal metal drill bit and got busy. Drilling out the spot welds worked and allowed me to separate the layers.


Wasn't as bad as I expected in there, just surface rust. Very difficult to get the layers apart above the right hand spot weld I drilled out, they were properly mangled together and the centre sheet of metal is much stronger than the outers. A chisel type of punch and a hammer eventually got them separated


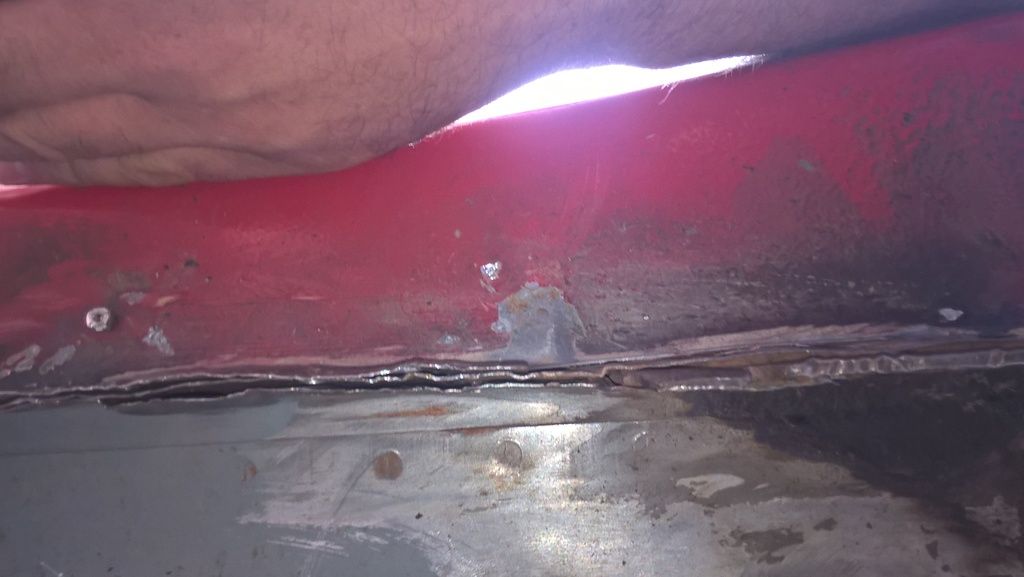
Much work with a small drill mounted wire brush got the metal clean and manipulation with pliers (I know, bit it's all I have) started straightening the metal


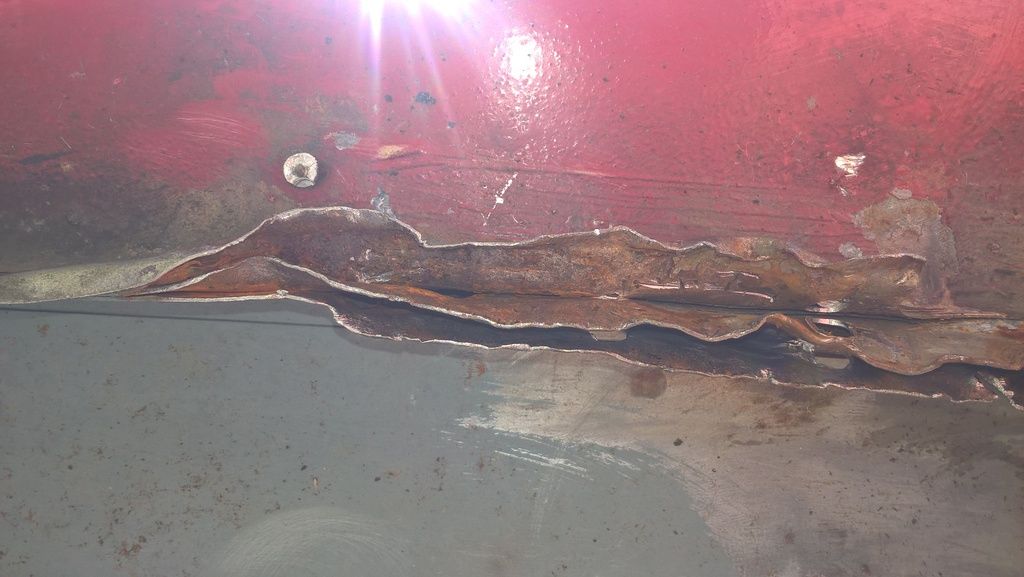
Until eventually after about 2 hours, I got it to somewhere near semi reasonable.


Still needs more straightening work but before i can do much more, the three sections need clamping together and the spot welds reinstating. Once that's done, I can work on getting the metal all back into the correct place. Still, I'm very pleased with how it turned out, considering the mess it was before I began.

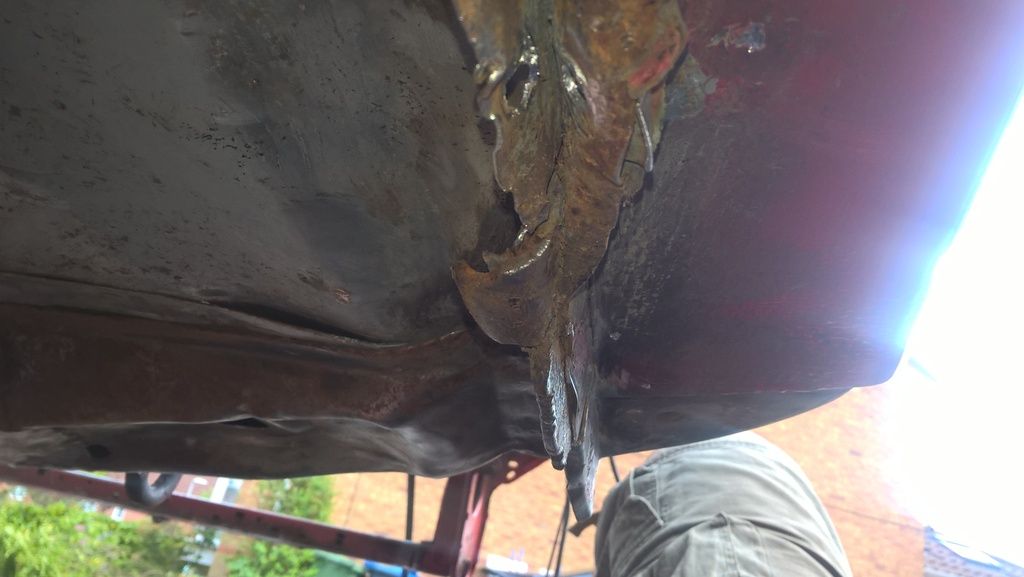
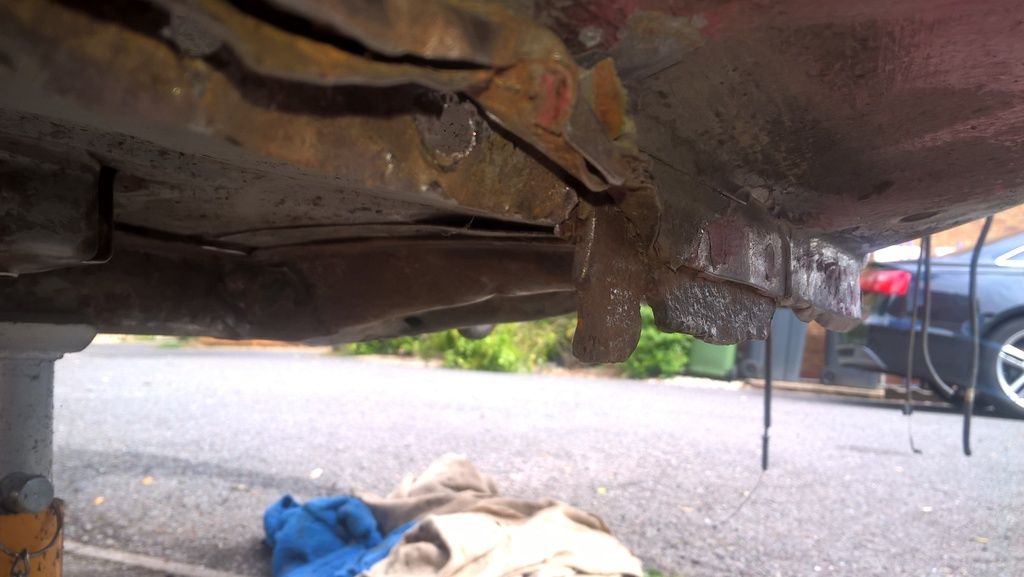
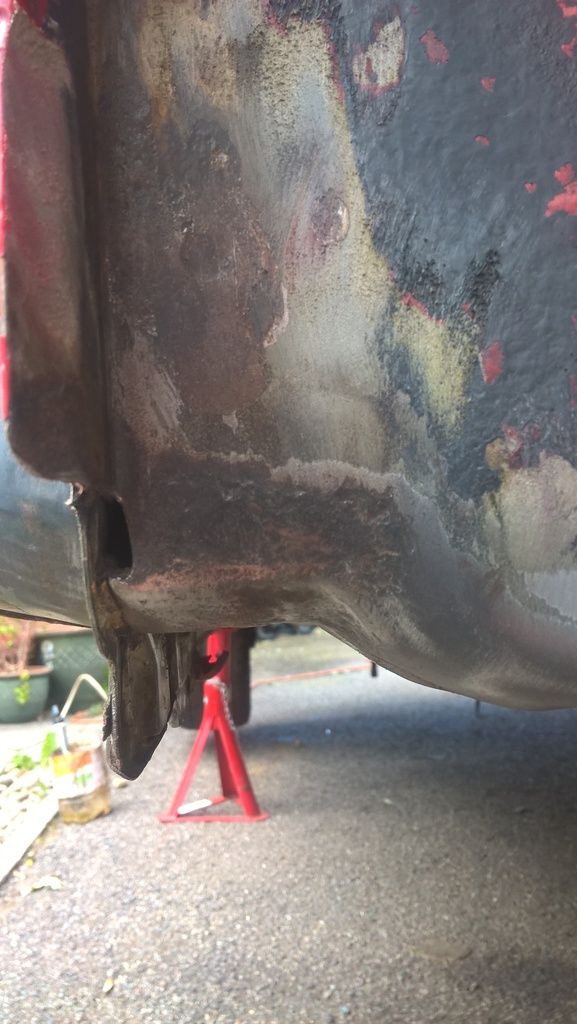
Also sorted this bit of the jacking point. Goodness only knows how it managed to get this bent. It's probably ¼” thick…..still, a bit of heat and the trusty mole grips and it's about there…


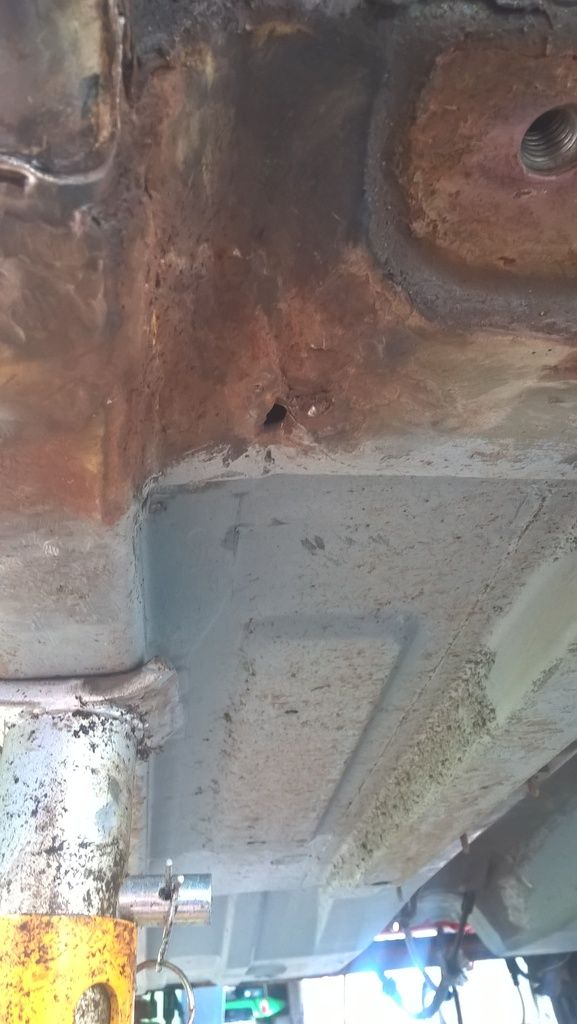
Then got busy cleaning up the surface rust and some scabby bits I could see at the bottom of the chassis leg….


A very small amount of welding required there….not sure if this hole is intentional either…


Was behind the factory seam sealant so who knows….anyway, that was all I did in the car itself today, currently got the zinc plating kit back out and fired up so will see how that goes….

________________________________________

Cherry Red Rallye .... On going OEM spec resto

China Blue GTi6 .... Weekend toy

Black 208 GTi .... Wife's car now

Silver BMW 550i.... The executive missile

Posted 21st Aug 2016 at 18:05
cully

Seasoned Pro

Location: Cullompton

Registered: 12 Jun 2013

Posts: 1,093

Status: Offline

Post #285
i think next MOT i will be having some box or angle welded in to reinforce the jack point as that's the main point i use to lift the car
Posted 21st Aug 2016 at 19:45
Ben_W

Formerly gpm

Location: Lutterworth

Registered: 01 Sep 2007

Posts: 2,941

Status: Offline

Post #286
The mangled bit was just behind the jacking point Cully. Think someone had taken it to Stevie Wonder Tyres Inc....god knows how they bent the bit of the jacking point though.....

________________________________________

Cherry Red Rallye .... On going OEM spec resto

China Blue GTi6 .... Weekend toy

Black 208 GTi .... Wife's car now

Silver BMW 550i.... The executive missile

Posted 21st Aug 2016 at 19:50
mik

Seasoned Pro

Location: Kent

Registered: 17 Feb 2011

Posts: 2,100

Status: Offline

Post #287
Someone jacked my car up on the sill before I bought it and the resulting dent resulted in a rust hole in the sill I had to have cut out. After fixing I blew Electrox in there with a lance (both sides of the central stiffener) so it covered any welding inside and also soaked between the 3 spot-welded layers, then followed that up with Dynax 50 wax.

Interesting to see your caved in cross-members. I'd say most 306s are like this now. I don't know why people seem to think this is an ideal place to jack the car up when there is a nice strong subframe a few inches away. Problem is the rust starts quickly and a hole appears in relatively short order if the bare meal is exposed.

I've ranted about this a few times as mine have been done on one side before I bought it, and then both sides twice while I've owned it as a garage caved in the new ones they had fitted a couple of years earlier. They did them again for free though, to their credit.

________________________________________

Cherry Rallye SOLD

Posted 23rd Aug 2016 at 22:51
Ben_W

Formerly gpm

Location: Lutterworth

Registered: 01 Sep 2007

Posts: 2,941

Status: Offline

Post #288
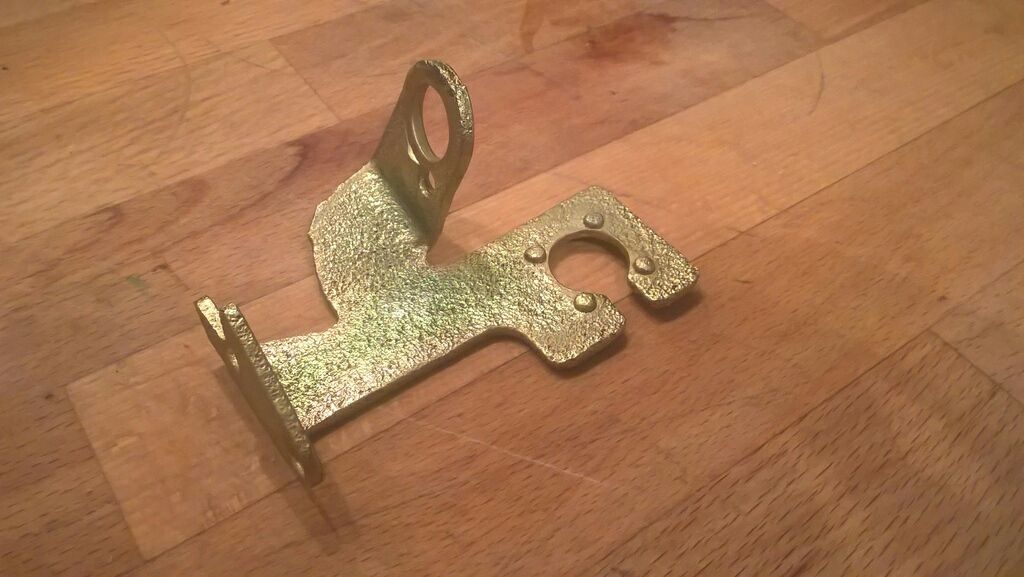
Starting to get the hang of this zinc plating lark....

________________________________________

Cherry Red Rallye .... On going OEM spec resto

China Blue GTi6 .... Weekend toy

Black 208 GTi .... Wife's car now

Silver BMW 550i.... The executive missile

Posted 29th Aug 2016 at 10:41
cully

Seasoned Pro

Location: Cullompton

Registered: 12 Jun 2013

Posts: 1,093

Status: Offline

Post #289
that looks good Ben, was that done with a kit you can buy or chemicals and bits you've put together yourself?
Posted 29th Aug 2016 at 10:47
Ben_W

Formerly gpm

Location: Lutterworth

Registered: 01 Sep 2007

Posts: 2,941

Status: Offline

Post #290
Done with a kit from Gateros plating Paul. Still not quite right with the method yet as the yellow finish is rubbing off in a couple of places.....trying to figure why.

________________________________________

Cherry Red Rallye .... On going OEM spec resto

China Blue GTi6 .... Weekend toy

Black 208 GTi .... Wife's car now

Silver BMW 550i.... The executive missile

Posted 29th Aug 2016 at 11:16
welshpug!

Capt Pedantic

Location: Bigend, Wales.

Registered: 27 Mar 2007

Posts: 25,817

Status: Offline

Post #291
a lot of cars are too low for a standard garage jack to get under to the subframe, though I agree I dont get how they manage to miss the sill, yet at the rear there is nothing but the sill or the beam to hack on!

________________________________________

need a part number? get on here - http://public.servicebox.peugeot.com

Bring on the Trumpets.

Posted 29th Aug 2016 at 11:39
deeturbo

Regular

Location: Leighton Buzzard

Registered: 22 Feb 2003

Posts: 283

Status: Offline

Post #292
Ben_W wrote:
Done with a kit from Gateros plating Paul. Still not quite right with the method yet as the yellow finish is rubbing off in a couple of places.....trying to figure why.


Could it be coming of because there was something contaminating the piece your trying to plate?

How have you cleaned it before plating?

I have no experience with plating but I would like to try it to.
Posted 29th Aug 2016 at 12:28
Ben_W

Formerly gpm

Location: Lutterworth

Registered: 01 Sep 2007

Posts: 2,941

Status: Offline

Post #293
Don't think there is any contamination. Would have plated with the zinc first if there was......

________________________________________

Cherry Red Rallye .... On going OEM spec resto

China Blue GTi6 .... Weekend toy

Black 208 GTi .... Wife's car now

Silver BMW 550i.... The executive missile

Posted 29th Aug 2016 at 12:36
cully

Seasoned Pro

Location: Cullompton

Registered: 12 Jun 2013

Posts: 1,093

Status: Offline

Post #294
i belive the colour is voltage dependant
Ie:- changing the plating voltage changes the colour
Posted 29th Aug 2016 at 12:45
Ben_W

Formerly gpm

Location: Lutterworth

Registered: 01 Sep 2007

Posts: 2,941

Status: Offline

Post #295
Its not cully.

Once the plating is done, you take the part out and dip clean in clean water. Then goes in to the clear/blue passivate for 20-40 seconds, then dip clean again, then into the yellow passivate for 60-90s. How long you leave it determines how deep a yellow colour it goes.

Ita the differing passivates that give the differing end colours.

________________________________________

Cherry Red Rallye .... On going OEM spec resto

China Blue GTi6 .... Weekend toy

Black 208 GTi .... Wife's car now

Silver BMW 550i.... The executive missile

Posted 29th Aug 2016 at 14:14
deeturbo

Regular

Location: Leighton Buzzard

Registered: 22 Feb 2003

Posts: 283

Status: Offline

Post #296
Clean water, is the tap or distilled?
Posted 29th Aug 2016 at 15:48
Ben_W

Formerly gpm

Location: Lutterworth

Registered: 01 Sep 2007

Posts: 2,941

Status: Offline

Post #297
Tap

________________________________________

Cherry Red Rallye .... On going OEM spec resto

China Blue GTi6 .... Weekend toy

Black 208 GTi .... Wife's car now

Silver BMW 550i.... The executive missile

Posted 29th Aug 2016 at 16:01
welshpug!

Capt Pedantic

Location: Bigend, Wales.

Registered: 27 Mar 2007

Posts: 25,817

Status: Offline

Post #298
that's likely to be it.

________________________________________

need a part number? get on here - http://public.servicebox.peugeot.com

Bring on the Trumpets.

Posted 29th Aug 2016 at 18:07
Ben_W

Formerly gpm

Location: Lutterworth

Registered: 01 Sep 2007

Posts: 2,941

Status: Offline

Post #299
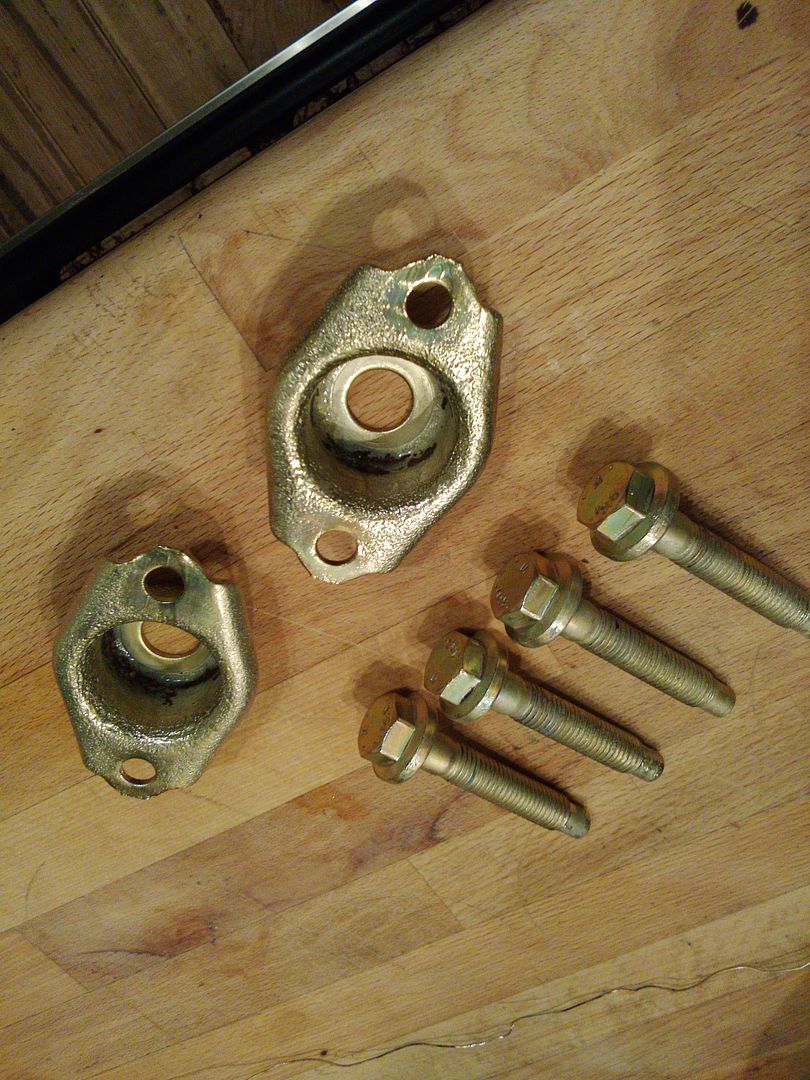
I'm not sure Mei......did a bit more today and I think I've got the process nailed now. These 4 bolts and two subframe mounts t cups have come out very well indeed. No rubbing off on these..... Think it's just technique perfection required!

________________________________________

Cherry Red Rallye .... On going OEM spec resto

China Blue GTi6 .... Weekend toy

Black 208 GTi .... Wife's car now

Silver BMW 550i.... The executive missile

Posted 29th Aug 2016 at 22:30
mocinim

Seasoned Pro

Location: The Darkside of bedford :)

Registered: 09 Jan 2015

Posts: 2,307

Status: Offline

Post #300
FYI the bolts are available as facelift still i believe even though they will be listed as no longer available for the rallye

They use the same bolts for berlingo and around 6 other different peugeot models they are identical

Just incase your having trouble sourcing

________________________________________

BLACK RALLYE - phoenix
WHITE RALLYE - valliant

http://public.servicebox.peugeot.com/

https://www.gov.uk/check-mot-history
Posted 29th Aug 2016 at 23:30

Pages (17): first .. 11 [12] 13 .. last

All times are GMT. The time is now 10:14

The Peugeot GTi-6 & Rallye Owners Club - ©2024 all rights reserved.

Please Note: The views and opinions found herein are those of individuals, and not of The Peugeot 306 GTi-6 & Rallye Owners Club or any individuals involved.
No responsibility is taken or assumed for any comments or statements made on, or in relation to, this website. Please see our updated privacy policy.