displaying posts 1 to 19 of 19

Author Subject: rear beam complete rebuild
pugheaven

Seasoned Pro

Location: Fareham

Registered: 17 Dec 2006

Posts: 4,602

Status: Offline

Post #1
Hi iv looked at every thread that talks about rebuilding the rear beam including the faq but none go into as much detail as I will need, I would love to rebuild it myself but without all the info I think i will become stuck pretty quickly Sad

As I would like to get the dimma on the ground asap iv asked miles and he can't do it until the end of August, jord is just too far away for me to drive to him so I'm a bit stuck and don't know who to trust and that will do a good job Sad

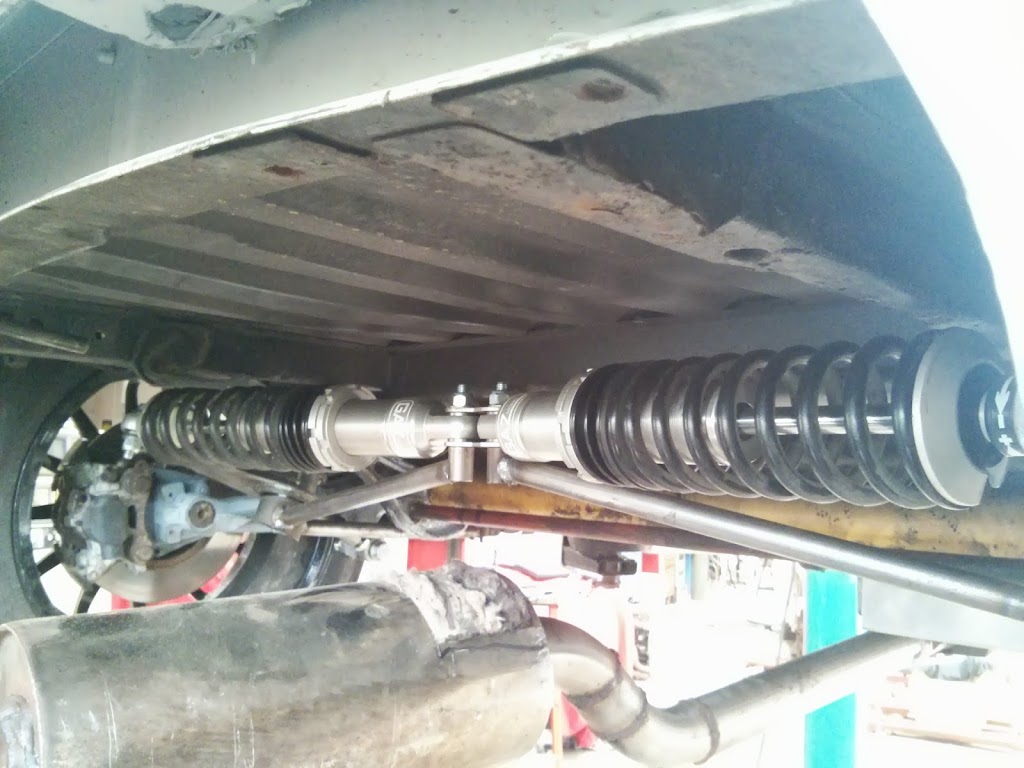
As you can see in the picture iv got new everything and have no idea where it all goes


I don't even think giving it to Peugeot to do will fill me with confidence as I would imagine it was a long time ago since they built one!

Does any one have a step by step guide as to where every part goes?
Posted 17th Jul 2014 at 11:41
rikky 🦔

Location: cheshire

Registered: 28 Feb 2004

Posts: 26,793

Status: Offline

Post #2
try the 205drivers website, there's a good guide on there for pics etc

http://www.205gtidrivers.com/articles.html/_/articles-guides/brakes-suspension-steering/rear-beam-refurbishment-guide-r66

________________________________________

306 rallye reproduction decals (full sets/individual decals) | 306 b-pillar textured vinyl weatherstrips
306 slam panel esso stickers | 306 yellow / orange / pension fund red side door badges
gti6 inlet manifold badges | 306 rear boot badges (p2/p3)
winner of Extraction of toys from prams with outstanding vigour award 2009 [source: gti6 owners club]
Posted 17th Jul 2014 at 11:45
dangti6

aka JKshooter

Location: Taunton, Somerset

Registered: 15 Jun 2006

Posts: 10,305

Status: Offline

Post #3
The hard work has been done by having it apart.

The Haynes has diagrams which will help as does the 205 forum as Rikky mentions.

Print off the service box diagrams so you can see which order bits go.

________________________________________

  • Senior Test Automation Engineer for the 306GTi6 Owners Club Forum Wizard


  • Posted 17th Jul 2014 at 11:47
    jeffers Forum Admin

    Location: Leeds

    Registered: 14 Dec 2003

    Posts: 3,702

    Status: Offline

    Post #4
    Or here too, i used this for mine......
    http://www.306gti6.com/forum/showthread.php?id=80349&page=1

    ________________________________________

    Team Running Engine again!
    Team Negative Camber!
    My Budget track engine build thread!
    Now appearing at a Trackday near you!!Hyper Hyper
    Posted 17th Jul 2014 at 11:47
    dangti6

    aka JKshooter

    Location: Taunton, Somerset

    Registered: 15 Jun 2006

    Posts: 10,305

    Status: Offline

    Post #5
    If you can get the bits to Dorset, Stef may be willing to assemble it for you.

    http://www.306gti6.com/viewprofile.php?id=15158

    He's built dozens of beams - and recently mine Flowers

    ________________________________________

  • Senior Test Automation Engineer for the 306GTi6 Owners Club Forum Wizard


  • Posted 17th Jul 2014 at 11:57
    pugheaven

    Seasoned Pro

    Location: Fareham

    Registered: 17 Dec 2006

    Posts: 4,602

    Status: Offline

    Post #6
    Brilliant info but it confuses me as to why some trailing arm shafts are pressed in flush with the end of the trailing arm and some are 5mm recessed?
    Posted 17th Jul 2014 at 11:57
    dangti6

    aka JKshooter

    Location: Taunton, Somerset

    Registered: 15 Jun 2006

    Posts: 10,305

    Status: Offline

    Post #7
    Some are right, some are wrong. Same old story - never go by what you see in some pics.

    I had the same query recently. 2mm I was told. You need to allow for the Yellow ring around the ARB flag to squash against the shaft so water doesn't get in.

    The ring is ~ 5mm, so a 5mm gap won't really allow it to do it's job properly.

    ________________________________________

  • Senior Test Automation Engineer for the 306GTi6 Owners Club Forum Wizard


  • Posted 17th Jul 2014 at 12:02
    pugheaven

    Seasoned Pro

    Location: Fareham

    Registered: 17 Dec 2006

    Posts: 4,602

    Status: Offline

    Post #8
    jeffers wrote:
    Or here too, i used this for mine......
    http://www.306gti6.com/forum/showthread.php?id=80349&page=1


    Doesn't give me anywhere as much info as I need!

    I stripped this beam years ago and remember it being a complete nightmare

    Posted 17th Jul 2014 at 12:02
    rikky 🦔

    Location: cheshire

    Registered: 28 Feb 2004

    Posts: 26,793

    Status: Offline

    Post #9
    what you really want is a colin satchell pushrod setup Hyper

    ________________________________________

    306 rallye reproduction decals (full sets/individual decals) | 306 b-pillar textured vinyl weatherstrips
    306 slam panel esso stickers | 306 yellow / orange / pension fund red side door badges
    gti6 inlet manifold badges | 306 rear boot badges (p2/p3)
    winner of Extraction of toys from prams with outstanding vigour award 2009 [source: gti6 owners club]
    Posted 17th Jul 2014 at 12:03
    pugheaven

    Seasoned Pro

    Location: Fareham

    Registered: 17 Dec 2006

    Posts: 4,602

    Status: Offline

    Post #10
    Your right I do Sad
    Posted 17th Jul 2014 at 12:05
    dangti6

    aka JKshooter

    Location: Taunton, Somerset

    Registered: 15 Jun 2006

    Posts: 10,305

    Status: Offline

    Post #11
    pugheaven wrote:
    jeffers wrote:
    Or here too, i used this for mine......
    http://www.306gti6.com/forum/showthread.php?id=80349&page=1


    Doesn't give me anywhere as much info as I need!

    I stripped this beam years ago and remember it being a complete nightmare


    Write a list of questions you have about the specifics which are concerning you.

    PM said list to Welshpug.

    ________________________________________

  • Senior Test Automation Engineer for the 306GTi6 Owners Club Forum Wizard


  • Posted 17th Jul 2014 at 12:07
    pugheaven

    Seasoned Pro

    Location: Fareham

    Registered: 17 Dec 2006

    Posts: 4,602

    Status: Offline

    Post #12
    Don't get me wrong it's a bloody good guide however it doesn't cover everything as its not a full on strip down rebuild guide, am I correct in thinking that some beams have a spacer on the stub axle before the hub bearing and some don't?
    It's these kind of things that makes me think it's easier to give it to someone who has done plenty before...
    It's only a 2 hour drive to Dorset so that's an option to consider Thumbs up
    Posted 17th Jul 2014 at 12:16
    welshpug!

    Capt Pedantic

    Location: Bigend, Wales.

    Registered: 27 Mar 2007

    Posts: 25,817

    Status: Offline

    Post #13
    Why would you change a wheel bearing when rebuilding a beam unless its worn out?!

    all disc bearings have a spacer.

    ________________________________________

    need a part number? get on here - http://public.servicebox.peugeot.com

    Bring on the Trumpets.

    Posted 17th Jul 2014 at 12:53
    jeffers Forum Admin

    Location: Leeds

    Registered: 14 Dec 2003

    Posts: 3,702

    Status: Offline

    Post #14
    I agree here, write down a list of what ur unsure of and pm Welshpug or myself, seriously its not half as difficult as its being made out to be!

    ________________________________________

    Team Running Engine again!
    Team Negative Camber!
    My Budget track engine build thread!
    Now appearing at a Trackday near you!!Hyper Hyper
    Posted 17th Jul 2014 at 12:58
    dangti6

    aka JKshooter

    Location: Taunton, Somerset

    Registered: 15 Jun 2006

    Posts: 10,305

    Status: Offline

    Post #15
    Or post it on here so others can see the answers when in a similar position in the future Thumbs up

    ________________________________________

  • Senior Test Automation Engineer for the 306GTi6 Owners Club Forum Wizard


  • Posted 17th Jul 2014 at 13:04
    jeffers Forum Admin

    Location: Leeds

    Registered: 14 Dec 2003

    Posts: 3,702

    Status: Offline

    Post #16
    dangti6 wrote:
    Or post it on here so others can see the answers when in a similar position in the future Thumbs up

    That as well!! LOL

    ________________________________________

    Team Running Engine again!
    Team Negative Camber!
    My Budget track engine build thread!
    Now appearing at a Trackday near you!!Hyper Hyper
    Posted 17th Jul 2014 at 13:10
    pugheaven

    Seasoned Pro

    Location: Fareham

    Registered: 17 Dec 2006

    Posts: 4,602

    Status: Offline

    Post #17
    I'm replacing every thing hence the bearing question, I'm not trying to be difficult and I'm sure it is easier than I'm making it out to be
    Posted 17th Jul 2014 at 13:10
    welshpug!

    Capt Pedantic

    Location: Bigend, Wales.

    Registered: 27 Mar 2007

    Posts: 25,817

    Status: Offline

    Post #18
    Yup, fit spacer, fit brg, fir washer and nut,, torque nut, stake nut, fit grease cap.

    done

    ________________________________________

    need a part number? get on here - http://public.servicebox.peugeot.com

    Bring on the Trumpets.

    Posted 17th Jul 2014 at 13:16
    stef306

    Regular

    Location: lyme regis

    Registered: 20 Sep 2009

    Posts: 201

    Status: Offline

    Post #19
    dangti6 wrote:
    If you can get the bits to Dorset, Stef may be willing to assemble it for you.

    http://www.306gti6.com/viewprofile.php?id=15158

    He's built dozens of beams - and recently mine Flowers


    thanks dan i have replied to ollies message hopefully we can work something out.

    ________________________________________

    1990 205 gti6 supercharged
    Posted 19th Jul 2014 at 12:56

    All times are GMT. The time is now 01:34

    The Peugeot GTi-6 & Rallye Owners Club - ©2024 all rights reserved.

    Please Note: The views and opinions found herein are those of individuals, and not of The Peugeot 306 GTi-6 & Rallye Owners Club or any individuals involved.
    No responsibility is taken or assumed for any comments or statements made on, or in relation to, this website. Please see our updated privacy policy.