Post #126
Put 2 wheel bolts back in then put a strong part diagonally between then and jam it against the ground that will stop it turning mate ________________________________________
Old pugs don't die they just get faster


|
| Author | Subject: Ph.1 Diablo |
|
Seasoned Pro  Location: Oxford Registered: 17 Sep 2013 Posts: 1,968 Status: Offline |
Post #126
Put 2 wheel bolts back in then put a strong part diagonally between then and jam it against the ground that will stop it turning mate ________________________________________ Old pugs don't die they just get faster |
|
|
|
|
Seasoned Pro  Location: Leicestershire Registered: 15 Jan 2013 Posts: 2,473 Status: Offline |
Post #127
Good idea thanks!Not in a huge rush to drop the rear beam as my rear shocks haven't arrived yet. Also need to sort springs for the front so I can get on with that. Finally, I'll need a new jack because a) the one I have is terrible and frankly pretty terrifying to use, the whole chassis of the thing twists right up and makes all sorts of noises and  once this has dropped 30mm it won't fit under the car. once this has dropped 30mm it won't fit under the car.  ________________________________________ 61k miles Ph.1 Diablo '6 Project Thread |
|
|
|
|
Seasoned Pro Location: Leicestershire Registered: 15 Jan 2013 Posts: 2,473 Status: Offline |
Post #128
Is there a trick to removing the rear shocks? Got the bolts all off and other than that I'm ready to drop the beam and put the donor one on. They seem to be a bit blocked from coming out by the metal arms that bolt to the boot floor and won't slide sideways off the bottom stud without the top of the shock moving.________________________________________ 61k miles Ph.1 Diablo '6 Project Thread |
|
|
|
|
Seasoned Pro Location: Oxford Registered: 17 Sep 2013 Posts: 1,968 Status: Offline |
Post #129
Sounds like you may need to get the grinder out ________________________________________ Old pugs don't die they just get faster |
|
|
|
|
Seasoned Pro Location: Leicestershire Registered: 15 Jan 2013 Posts: 2,473 Status: Offline |
Post #130
Surely not, there must be a way of removing them before dropping the beam as that's what everyone does!Edit: Nevermind found the FAQ. The bottom bolt can be knocked out. D'oh.  ________________________________________ 61k miles Ph.1 Diablo '6 Project Thread |
|
|
|
|
Capt Pedantic  Location: Bigend, Wales. Registered: 27 Mar 2007 Posts: 25,817 Status: Offline |
Post #131
that or compress them.________________________________________ need a part number? get on here - http://public.servicebox.peugeot.comBring on the Trumpets. |
|
|
|
|
Seasoned Pro 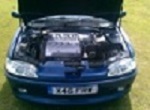 Location: Pontypool Registered: 01 Sep 2006 Posts: 1,839 Status: Offline |
Post #132
I just drop beams off whole then anything you need to remove is easier when it's on the floor I find.Nice to see a phase 1 being looked after so well, getting quite rare now certainly in this condition ________________________________________ Ryan |
|
|
|
|
Seasoned Pro Location: Leicestershire Registered: 15 Jan 2013 Posts: 2,473 Status: Offline |
Post #133
Kind of difficult to compress it when I can't really get at the top. Knocking the bolt out will be great.I am just swapping the whole beam. Thanks, got quite a few things that need sorting sadly but I'm getting through them slowly but surely. ________________________________________ 61k miles Ph.1 Diablo '6 Project Thread |
|
|
|
|
aka JKshooter  Location: Taunton, Somerset Registered: 15 Jun 2006 Posts: 10,305 Status: Offline |
Post #134
If you are swapping the beam, why not make life easier and remove it as is and tackle the bolts on the ground?________________________________________  |
|
|
|
|
Seasoned Pro Location: Leicestershire Registered: 15 Jan 2013 Posts: 2,473 Status: Offline |
Post #135
I probably could have done it that way but it is basically done now other than being dropped off and swapped. I've kept all the brake lines connected and have just removed calipers.I've read (and it looks like it is possible) to just drop the beam tube & trailing arms with hubs etc. off the metal arms that mount to the boot floor, and swap just that bit which saves buggering around with mounts for now. Every time I do a job for the first time I learn that that probably wasn't the easiest way. ________________________________________ 61k miles Ph.1 Diablo '6 Project Thread |
|
|
|
|
Seasoned Pro Location: Leicestershire Registered: 15 Jan 2013 Posts: 2,473 Status: Offline |
Post #136
The postman came and gave me this box today: In this box were these:  ________________________________________ 61k miles Ph.1 Diablo '6 Project Thread |
|
|
|
|
Senior User  Location: Birmingham Registered: 23 Jun 2013 Posts: 994 Status: Offline |
Post #137
Very nice Luke, we like yellow. ________________________________________ Bianca 306 Rallye.Mondeo Titanium X. |
|
|
|
|
Seasoned Pro Location: Leicestershire Registered: 15 Jan 2013 Posts: 2,473 Status: Offline |
Post #138
Thanks! Finally managed to get a bit of free time over the easter weekend and then during this short week. That's going to disappear as things go back to normal though!It would be good to see the rallye again. Really want to make it to pugfest or something this summer as I couldn't last year but I'm holding off getting tickets in case I have to work abroad. Lifted the rebuilt and lowered rear beam onto the car, which was a bit tricky as it is a little heavy:  I then repaired the compensator, as instead of the standard sprng assembly it had a piece of threaded SS rod and two tiny springs bouncing around on it. I didn't get a picture of the old 'compensator'. I test-fit the shocks. I think I may have put too many washers in though, I've got one either side of the shock (at the bottom), but I'm beginning to think that there are none either side of the shock here and there should be just one between the nut and the brackets for the compensator and flexi hose?  Likewise, on the other side, should there actually just be one washer between the flexi hose bracket and the nut instead of one either side of the shock? Also, pretty sure the flexi hose bracket needs turning backwards as I don't think the brake line should be hanging down like that:  They are only on loosely as I didn't have time to keep tweaking to get everything lined up perfectly and in the right place as the light was fading. It is good to be at a stage where the rear is just about done! I'm hoping that the fronts will be fairly straightforward. ________________________________________ 61k miles Ph.1 Diablo '6 Project Thread |
|
|
|
|
Seasoned Pro Location: Leicestershire Registered: 15 Jan 2013 Posts: 2,473 Status: Offline |
Post #139
Tweaked brake lines etc. and mounted shocks correctly. Anyone know the shock mounting bolt torques, also rear brake caliper torques while we're at it? Could do with picking up a Haynes manual really.Also, I painted up some stuff:   I gave the rear calipers their first coat of paint as well, need to finish them off today. Also need to wind the rear caliper pistons back in which I'm not particularly looking forward to as I've heard it can be a pain, but I'll give it a go! Also been struggling to remove the cat, just a bit of a pain getting a spanner on the top of the bolt. Got new Lemforder droplinks in the post, and SKF topmount kits. ________________________________________ 61k miles Ph.1 Diablo '6 Project Thread |
|
|
|
|
Seasoned Pro  Location: Bristol Registered: 20 Apr 2013 Posts: 5,212 Status: Offline |
Post #140
Looks Great  |
|
|
|
|
Seasoned Pro Location: Leicestershire Registered: 15 Jan 2013 Posts: 2,473 Status: Offline |
Post #141
Thanks. I've been following your project thread with interest as well.Outsides of rear calipers painted. Just need to wind pistons back in and reassemble them. Then I can carry on with the front and the cat.  Brand new Eibach springs have been ordered. ________________________________________ 61k miles Ph.1 Diablo '6 Project Thread |
|
|
|
|
Seasoned Pro Location: Leicestershire Registered: 15 Jan 2013 Posts: 2,473 Status: Offline |
Post #142
Brakes put back together but the rear discs are very warped: The discs and pads seem to be very cheap, low quality ones so I've ordered brembo discs and pads all round. While I was away for the weekend the postman turned up with more brand new shinies.  ________________________________________ 61k miles Ph.1 Diablo '6 Project Thread |
|
|
|
|
Seasoned Pro Location: Leicestershire Registered: 15 Jan 2013 Posts: 2,473 Status: Offline |
Post #143
Been attacking this today. Took me all day to get the front left strut off the car due to being rained on fairly frequently and having to pop to town.Began building up new strut for the front left but the spring compressor popped off and the spring hit my hand pretty hard so lost a bit of confidence, I'll resume very gingerly tomorrow.  ________________________________________ 61k miles Ph.1 Diablo '6 Project Thread |
|
|
|
|
Seasoned Pro  Location: Melksham. Wiltshire. Registered: 08 Dec 2009 Posts: 2,516 Status: Offline |
Post #144
What spring compressors are you using?! You're lucky it didn't hit you in the face. ________________________________________ 2005 Peugeot 206 GTI 1802008 BMW K1200R |
|
|
|
 Location: cheshire Registered: 28 Feb 2004 Posts: 26,793 Status: Offline |
Post #145
they go through the roof too  ________________________________________ 306 rallye reproduction decals (full sets/individual decals) | 306 b-pillar textured vinyl weatherstrips306 slam panel esso stickers | 306 yellow / orange / pension fund red side door badges gti6 inlet manifold badges | 306 rear boot badges (p2/p3) winner of Extraction of toys from prams with outstanding vigour award 2009 [source: gti6 owners club] |
|
|
|
|
Seasoned Pro 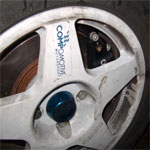 Location: Halifax Registered: 31 Aug 2007 Posts: 1,565 Status: Offline |
Post #146
Hate compressing springs twitchy business ________________________________________ 1997 P1 Gti 6 Charged |
|
|
|
|
Seasoned Pro Location: Leicestershire Registered: 15 Jan 2013 Posts: 2,473 Status: Offline |
Post #147
Ones borrowed from a friend. I made sure the spring was pointed so that it couldn't go upwards only along the floor.It made a hole in my glove and part of my plam is a bit swollen, and that was just it going past my hand lol. ________________________________________ 61k miles Ph.1 Diablo '6 Project Thread |
|
|
|
|
Seasoned Pro Location: Leicestershire Registered: 15 Jan 2013 Posts: 2,473 Status: Offline |
Post #148
To clarify, I kept it as safe as possible by using a pair on opposite sides of the spring, only one popped off and even the force of that was enough to bruise my palm and swell it a bit, and fire the spring cup a couple of feet, one side of the spring expanded maybe 3cm.Anyway, this morning while treating the spring like an unexploded bomb I got the front left strut all built up. Sadly rain has now stopped play so got to wait a bit to start removing the other side!  ________________________________________ 61k miles Ph.1 Diablo '6 Project Thread |
|
|
|
|
Seasoned Pro Location: Leicestershire Registered: 15 Jan 2013 Posts: 2,473 Status: Offline |
Post #149
Things to do:Fit new rear beam with new rear shocks DONE Paint rear calipers and other bits DONE Fit front suspension Paint front calipers Fit brakes front and rear and flush fluid Refit all the now repainted things I removed earlier Remove cat and get the outlet pipe welded (cat 75% off but bolts not budging any more )Wait for new steering wheel in the post and fit it Get tyres swapped onto TD wheels Fit new steering wheel and boss Give it a really good clean In the future I'll tidy up the engine bay a bit and swap engine looms as well but I'd like to drive the thing for a bit first. ________________________________________ 61k miles Ph.1 Diablo '6 Project Thread |
|
|
|
|
Seasoned Pro Location: Leicestershire Registered: 15 Jan 2013 Posts: 2,473 Status: Offline |
Post #150
Front struts all fitted. Track rod ends are a pain though, one is 75% undone but now just spins, with mole grips and when jacked up, the other is fine but won't do back up even when jacked up. :  ________________________________________ 61k miles Ph.1 Diablo '6 Project Thread |
|
|
|
The Peugeot GTi-6 & Rallye Owners Club - ©2024 all rights reserved.

Please Note: The views and opinions found herein are those of individuals, and not of The Peugeot 306 GTi-6 & Rallye Owners Club or any individuals involved.
No responsibility is taken or assumed for any comments or statements made on, or in relation to, this website. Please see our updated privacy policy.