Post #276
Nice updates as usual mate! 
________________________________________
Goldie the track car.


|
| Author | Subject: Tea Boy's 6 |
|
Seasoned Pro  Location: DoncastAAAAARGH Registered: 13 Jan 2008 Posts: 4,639 Status: Offline |
|
|
|
|
|
Senior User  Location: Market Rasen Registered: 27 Feb 2010 Posts: 632 Status: Offline |
Post #277
prism7guy wrote: Nice updates as usual mate! Cheers mate. I was in Donny today to see my Dad. (I'm Donny, born and bred, just living in exile in Lincolnshire) Day666 wrote: What you waiting for Mark ?......get on with it  See below.  Let's go then... First job is to fit the new seal onto the pinion shaft below the valve block. To aid this I used some red rubber grease. 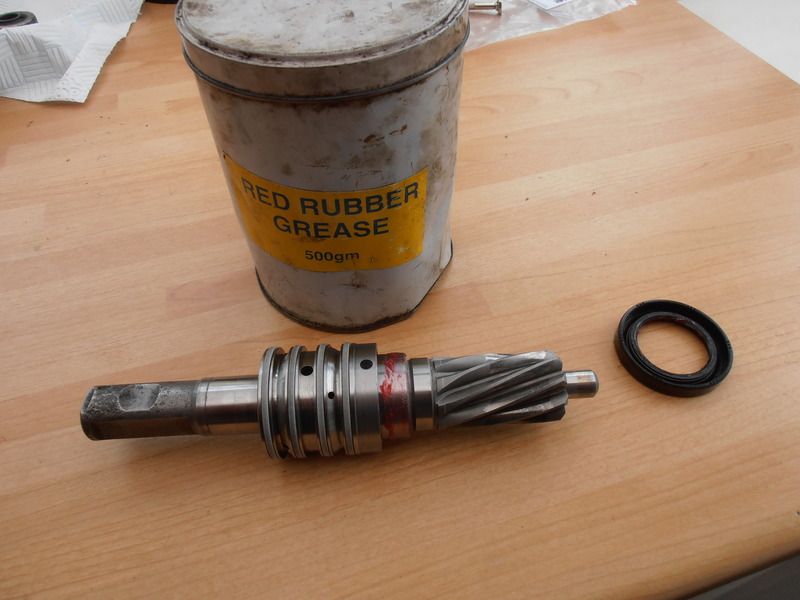 I am a big fan of rubber lube... You have to carefully tease the seal on as you are effectively fitting it the wrong way round, the rubber grease helps here and it also means you won't be having a dry seal running on a dry shaft when you are done. Then on with the new bearing. 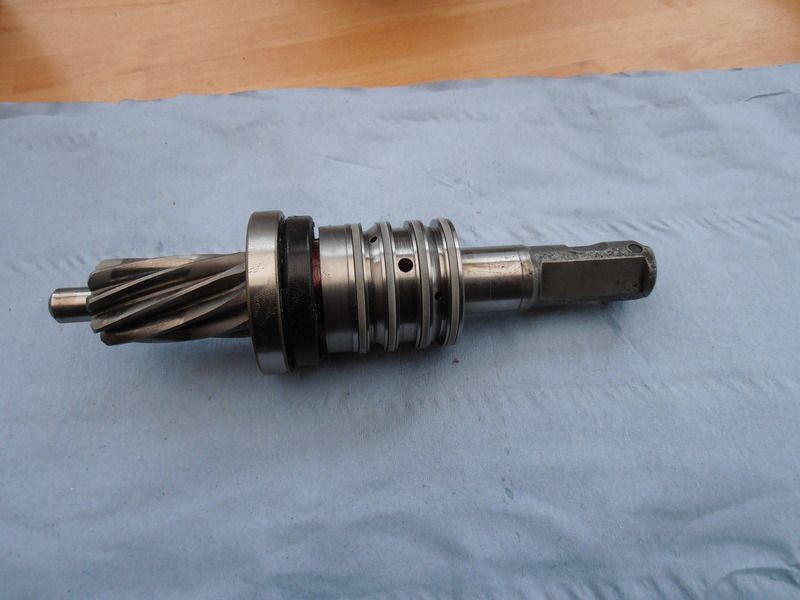 Then you have to carefully press the lower of the two top seals in, followed by the INA bearing. 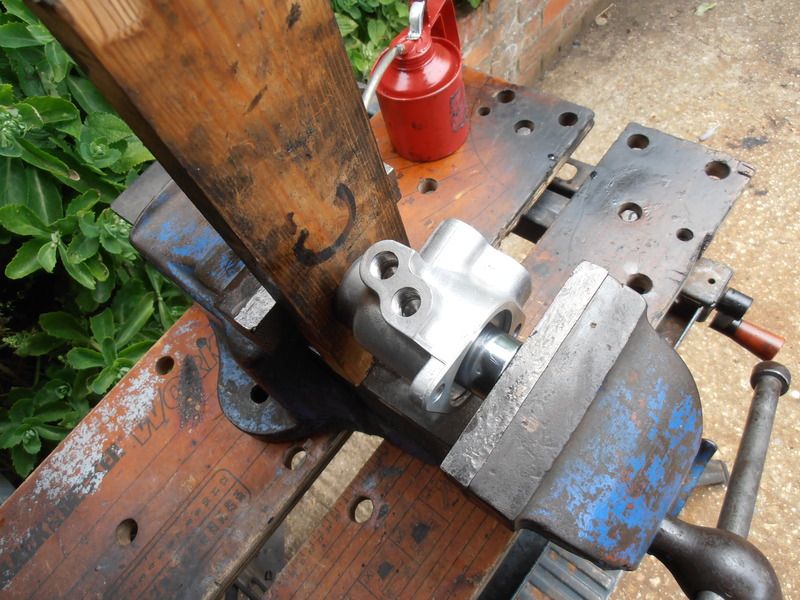 The upper dirt seal goes in from the top.  We are almost ready to insert the pinion back into its housing, but first lube the seals with some rubber lube and the valve block and housing are lubed with ATF. Then you can stick it in.  You can see how the bearing sticks out of the bottom of the housing here. Right, now we had better get the rack ready for it. There is a nylon bush in the end of the rack housing at the opposite side from the pinion. 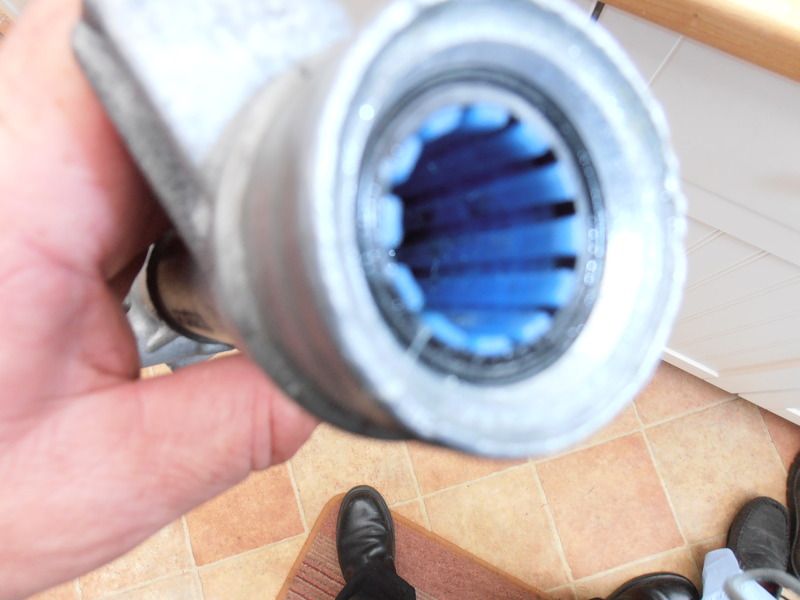 You see those longitudinal grooves in the bush? You must NOT let them get filled with grease. The purpose of those is to allow the air inside the rack gator displace to the other side when the rack moves. You can put plenty of grease on the geared end of the rack though. The stuff inside mine was all dried out like toffee when I stripped it down. Before you fit the rack back into its housing fill the bottom pinion needle bearing with grease whilst you can still get at it. Then put the new gaitor on the rack and slide it into the housing dry.  Once it is in you can then pump some grease in from the other end to lube the geared end. I put it in then spread it into place with a paint mixing stick. Then you can put the pinion back in by carefully tightening the two cap screws evenly to re seat the bearing. The screws are secured with Loctite 242  So next is the thrust piston, you remembered the order they go in, dont you? O ring. 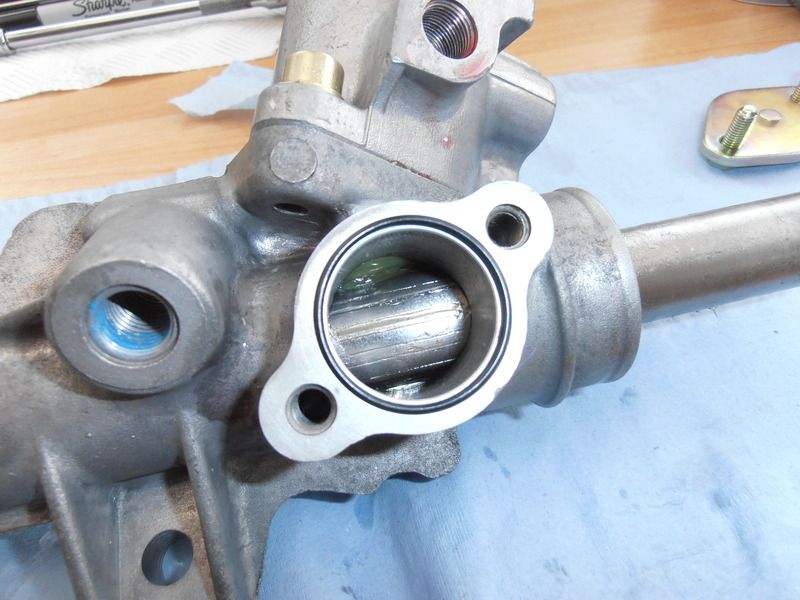 Piston with spring inside, shim washer on the outside.  Stick the other three shims onto the top plate with grease then bolt it on, screws loctited again.  With the main rack assembly back together we just need new track rods.  I have no idea what that odd looking washer is for and I don't recall taking any out with the old ones so I didn't use them. The trackrods are loctited in, of course. With all this it would be rude not to have new trackrod ends. 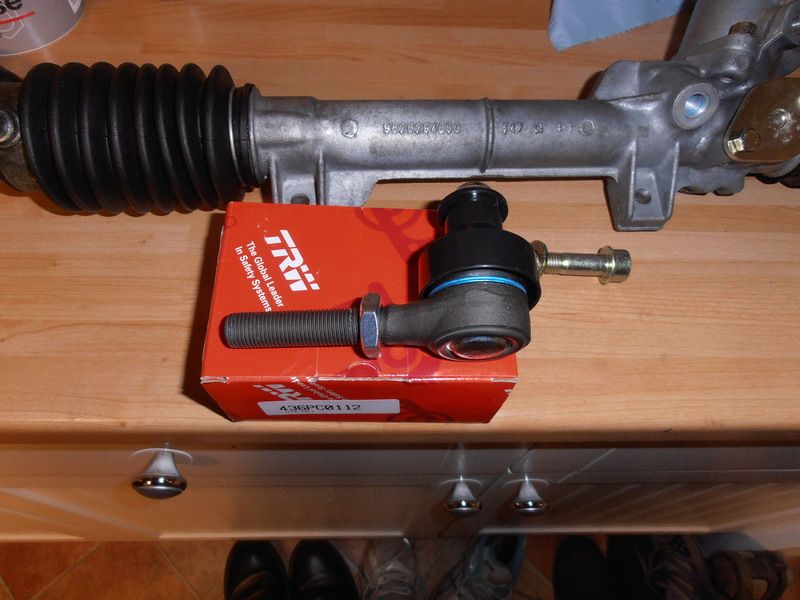 And that is it! 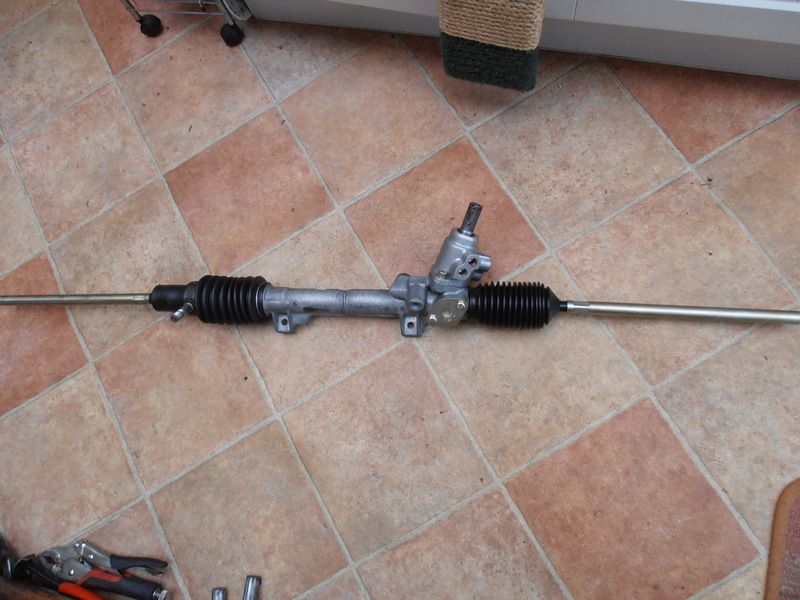 Or at least I thought it was... I have just read the instructions with the trackrod ends, it says that any work on suspension and steering should be carried out by a trained professional, so I now have to strip it all down and give it all to Carl @mechanical_repairs to do it properly  ________________________________________ Make tea, not war.If it ain't broke......fix it until it is. |
|
|
|
|
Seasoned Pro  Location: Bristol Registered: 20 Apr 2013 Posts: 5,212 Status: Offline |
Post #278
Brilliant update Keep them a coming !!!!!! |
|
|
|
|
Senior User Location: Market Rasen Registered: 27 Feb 2010 Posts: 632 Status: Offline |
Post #279
Day666 wrote: Brilliant update Keep them a coming !!!!!! Thanks mate. In my haste to post this up last night before I went to bed I forgot to mention a couple of things. When you put the centre bearing on the pinion shaft, remember to replace the circlip.  As I had forgotten to photograph the circlip, I pulled the pinion out again to do it for you. This reminded me of another thing I didn't mention, when you re fit the pinion, firstly centralise the rack as best you can, then fit the pinion so the top bit where the joint goes on (when it is fitted into the car) is reasonably 'straight' and not just at any old angle.  You may also have noticed that there is no clip on the O/S rack gaitor. 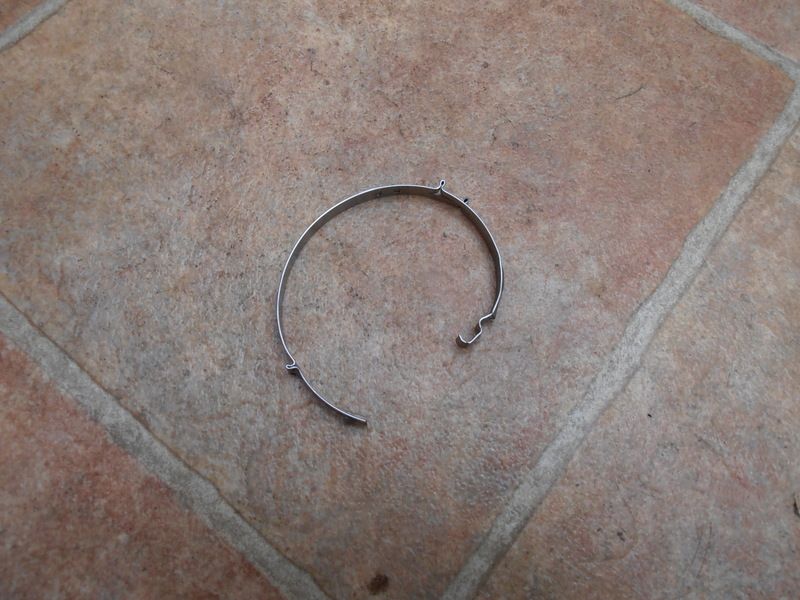 This is because I fave totally failed in my attempts to fit the b**tard! Despite having these at my disposal.  I have not yet decided if I am going to get another one to try again or if I am going to use something else entirely. Anyone got any suggestions? ________________________________________ Make tea, not war.If it ain't broke......fix it until it is. |
|
|
|
|
Capt Pedantic  Location: Bigend, Wales. Registered: 27 Mar 2007 Posts: 25,817 Status: Offline |
Post #280
Just normal pincers or side cutters I use for that type.________________________________________ need a part number? get on here - http://public.servicebox.peugeot.comBring on the Trumpets. |
|
|
|
|
Senior User Location: Market Rasen Registered: 27 Feb 2010 Posts: 632 Status: Offline |
Post #281
welshpug! wrote: Just normal pincers or side cutters I use for that type. Yeah, tried those too! when I squeezed the two bits up it pulled it off at the joint. ________________________________________ Make tea, not war.If it ain't broke......fix it until it is. |
|
|
|
|
Seasoned Pro  Location: Sunny Retford Registered: 26 Jan 2008 Posts: 2,502 Status: Offline |
Post #282
Is that the kitchen floor again? Mrs Tea must be in a good mood  ________________________________________ Almost standard 1999 Bianca RallyeHilux InvincibleX daily 306 No.13  Carp and specialist Anglers Click here |
|
|
|
|
Senior User Location: Market Rasen Registered: 27 Feb 2010 Posts: 632 Status: Offline |
Post #283
walker_texasranger wrote: Is that the kitchen floor again? Mrs Tea must be in a good mood Mrs, or should I say Dr Tea is currently in a very good mood as she has just passed her PhD. Her moods, as with any female are a transient thing so I have not encroached upon the kitchen (yet). That is the conservatory, or, as I like to call it, workshop floor. ________________________________________ Make tea, not war.If it ain't broke......fix it until it is. |
|
|
|
|
Senior User Location: Market Rasen Registered: 27 Feb 2010 Posts: 632 Status: Offline |
Post #284
Right, the bloody clip is on!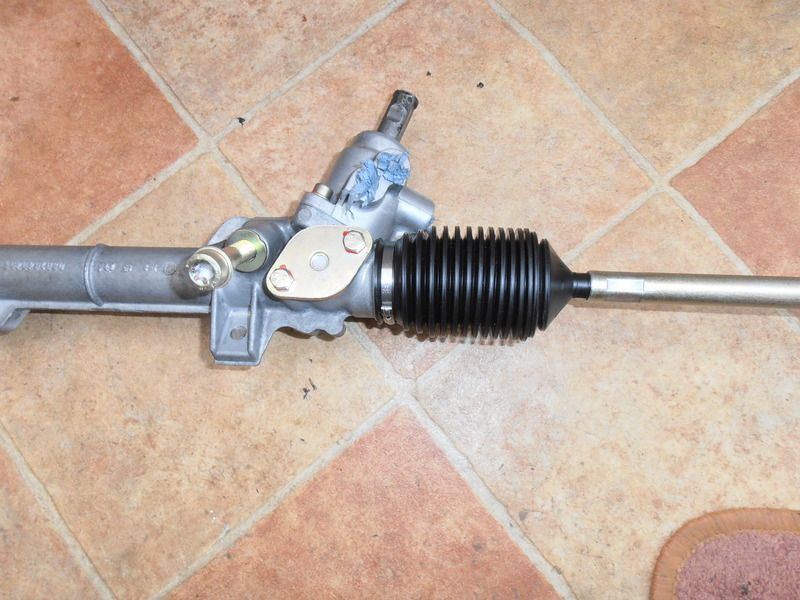 ________________________________________ Make tea, not war.If it ain't broke......fix it until it is. |
|
|
|
|
Seasoned Pro Location: Sunny Retford Registered: 26 Jan 2008 Posts: 2,502 Status: Offline |
Post #285
quote: tea boy wrote: Mrs, or should I say Dr Tea is currently in a very good mood as she has just passed her PhD. Congrats to Dr Tea, I remember many moons ago when my mum was studying for hers, it was a monumnetal task. tea boy wrote: Her moods, as with any female are a transient thing so I have not encroached upon the kitchen (yet). Standard... Wise tea boy wrote: That is the conservatory, or, as I like to call it, workshop floor. I am similar, though my 'workshop' is the spare room, I currently have a plethora of fishing kit everywhere in there, a couple of Yamaha outboards and three fish tanks that are 'projects', the mrs is banned. If she was to step foot in there the moon would be severely diverted from the orbital path it's currently on  ________________________________________ Almost standard 1999 Bianca RallyeHilux InvincibleX daily 306 No.13 Carp and specialist Anglers Click here |
|
|
|
|
Seasoned Pro  Location: leicester Registered: 10 Jan 2005 Posts: 12,122 Status: Offline |
Post #286
Good work Mr, did I tell you that your a plonker?Carl ________________________________________ C.G.Cars of Leicester, Peugeot/Citroen/Renault specialist Tel: 01162 624498/07799 405184 WWW.CGCARSLEICESTER.CO.UK36 narborough road south, Leicester LE3 2fn MOT station now open, tests £35 with a free retest. Recovery available with a recovery unit, for those not so local jobs Also offer the loan of a free courtesy car 306 dturbo |
|
|
|
|
Senior User Location: Market Rasen Registered: 27 Feb 2010 Posts: 632 Status: Offline |
Post #287
mechanical_repairs wrote: Good work Mr, did I tell you that your a plonker? Carl On numerous occasions Carl, but you are not the only one to do so... Those bits that the rear beam fixes to (servicebox calls it a flange, so I'll call it that) on my donor axle are from a citroen and it didn't have a rear load valve on it, so I thought I would sort that out. On the citroen the rear flexis fasten to a bracket on the flange on both sides but on ours the O/S hose fastens to the load valve mounting. This is the brake hose mounting bracket. 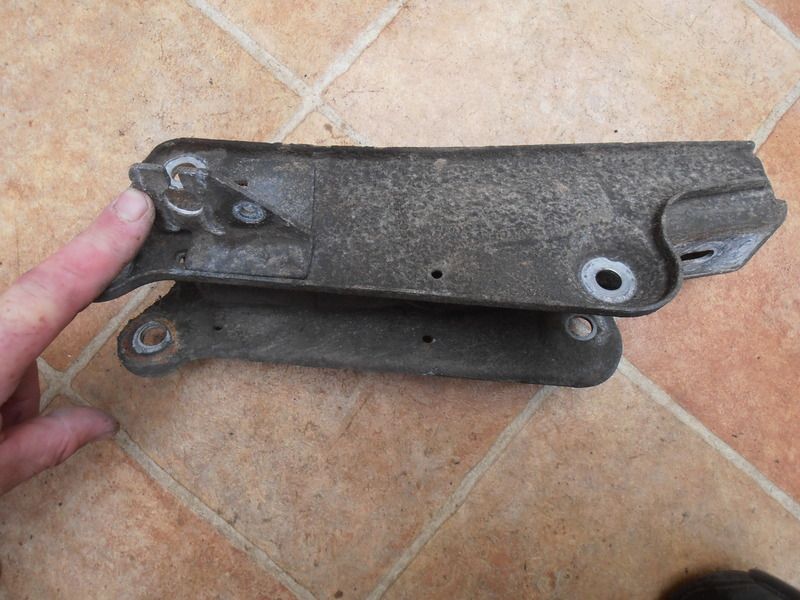 I offered the load valve mount up to see what it would look like.  The rear part of it didn't fit very well onto the flange as there is a bulge pressed into it. Hmmm... I'd better have a cuppa and a think about it. Hold on a minute, looks like I am being a complete nob, what if I got the flange for the O/S instead of the N/S, then I might get somewhere? This one. 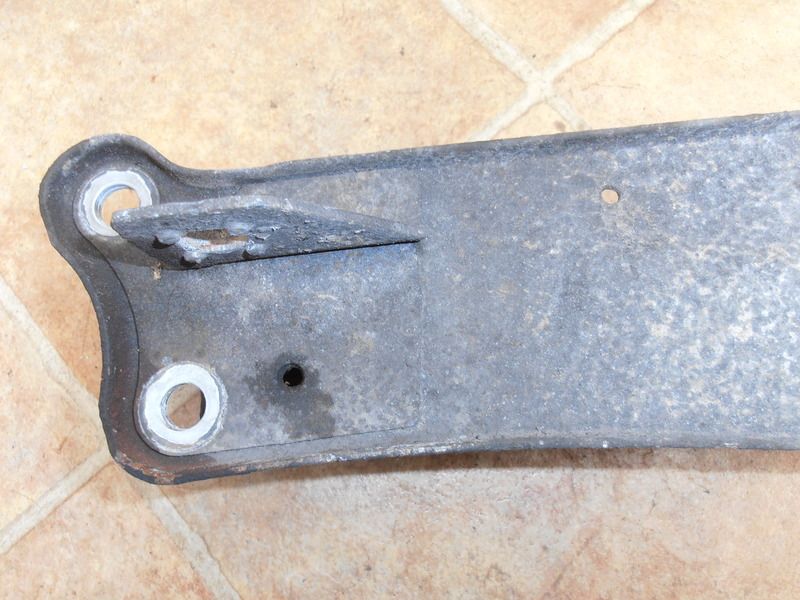 It even has the hole already drilled for the load valve mount.  I just needed to drill out the two spot welds on the old bracket. (I stopped just short of drilling all the way through) 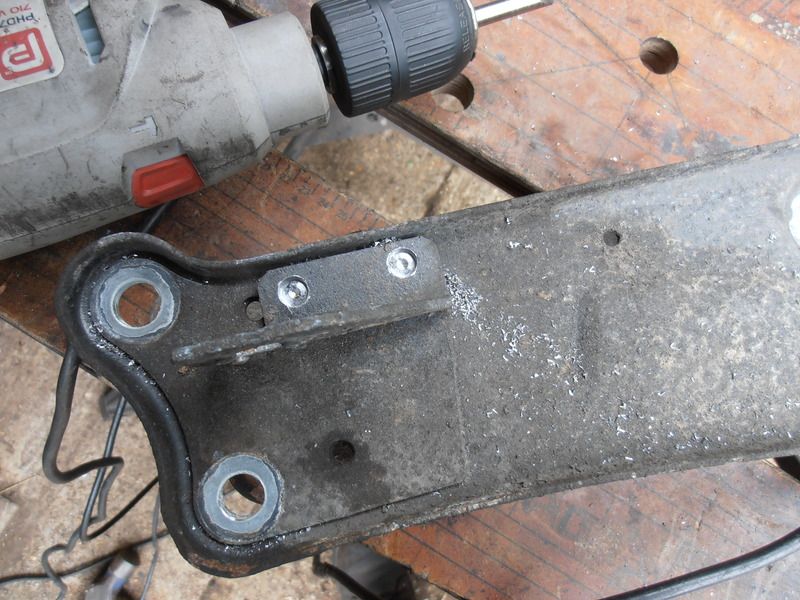 So I had to rip it off with some moldy grips.  Tidy up a bit with the power file.  Now when I offered the bracket up it looks a bit more like. 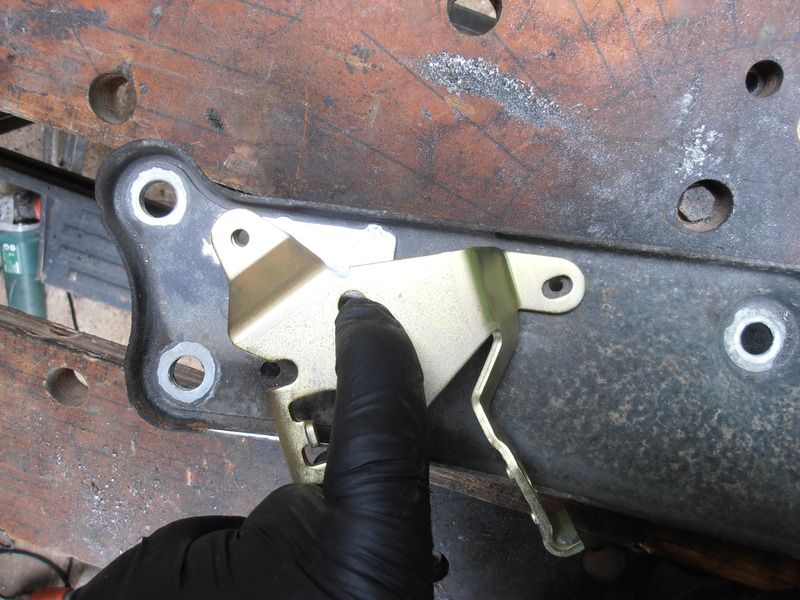 I might get them blasted tomorrow. ________________________________________ Make tea, not war.If it ain't broke......fix it until it is. |
|
|
|
|
Formerly gpm  Location: Lutterworth Registered: 01 Sep 2007 Posts: 2,941 Status: Offline |
Post #288
tea boy wrote: I might get them blasted tomorrow. I was about to express my disgust at the state of them!!!! The bracket you are offering up, is that new from Peugeot or have you had it zinc plated?? ________________________________________ Cherry Red Rallye .... On going OEM spec restoChina Blue GTi6 .... Weekend toy Black 208 GTi .... Wife's car now Silver BMW 550i.... The executive missile |
|
|
|
|
Senior User Location: Market Rasen Registered: 27 Feb 2010 Posts: 632 Status: Offline |
Post #289
Ben_W wrote: The bracket you are offering up, is that new from Peugeot or have you had it zinc plated?? The bracket is new, I also have a new load valve which has been in stock for months because I am sick of having to free this one off. 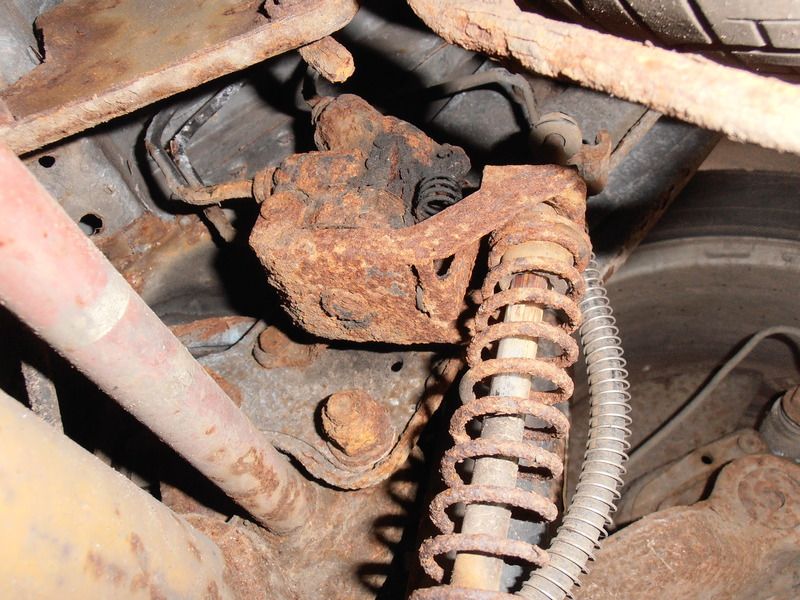 I got new stuff because I wanted to build up the axle ready to swap straight over and, as I said, my citroen axle didn't have these bits on for me to restore. Looking at that picture above, I may have to do something about the rear floor whilst the beam is off.... ________________________________________ Make tea, not war.If it ain't broke......fix it until it is. |
|
|
|
|
Senior User Location: Market Rasen Registered: 27 Feb 2010 Posts: 632 Status: Offline |
Post #290
I read the Haynes manual to see what it said about removing the steering rack.Basically disconnect everything and pull it out through the right hand wheelarch. Piece of p!ss then... I'd like to see them pull it out of the bloody arch! Better drop the subframe then. If the front subframe bolts were not seized it would have been a piece of cake. Whilst the subframe was off I thought it would be a good idea to take care of a bit of surface rust in the front wheelarch and the front floor.  Found a bit under the underseal, there was just the slightest trace showing so I went at it. 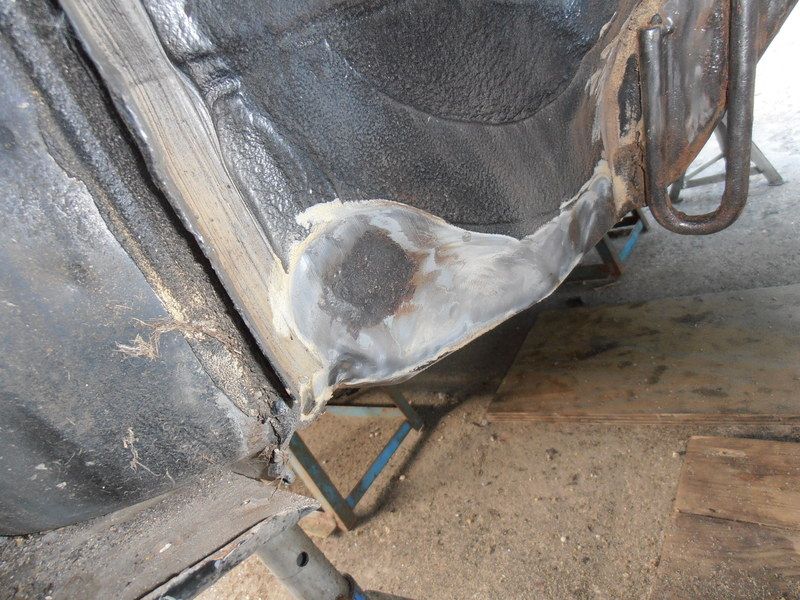 It doesn't photograph very well but the front outrigger bit has been crushed by tyre fitter's jacks.  I thought It would be a good idea to remove the sill cover to have a look. It wouldn't come off because someone thought it would be a good idea to stick it on with silicon. When I eventually pulled it off I found this.  Oh, that doesn't look good. Better have a prod. 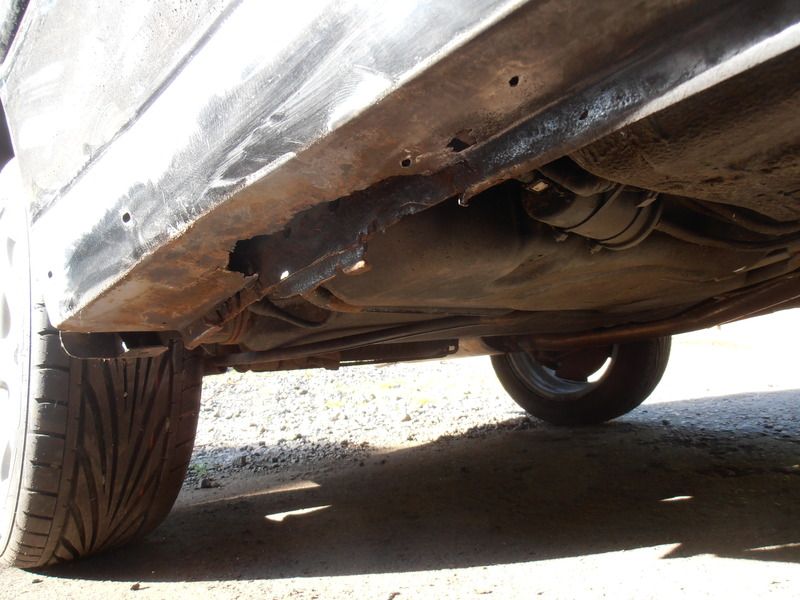 Oh bo***cks. There was this too, under some filler. 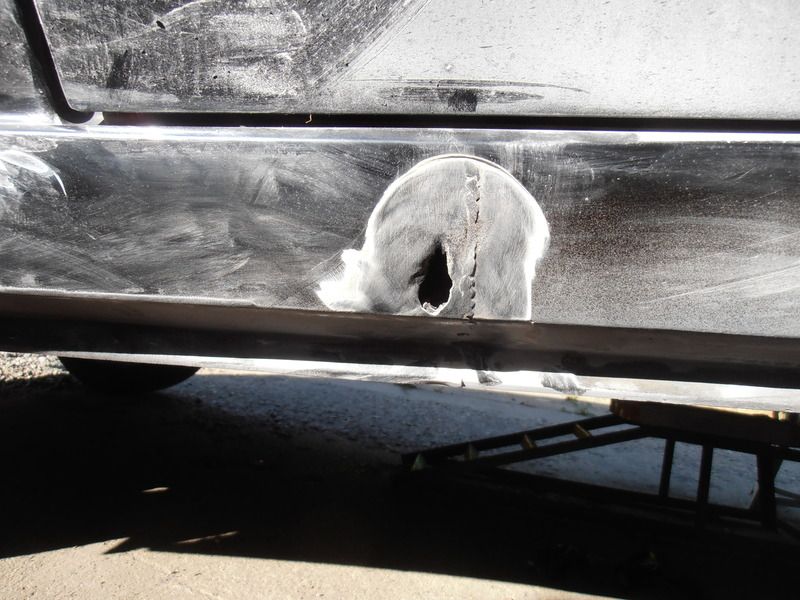 There has obviously been a rear quarter fitted at some point. Not particularly well fitted it seems. It was probably fitted by the same useless bellends who 'repaired' the front end. When I discovered that the front end had been bumped and badly repaired I took it on the chin and set too and fixed it properly. Now I find that the back has had the same thing. I feel like I have been p**sing in the wind. I am utterly, utterly p**sed off with it... ________________________________________ Make tea, not war.If it ain't broke......fix it until it is. |
|
|
|
|
Seasoned Pro Location: DoncastAAAAARGH Registered: 13 Jan 2008 Posts: 4,639 Status: Offline |
Post #291
Don't be too disheartened, just do your usual trick and work your magic and it will be as good as new in no time. ________________________________________ Goldie the track car. |
|
|
|
|
Seasoned Pro Location: leicester Registered: 10 Jan 2005 Posts: 12,122 Status: Offline |
Post #292
It's in the right hands should anyone put it right, look at the old beetle you are playing with.Carl ________________________________________ C.G.Cars of Leicester, Peugeot/Citroen/Renault specialist Tel: 01162 624498/07799 405184 WWW.CGCARSLEICESTER.CO.UK36 narborough road south, Leicester LE3 2fn MOT station now open, tests £35 with a free retest. Recovery available with a recovery unit, for those not so local jobs Also offer the loan of a free courtesy car 306 dturbo |
|
|
|
|
Senior User Location: Market Rasen Registered: 27 Feb 2010 Posts: 632 Status: Offline |
Post #293
prism7guy wrote: Don't be too disheartened, just do your usual trick and work your magic and it will be as good as new in no time. mechanical_repairs wrote: It's in the right hands should anyone put it right, look at the old beetle you are playing with. Carl Thanks for the support chaps, I need cheering up. I have resorted to brown booze to take my mind off it. In the meantime I did a bit of fannying around with my trailing arms. These are citroen VTS ones which are not exactly the same as they have some bits screwed on where the bump stops are. They came off quite easily with the impact driver so I could clean underneath them. 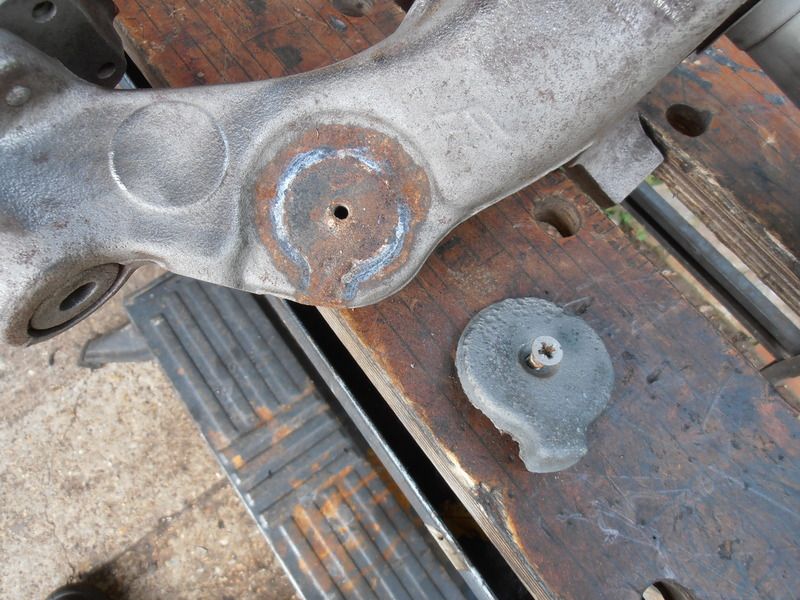 As you can see, I have given the arms a bit of a going over with the shot blaster. I don't want to paint them yet until I have pressed in the new shafts, so I stuck some of that hydrate 80 stuff on them to keep the rust off for now. 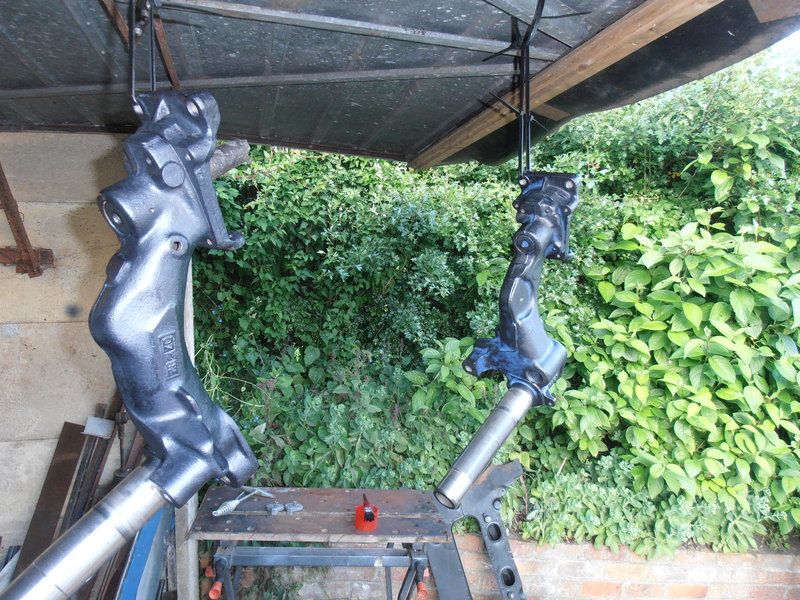 I am still properly annoyed about the sill, it has rusted purely due to crap workmanship on the part of whichever body shop fitted it. I have yet to find a body man/painter who is even half as good as he thinks he is. Just look at this, they have painted the vertical side of the quarter but there is feck all on the underside. His mum must have fastened his braces too tight so he couldn't bend over to do it. Obviously his mum dresses him because the useless cnut wouldn't be able to do it himself. Did I mention that I was annoyed? ________________________________________ Make tea, not war.If it ain't broke......fix it until it is. |
|
|
|
|
Senior User Location: Market Rasen Registered: 27 Feb 2010 Posts: 632 Status: Offline |
Post #294
Well, I've tried to get myself motivated to weld this up but it's not happening.It was bumped at the front and badly repaired, now I find it has been bumped at the back and also badly repaired. For all I know it has probably hit a milk float. I am thinking that whatever I do to it, it will always be a pig in a poke. I think I am going to chop it up. Trouble is I have bought a load of new bits for it. Hmmm... ________________________________________ Make tea, not war.If it ain't broke......fix it until it is. |
|
|
|
|
Capt Pedantic Location: Bigend, Wales. Registered: 27 Mar 2007 Posts: 25,817 Status: Offline |
Post #295
reshell  ________________________________________ need a part number? get on here - http://public.servicebox.peugeot.comBring on the Trumpets. |
|
|
|
|
Seasoned Pro  Location: Oxford Registered: 17 Sep 2013 Posts: 1,968 Status: Offline |
Post #296
You,ll turn it around. Shes come too far for you to give up on her now ________________________________________ Old pugs don't die they just get faster |
|
|
|
|
Seasoned Pro Location: leicester Registered: 10 Jan 2005 Posts: 12,122 Status: Offline |
Post #297
Cmon tea update the thread, let everyone see the pink new one you have bought.Carl ________________________________________ C.G.Cars of Leicester, Peugeot/Citroen/Renault specialist Tel: 01162 624498/07799 405184 WWW.CGCARSLEICESTER.CO.UK36 narborough road south, Leicester LE3 2fn MOT station now open, tests £35 with a free retest. Recovery available with a recovery unit, for those not so local jobs Also offer the loan of a free courtesy car 306 dturbo |
|
|
|
|
Senior User Location: Market Rasen Registered: 27 Feb 2010 Posts: 632 Status: Offline |
Post #298
Cjwatson27 wrote: You,ll turn it around. Shes come too far for you to give up on her now Thoroughly sick of the black shed now. welshpug! wrote: reshell Well... mechanical_repairs wrote: Cmon tea update the thread, let everyone see the pink new one you have bought. Carl Not quite pink....  ...MANSTONE! ________________________________________ Make tea, not war.If it ain't broke......fix it until it is. |
|
|
|
|
Senior User Location: Market Rasen Registered: 27 Feb 2010 Posts: 632 Status: Offline |
Post #299
To be fair it is a total shed and it drives like a pig.It needs all the bits that I bought for the black one. ________________________________________ Make tea, not war.If it ain't broke......fix it until it is. |
|
|
|
|
Seasoned Pro Location: leicester Registered: 10 Jan 2005 Posts: 12,122 Status: Offline |
Post #300
tea boy wrote: To be fair it is a total shed and it drives like a pig. It needs all the bits that I bought for the black one. Looks well on photos. Sure you will sort a good un out the two Carl ________________________________________ C.G.Cars of Leicester, Peugeot/Citroen/Renault specialist Tel: 01162 624498/07799 405184 WWW.CGCARSLEICESTER.CO.UK36 narborough road south, Leicester LE3 2fn MOT station now open, tests £35 with a free retest. Recovery available with a recovery unit, for those not so local jobs Also offer the loan of a free courtesy car 306 dturbo |
|
|
|
The Peugeot GTi-6 & Rallye Owners Club - ©2024 all rights reserved.

Please Note: The views and opinions found herein are those of individuals, and not of The Peugeot 306 GTi-6 & Rallye Owners Club or any individuals involved.
No responsibility is taken or assumed for any comments or statements made on, or in relation to, this website. Please see our updated privacy policy.