
Post #1
NOTE You can just copy and paste this guide into a Word document for easy printing 
This guide has been collectively written by Chris, John and myself...
Radiator Fitting Guide
Time required varies depending on if you have someone to help and if you struggle with anything, but it shouldn't take more than 4 hours.
Buying the right radiator
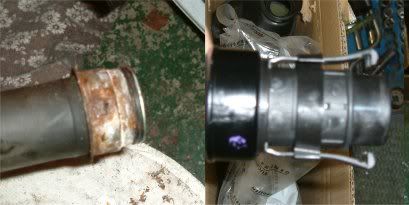
There are 2 types of lower hose connectors and hence there are 2 types of radiators. Which one is the newest type of connector I do not know, however I've handled 4 different radiators while doing mine and they all had the connector shown in the pictures below, which requires the black twist/clamp connector
This was a different connector to what was in my car from the factory, so you may need to buy a new lower hose (I asked Pug for a lower hose for a 306 XSi , that's the right one, about £27)
Left = Old from my car, Right = New connector from Pug
I bought a Rad from GSF and they sent me the wrong one, and I ended up calling local radiator places at the last minute. I'm glad I did because the radiator looks of much better quality than the one from GSF and I only paid £90 for mine (including £4 tip!). Go on http://www.yell.com and type in 'radiator'.
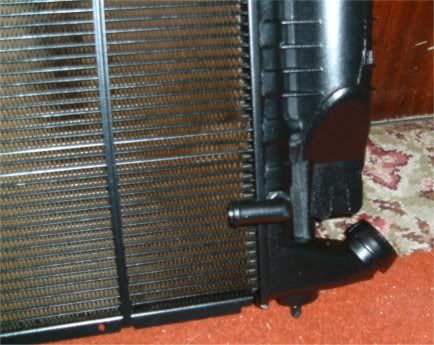
Make sure you have the right one before you start! Aside from that it obviously looks the same from the top take careful note of the lower hose connector and the oil cooler pipe:
Required items
1 new radiator
1 new O ring for bottom pipe (two different sizes � worth getting both just in case cos they got mine wrong)
Coolant - 6 litres without spills (7 litres recommended)
A Selection of sockets with extensions
T25 & T30 torx bits
Jack and Axle stands / blocks
Chocks for wheels
Washing up bowl or two (or something to collect the old coolant)
Adjustable spanner
Pliers
Molegrips
Screwdrivers
Hacksaw
5mm allen key
(Possibly 11mm allen key � see below)
Recommended items
Plastic plugs for the arch liner in case any bust on removal
Blanking bolt to fit new rad under top pipe � my new rad didn�t come with one. Could use one off old rad if you can get it off � 11mm allen key or mole grips !
(New rad drain plug if not already fitted)
(Possibly a thermostat gasket � see below)
(Possibly a new lower coolant hose � see below)
(Possibly 2 x radiator retention spring clips � see below)
1 willing helper
Spare car and a local pug dealer/motorfactors for any emergency part runs !
Preparation
Check the handbrake is on and the car is in gear.
Jack up the front of the car and lower unto axle stands
Remove the offside (driver�s) front wheel
Remove main undertray
- 3 twisty clips (incl. 2 mentioned above)
- 2 13mm bolts towards the rear of the car
- 3 10mm bolts towards the front of the car
Remove the main arch liner
� 2 short torx (T25) screws at the front of the wheel arch
� 1 long torx (T25) screw - accessed through a hole in the skirt on the rear edge of the arch
� 3 large and 1 small plastic plugs (can be levered off either by pulling trim or inserting 2 screwdrivers under the head either side and levering � if you�re lucky you can re-use them)
Remove inner arch liner against engine bay
� 2 plastic plugs � 1 up by ABS wire, 1 on inner panel
� Note: the 2 twisty clips from the main undertray locate into this from underneath
Remove wheelarch mini undertray
- one torx (T25) screw at the front of the car
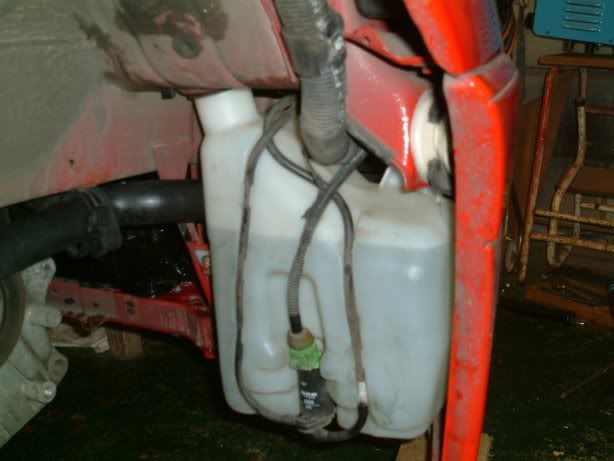
Remove the washer bottle
- unscrew filler neck
- two bolts either side of the bottle
- the bottle can be tied up against the suspension strut to avoid emptying it / removing tubes and lead. Its a little tricky, but you'll find if you twist the bottle it'll sit nicely on the caliper without the need to remove the pump.
Under bonnet, remove front induction piping on top of slam panel
- single torx (T30) bolt which is fairly obvious, may have to hold the nut on the other side. (I covered the end of the open pipe to stop water / dirt getting in whilst removing the rad)
Unclip thermostat if applicable (new gasket required ?) (not fitted to rad on my 98 Phase 2)
� push in the metal bar, and then pull off connector
Draining the system
Locate the drain plug (if your rad has one) and Place the washing up bowl under the pipe. You may want to use a funnel or some piping to ensure the coolant is directed into the bowl.
Open drain plug, you may need an adjustable spanner or pliers to open it
Open the three bleed points � top nearside of radiator
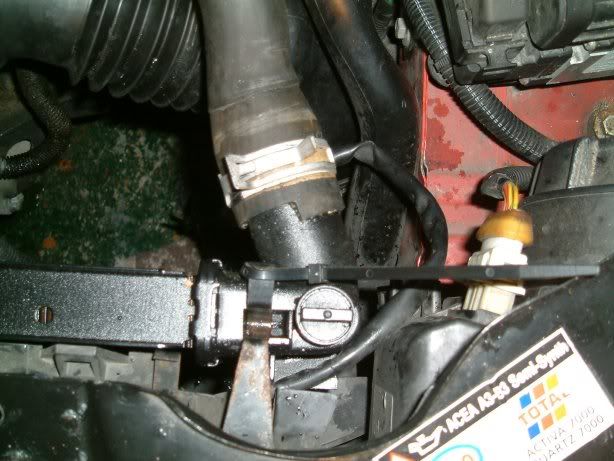
- bleed screw on the thermo housing on the engine (5mm allen key required)
- bleed thing next to heat shield at rear of engine bay (not fitted on my 98 Phase 2)
Removing the radiator
From above :-
Using molegrips undo oil cooler hose clip � leave clip on hose or replace with jubilee clip
Using molegrips undo top hose clip � leave clip on hose or replace with jubilee clip
From below :-
Undo lower hose connector
if it�s a black plastic connector twist the wing bits anti-clockwise and then separate the two ends by pulling them apart (a screwdriver may be useful to prise the clips over then end of the pipe)
if it�s a whitish plastic connector with metal clip
- remove metal clip
- split the two ends by pulling them apart
- if the hose is stuck like mine you will need to cut the lower hose, and so need a new one, best to check with the dealer that they have them in stock before doing anything drastic.
From above :-
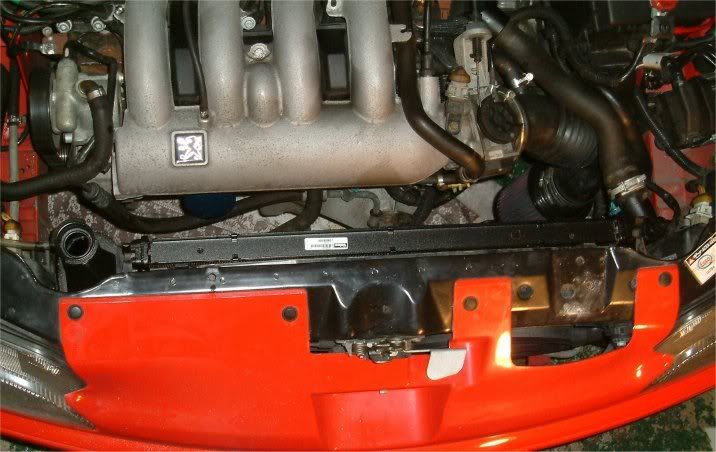
Undo the two (13mm) bolts on the front slam panel that holds the front bumper to the wings. Pull the slam panel forwards hard, it should move about an inch.
Push and / or tie any obstructing pipes out of the way.
Unclip the radiator clips on the top of the radiator carefully � they corrode and break (otherwise, remove the clips by undoing 1 torx (T30) screw each side to give more clearance)
Remove the radiator
- note the rad slots into spigots on the aircon condensor
- it can be tricky to get oil cooler pipe past manifold, but it will pass eventually.
- Also the clips may catch on the side of the radiator, and so care will be needed not to bend them.
Remove and retain the thermostat from the old radiator, using the adjustable spanner (if applicable).
Remove and retain the overflow hose from the reservoir.
If you�ve got air con, take the opportunity to clean around the pipes running under the rad whilst you�ve got access
Flushing the system
This is only necessary if your old coolant came out with any kind of bits in.
Pour a load of water through the top hose, will come out of oil cooler hose, once there is no more coolant coming out, you can stop. Pull the lower hose out of the body, and so can be held up in the wheel arch as high as possible. Fill this pipe with water, until water comes out of the bleed screw on the engine block, and then tip it upside down to empty the system. Close the bleed point on the thermo housing, and repeat until water comes out of top bleed point, and there is no coolant in the flush water.
Refitting the radiator
Fit new O ring to lower hose connection (bayonet fitting on my 98 Phase 2) if required
Replace the radiator in the engine bay,
- you may require someone to pull the front a bit further out to get it to pass, but it can be angled downwards towards the offside wheel arch, which helps it fit.
- Again take care to avoid the clips getting bent
- If got air con, then make sure the rad is clipped onto spigots on the front of the air-con radiator (only the top two are used, not sure what lower two clips on rad are for ?)
(Refit clips holding rad if previously removed)
Reconnect the lower hose
Reconnect the oil cooler hose
Reconnect the top hose
Reset the slam panel - I used a screwdriver and a hammer to nock it back into place
Replace the bolts to secure it
Replace front induction piping on top of slam panel (removing cover from pipe if fitted earlier)
Undo bleed screw on the thermostat housing, so the hole is exposed
Open bleed point on new radiator
Reconnect the reservoir over flow pipe
Replace washer bottle
- washer on the top of the bottle
- two bolts
- filler neck
- reconnect the two pipes (if removed)
Replace inner arch liner
Replace main arch liner
Replace mini undertray (leave the main one off to check for leaks)
Re-filling the system
Make a header tank out of an old coolant bottle, cut the bottom off, and put tape around the neck to create a seal to the radiator filler
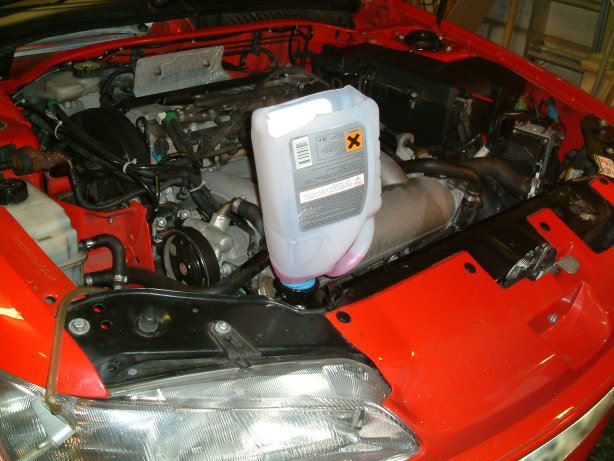
Start pouring in coolant/water mix, keep watching the bleed point at top of radiator and thermo housing, once liquid comes out of the rad then close the bleed point.
Carry on filling with water until it comes out of thermostat bleed point, and then close this as well. Add the blue peter style header tank.
Carry on filling with water until the top bleed point has water coming out
Removing air from the system
Make sure the overflow hose from the reservoir is above the level of the header tank
Keeping the header tank at least ½ full, start the engine
Run the engine till the fans come on, can blip the throttle to speed up the process, but nothing excessive
Once everything is warm, and there are not too many bubbles, drain the header using the reservoir overflow pipe.
Replace the rad cap
(Could replace main undertray now if confident of no leaks)
Replace the wheel
Raise car on jack and remove axle stands
Lower the car and ensure the jack / axle stands are out of harms way
Unchock the wheels.
Go for a drive
Allow to cool for a while then using a towel/cloth open the rad cap and check the level, top up if required, and check for leaks
Replace main undertray
Cooling system bleeding tips added 28/10/2012:
- Leaving the rad cap on and using your mouth to blow through the overflow tube to get the coolant moving.
- Filling the top radiator hose with coolant until it comes out of the radiator bleed point (before starting the engine).
- Rev the engine (by hand) to between 1500-2000rpm will help to circulate the coolant for an easier bleed.
Double check everything's secure
The clips that hold the radiator at the top are crap, in fact the reason I got my radiator leak was because one of them came undone.
I recommend tying the right one down with a tie wrap, and just make sure the one on the left is on right.
Job Done

________________________________________
always in stock, just PM me to order
 .
.