Post #1
Hi.My central locking like many pug owners went faulty last friday. When you locked the door by key or remote fob the doors locked for a second and then unlocked themselves. A common fault it seems and having read the many possible solutions to resolving the problem on the forums. So today while it wasnt raining I decided to set about rectifing my problem and documenting it.

So here goes, ive broken it into 3 parts. I know some of its basic, but i wanted to show people how easy it really is to check out, but please note I am no expert. What you attempt to do on your own car is your responsibility and not mine,

Anyhow... on with the show.
1. Bypassing The Problem.
2. Repairing the door loom.
3. Other Solutions.
1. Bypassing the problem.
The best bypass solution to stop your central locking from auto-unlocking but still allowing you to lock your car using your keyfob is to tell the Central Locking control unit that the doors when locked are always locked correctly.
To enable this to happen you need to complete the following modification to your Central Locking Control unit.
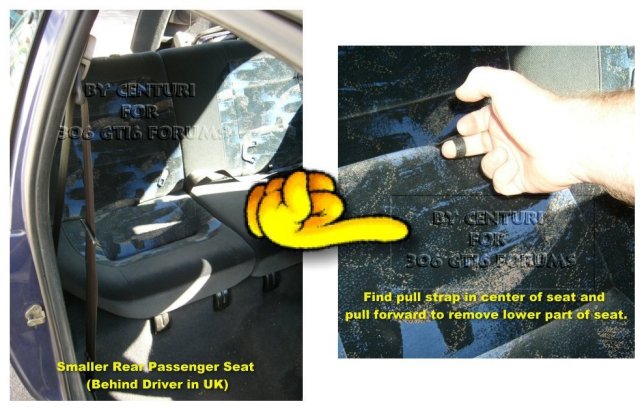
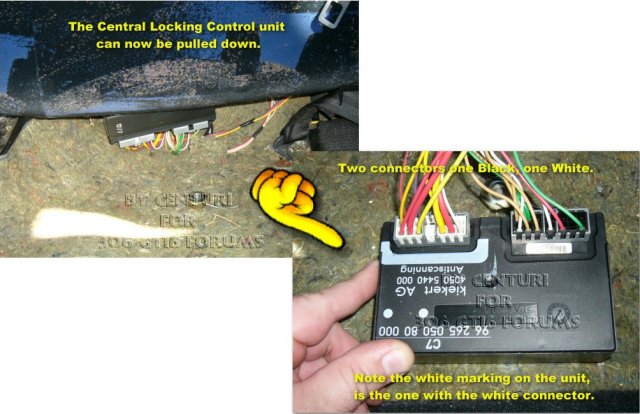
a. To locate the Central Locking Control Unit you need to remove the rear seat from behind the driver.
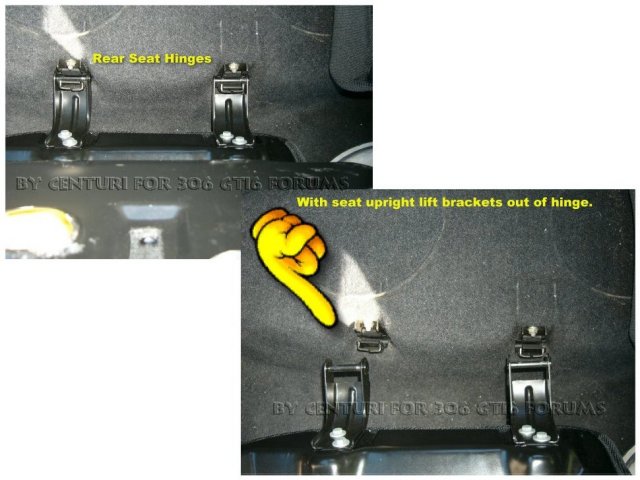
b. With the seat tilted forward, lift the hinges so they separate easily, a simple up lift will dislodge them.
c. At this point you may see the bottom of the Central Locking control unit. Depending on the level of solution you wish to take you may work on it from there. Myself I decided to remove the unit as follows.

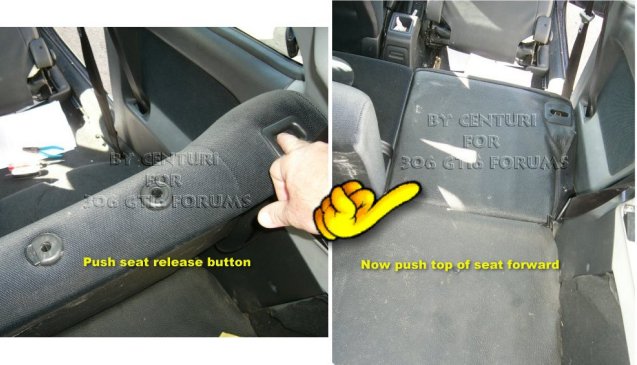
d. To remove the unit fully, you need to release the top half of the rear seat. Do this as you normally would by pressing the release button at the top of the seat. From inside the boot push the seat forward.
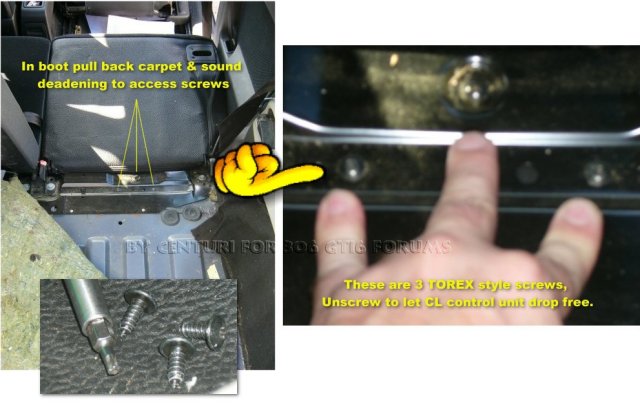
e. With the seat forward, you will need to pull back the carpet and sound deadening from inside the boot. Just at the bracket which holds the top of the seat to the car you will see 3 x Torex screws standard size for your Pug. These 3 screws hold the Central Locking unit in place, so remove them.
f. Back inside the car, the Central Locking control unit will have dropped so can be removed fully. You will note there are 2 x connectors that are keyed so you cannot plug them in the wrong socket. They are also color coded on the unit with a white band for the white connector. The other connector is black and is the same colour as the unit. This is the connector we shall be working with.
g. Now depending on how permanent you wish to have this solution, A or B, ive provided you with two options here.. one long term, one temporary. You can chose
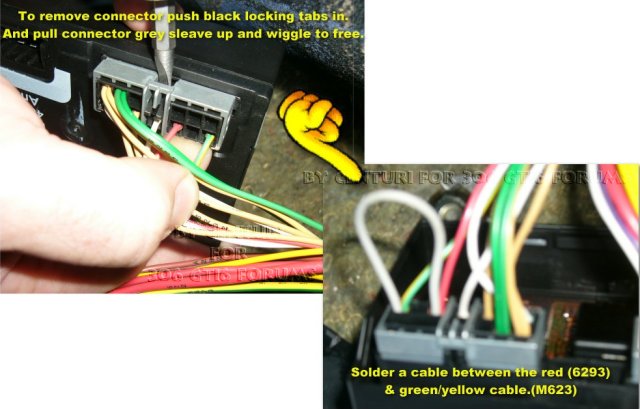
Either way you will need to remove the 2 x connectors plugged into the unit. To do this without breaking the connector push a flat bladed screwdriver into the black locking tabs and pull the grey sleave up and wiggle the connector. It should come apart quite easily.gA. As the temporary solution, take the black connector and solder a wire in a loop from connector with the Green & Yellow wire (Labelled M623) and connect it to the Red(Pink/ or even Blue) wire labelled 6293. What the loop allows is a simple means for you to cut at a later date when you have actually repaired the problem with the central locking hence return the Control Unit to its factory state.
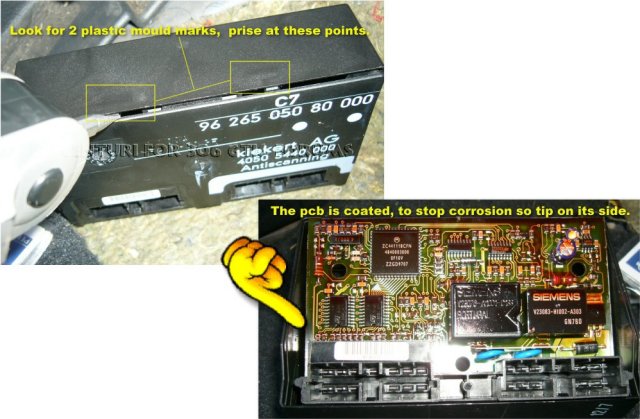
gB. The more permannent solution is as follows, again this could be returned to factory, but as we are working inside the Control Unit itself it would require more labour. With the control disconnected tilt the unit so the marking are the correct way up and the sockets are the the bottom. You will see 2 mold markings thse are pinch marks which allow the case to click together. Prise a flat bladed screw driver into this box at the two mold marking and the unti will pop apart quite easily. You will notice the depending on the age of your car, the Peugeot actually started coating the pcbs, to stop corrosion. Strangley thou they miss half an inch of every pcb at the point the socket connects to the circuit board. Tilt the unit on its side so you can see the sockets.
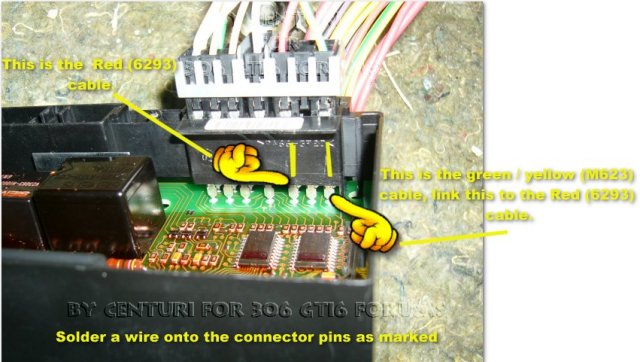
h. Similair to the tempoary fix, you will need to solder a wire between the two pins that the Green / Yellow wire and Red wire attach to.These are marked in yellow in the image. As you are working inside the control box you do not have to alter the cars wiring. Solder directly to the pins that go into the circuit board. Again RED (6293) connect to Green Yellow (M623). You can then put the casing back together and all the modifications are hidden away and protected.
Thats it, that mod will tell your central locking that its happy your doors are all closed correctly and will therefore stay locked when you lock them. Remember this is not a repair to the problem you had, just a bypass, if youre solenoids in your doors go faulty this mod is ignored and the doors will still open or not lock.
2. Repairing The Door Loom.
a. The majority of problems related to Central Locking on PUGs, and anything else electrical linked to your doors comes down to the crap design Peugeot used for the wiring solution. The door loom goes faulty, as the repeated opening and closing of the drivers door wears the wires inside the loom and the finally core by core they break and until the complete wire snaps.
Because of this things like the central locking control unit, misbehave because signals they are suppose to be receiving from the solenoid in each door arent making it.
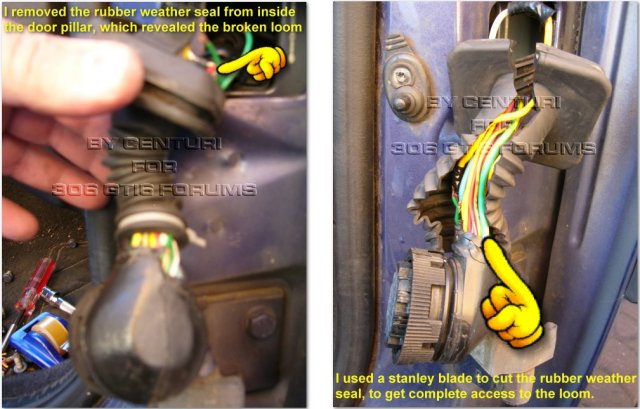
The part of the loom that tends to get damaged most is directly between the door pillar and the door itself. The wires in this loom are held in a rubber sheaf and connect to a interlocking connection on the door.
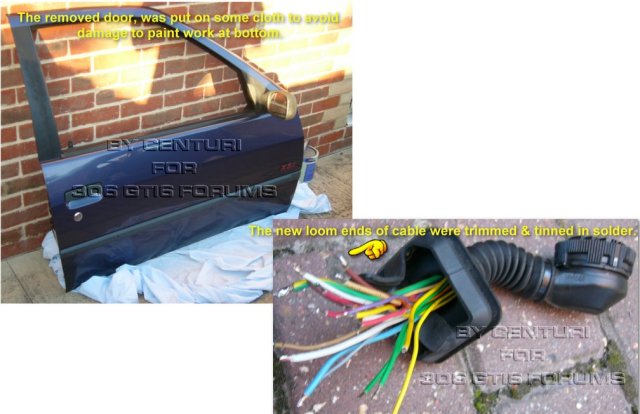
To check this loom you need to open the door as wide as possible. Some people find it handy to remove the door, this will add more labour to the job in hand, so if you have the time I would recommend it. TO do this remove the door pin by tapping it with a small hammer and undo the two nuts holding the door on.
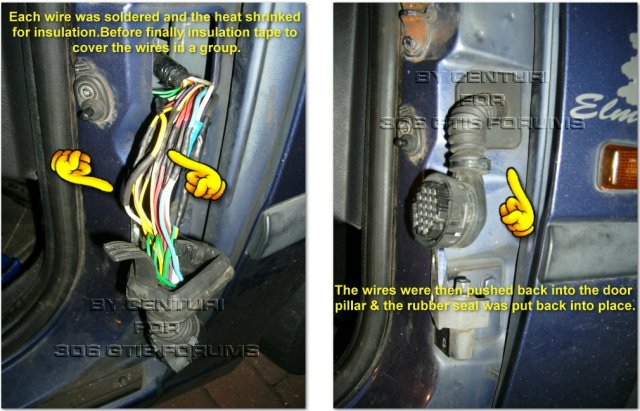
The interconnect that you need to undo is a larger version of the connector that plugs your rear shelf and speakers into your car in the boot. Except this ones uses a locking mechanism, I found by turning the plastic with my hand and tapping the indents with a screwdriver I was able to undo the connector quite easily. With this removed I was able to remove the opposite end of the rubber seal in the door pillar. This gave me the leverage to slide the rubber sheaf so I could see all the cables in the loom. In my case it was apparent I had 2 broken cables and the loom had been previously been repaired. Because of this I have decided to replace the looms instead of further repairing them and have ordered a new loom from Peugeot.
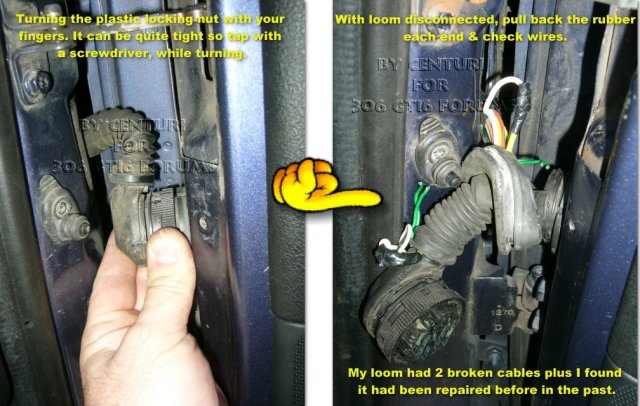
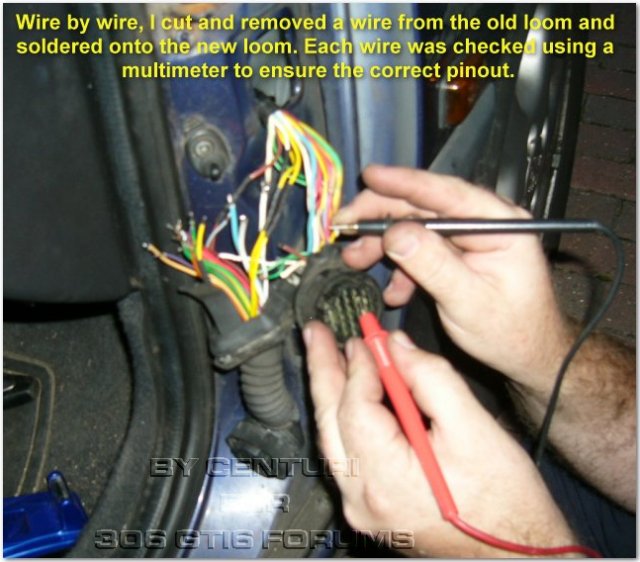
I will add more images when I have installed the new loom, but from the image you can work out how easily you could repair the existing loom by cutting and soldering in new wires.
3. Other Solutions
Just to remind you of some of the other possibilitys to resolve your central locking problems.
a. Remove FUSE 14 (on a 30 Fusebox), the downside to this is if your audio setup is using Fuse 14 also, your stereo will go dead
but this solution means your doors will lock and stay locked manually only and your boot will be unlocked!.b. Remove and insulate 2 x connectors from the Central Locking unit. IE dont plug them in. This does the same as above but allows you to keep whatever you have that shares fuse 14.
c. Faulty solenoids will need replacement, these are located in your doors and boot
, sometimes if they are jammed you can get away with yanking them with your hand inside the door, to free them up, but its quite rare.d. Never over look replacing the battery in your key fob, if the central locking works fine with the key but not the remote keyfob, replacement batterys can save time and money. Press and hold the button, if it fades after a few seconds replace it.
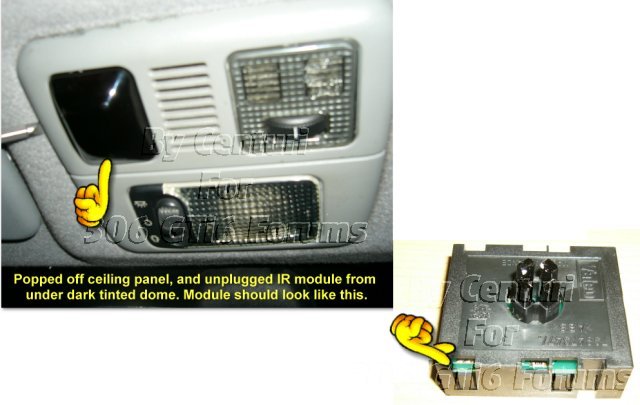
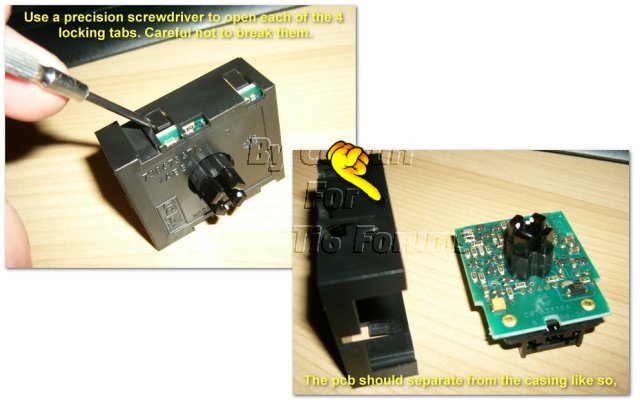
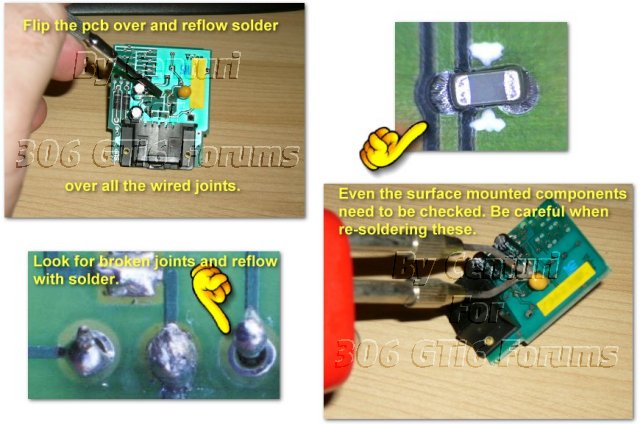
e. Sometimes the keyfob receiver in the roof of the car can become damaged and corroded, this mainly happens on PUGs with sunroofs that leak. When these malfunction it has been said they can cause unlocking of your car at random times. The early stages of this can be just dry joints appearing the circuit board, if this is the case on yours it is an ideal time to rerun solder over the connectors and buy some Plastic Sealer from an electronics shop as this will help preserve the pcb from further corrosion.
f. A loose door handle can also prove to give problems with your central locking, to check this you would need to remove the door trim to see inside the door. Disconnect the rod from the solenoid and try locking the door. If the door locks fine the handle maybe stopping the rod from reaching its parked point. Adjust and test.
Anyway hope this helps people who are suffering the same problem I have with my car..
Have fun, and remember.. its safer to disconnect your battery when working on any electronics in your car,.. its not my fault if you set fire to your car
Rgds
Jon
Centuri
________________________________________
http://www.centuri.net