Post #51
18 do fill the arches nicely dont they 
________________________________________
Proud Member of the ASTOR Owners Club


|
| Author | Subject: 306 Maxi project |
 Location: Leeds Registered: 20 Aug 2005 Posts: 8,878 Status: Offline |
Post #51
18 do fill the arches nicely dont they ________________________________________ Proud Member of the ASTOR Owners Club |
|
|
|
|
Capt Pedantic  Location: Bigend, Wales. Registered: 27 Mar 2007 Posts: 25,817 Status: Offline |
Post #52
the arches were made for 18", the maxi ran a bigger tyre than the road cars.________________________________________ need a part number? get on here - http://public.servicebox.peugeot.comBring on the Trumpets. |
|
|
|
|
Regular Location: Northwich Registered: 03 May 2016 Posts: 353 Status: Offline |
Post #53
gnrlee wrote: 18 do fill the arches nicely dont they Yep 18's do. I've got basically the same diameter tyres on my 17's though. The Michelin Pilot Sport Cups are very large for their given size (205/50) coming nearly as wide and as deep as these 18's (220 IIRC). Maxi's will have run 200's I think, (limited by regs at the time, but possibly free-er now in class) probably dia. 625's or maybe 640's. Both my tire options in 17 and 18 are coming in at 636 so I'm on the money there. I hate a rubber band profile tire, so hopefully I'm good. I'll have sleepless nights over inner arch clearance at the front until I drop it on the ground - but nothing an angle grinder can't fix  |
|
|
|
|
Capt Pedantic Location: Bigend, Wales. Registered: 27 Mar 2007 Posts: 25,817 Status: Offline |
Post #54
personally I think I would just Tub it now straight away seeing as youre well into the bodywork, with the longer wheelbase from the extra castor things will be quite tight if you want some wheel travel.________________________________________ need a part number? get on here - http://public.servicebox.peugeot.comBring on the Trumpets. |
|
|
|
|
Regular Location: Northwich Registered: 03 May 2016 Posts: 353 Status: Offline |
Post #55
Have gone one way then the other with this Mei.Thing is I'm not running mega low, but as you say the castor will have a role to play too. I've got to do a rad and slam panel, and have an airbox to fit a bit later, so still have plenty to do on the front end, but was going to save it for another time. Needless to say if I have to, I will. But there are cars on the forum running 17's without, albeit on lower profile tires, but none are as wide as this, so I'm hoping that will do for the moment. |
|
|
|
|
Regular Location: Northwich Registered: 03 May 2016 Posts: 353 Status: Offline |
Post #56
Only a little update today. Was mostly a family day out and about. When we got back I managed to squeeze in a bit of prep work on the first panel I fitted.The bonding is now fully cured, so out came all the speed pins, and self tappers; 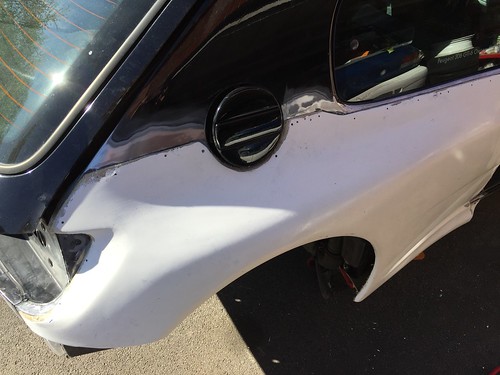 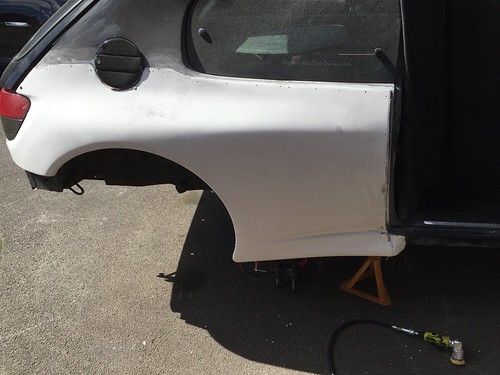 I then did some cleaning up of the edges using a mix of the dremel and my mini rotary sander powered by my compressor. All the joins looked good and I was happy with the fit. It's already impressively solid now it's fixed in place. I then laid on some kevlar bridging filler around the panel edges. Once that dried I then sanded it back. 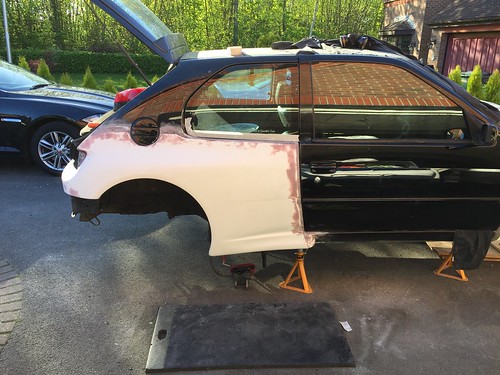 The put on a bit more where a bigger layer was needed and used a bit of filler for some finer work. 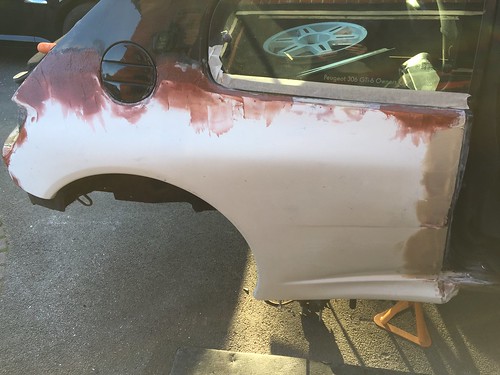 I sanded this back again, and started to see some decent progress in some areas like the door shut, but still a fair bit more to do around the top of the panel, where I should have been a bit bolder and laid it on thicker. No harm though. Might get a chance to do a bit more on this tomorrow, after another day out with the family first. Had to order some more kevlar filler too, which will delay me cracking on with the other side, so will have to turn my attention elsewhere if I finish this side before. Cheers Iain |
|
|
|
|
Regular Location: Northwich Registered: 03 May 2016 Posts: 353 Status: Offline |
Post #57
Well as predicted a bit of a family day again today, but managed to get an hour in between 8:30-9:30am (no power tools at this time in the morning!) and then another couple of hours towards the end of the day. So nothing too eventful for today, but thought I'd update the build all the same..I had long enough to get a layer of finer filler on in the morning, sand it back later on today, then get another layer on and at least begin to sand it back a little before coming in. 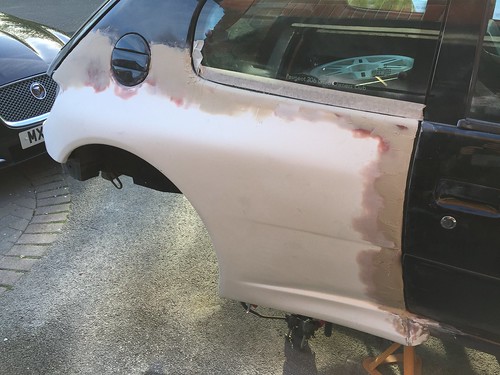 This was how I left it this evening. Tomorrow I'll do some more careful sanding back, then I think I should be onto the final more detailed bit of filling in a few key areas to get it as good as I can. After that it'll be a bit of primer filler I think to get a smooth finish. If I can finish tomorrow with this rear quarter smooth, and a single colour (of some description) I'll be happy - the weather will need to be kind though. Cheers for now Iain |
|
|
|
|
Regular Location: Leeds Registered: 12 Feb 2011 Posts: 276 Status: Offline |
Post #58
Dolphin glaze is a nice fine filler if your looking for something to finish with. Also what are these magical speed pins you're using?Great build. ________________________________________ Ph1 Cossack 6' |
|
|
|
|
Regular Location: Northwich Registered: 03 May 2016 Posts: 353 Status: Offline |
Post #59
Nice tip, thanks mate, I'll look it up.The speed pins are a different way of achieving a temp fastening than cleco's. I like them because the clamping force is high. Reusable too of course as many times as you like. They have a little spliced section that slides up the pin as you wind in the collar. You can just do it using your fingers. I can find the original supplier if you're interested, as I've still got the packet somewhere. |
|
|
|
|
Seasoned Pro  Location: Co. Durham Registered: 12 Feb 2009 Posts: 2,401 Status: Offline |
Post #60
Merlin motorsport do them, search for rivet clamps or 'skin pins'________________________________________ Team 'unintentional rat look' |
|
|
|
|
Regular Location: Northwich Registered: 03 May 2016 Posts: 353 Status: Offline |
Post #61
clen666 wrote: Merlin motorsport do them, search for rivet clamps or 'skin pins' The price though! Bloody hell.. Mine were a fraction of that from a kit car supplies fella who has a retirement business on the go selling body working tools.. I'll search him out if I can. Failing that I'll be at Stoneleigh next week for the kit car show stocking up on stuff like this and will look out for him. |
|
|
|
|
Seasoned Pro  Location: DoncastAAAAARGH Registered: 13 Jan 2008 Posts: 4,637 Status: Offline |
Post #62
Are you staying overnight at stoneleigh?I'm hoping to make an appearance with my old man if the weather is nice, should be in the Caterham owners area in the evening if the weather is good enough to camp you're welcome to come and have some burgers and beers with us if you'll be around that late  ________________________________________ Goldie the track car. |
|
|
|
|
Regular Location: Northwich Registered: 03 May 2016 Posts: 353 Status: Offline |
Post #63
Cheers Steve Thanks for the offer. I'll be passing through with the family in the middle of the day on Sunday, so it looks like I might miss you? We're on our way back from visiting my folks, so Stoneleigh will be a halfway stop for us, so I think we'll need to blitz it in a couple of hours then pile back in the car... (Beer and burgers sounds preferable!) |
|
|
|
|
Seasoned Pro  Location: Airborne in the lanes Registered: 26 Aug 2008 Posts: 2,220 Status: Offline |
Post #64
I'm lucky I relocated some skin pins from work  ________________________________________ How to do a clicky: [url =http://www.306gti6.com]click here[/url] remove the space between [url & = |
|
|
|
|
Seasoned Pro Location: DoncastAAAAARGH Registered: 13 Jan 2008 Posts: 4,637 Status: Offline |
Post #65
If the weather is nice I'll be arriving there at some point early in the afternoon on Sunday.Usually i just wander round on the Sunday eyeing up all the things i want then buy them on the Monday before stuffing it all into my dads car for the trek home ________________________________________ Goldie the track car. |
|
|
|
|
Regular Location: Northwich Registered: 03 May 2016 Posts: 353 Status: Offline |
Post #66
Just another little update; battled wind and rain a bit today, as well as waiting around for the BT engineer to install new broadband and telly..So yet more sanding, filling, sanding etc.. The tip on Dolphin Glaze was spot on (thanks) it's a great stopper, and sands really nicely. In between weather breaks, buying supplies and BT I managed to get to my end goal today; just a filler primer layer, but a solid colour of sorts! 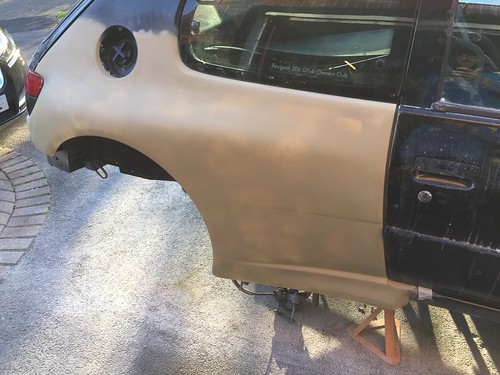 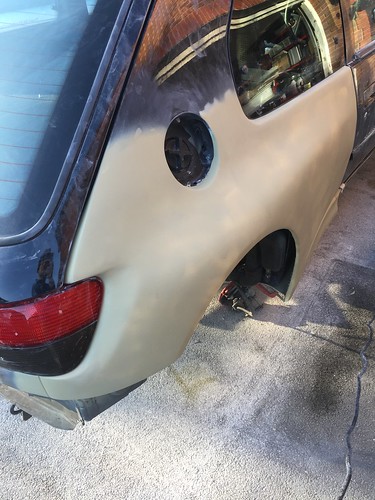 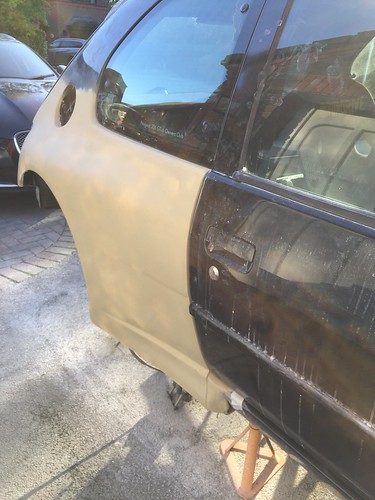 Although the primer filler was very hastily applied at the end of the day (it'll be sanded of course) I'm really chuffed to how well the panel has come out. The joins are now invisible and the panel feels smooth. I've got good alignment and was able to really define the bottom skirt where it joins the OEM side skirt. Now I've got a bit of a colour on it, I can see a few more bits I need to do; but overall I'm very pleased with it. Will make a start on the other side weather permitting tomorrow. Cheers Iain (Before anyone points out - I'm aware primer is porous) |
|
|
|
|
Location: Leeds Registered: 20 Aug 2005 Posts: 8,878 Status: Offline |
Post #67
that looks really smart!  ________________________________________ Proud Member of the ASTOR Owners Club |
|
|
|
|
Regular Location: Leeds Registered: 12 Feb 2011 Posts: 276 Status: Offline |
Post #68
Cracking on fast there mate! What primer you used?________________________________________ Ph1 Cossack 6' |
|
|
|
|
Regular Location: Northwich Registered: 03 May 2016 Posts: 353 Status: Offline |
Post #69
Cheers Lads.I'm using the U pol filler primer. Went on well - will judge better when I come to sand it in the coming days to see how it adhered. Certainly seems to have done a good job on micro pin holes etc. Wasn't cheap tho, but offered decent coverage. |
|
|
|
|
Senior User  Location: northamptonshire Registered: 06 Jun 2008 Posts: 667 Status: Offline |
Post #70
looks mega mate! Glad your put 18"s on it. really helps the look. ________________________________________ 1997 ph1 bianca GTI6 - The looker1996 ph1 Sigma GTI6 - Dead  1999 Red Rallye - The Daily 2005 Nissan Navara D40 - Family car 1968 Mustang Coupe - The dirty little secret Put ya foot down, put ya foot down we'll loose em easy! |
|
|
|
|
Regular 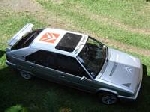 Location: West Byfleet Registered: 11 Jul 2013 Posts: 451 Status: Offline |
Post #71
Wow you are really making fast progress on your car, looks impressive, I wish I could fill as good as that. Are you going to put anything behind the fibreglass panel or leave it hollow?. I had a problem with the quarter panel at the bottom corner where it meets the bottom corner of the door, it sat too high up off the sill. Looks like yours is done well. |
|
|
|
|
Regular Location: Northwich Registered: 03 May 2016 Posts: 353 Status: Offline |
Post #72
I'll think I'll be leaving it as it is behind there Rouben. It's so solid as it is, being a kevlar panel. It certainly doesn't need any extra support, and the thought of moisture sitting underneath some expanding foam fills me with dread. I'll be using some arch liners though. Either Kevlar or Twintex. Today was a fairly full day of filling and sanding. As per the last panel, I started off cleaning up the joins and removing excess PU so the kevlar bridging filler sits on bare metal or kevlar, and not a skin of PU. 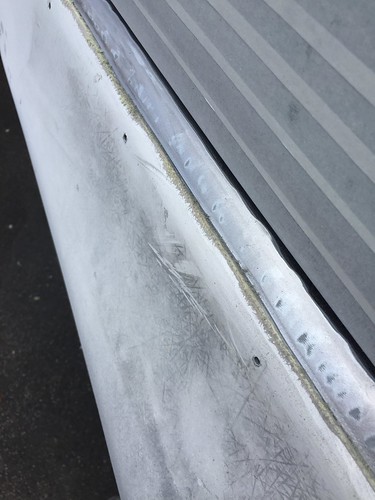 Whole panel ready for kevlar bridging filler: 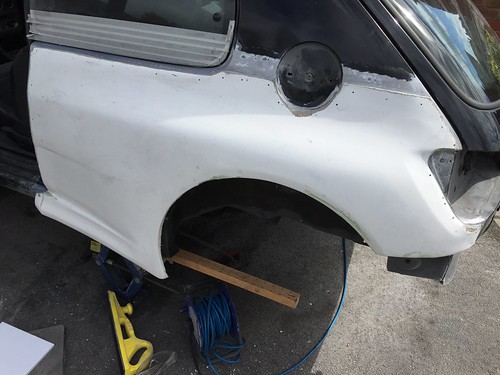 At this point, I'd already found a few air bubbles and ground back the loose gel coat, and filled them. Had a very timely delivery.. I'd completely forgotten that I'd run out of filler, and I'd just prepped the panel ready to start just as Parcelforce arrived..  Wayside Adhesives must be doing a special offer as a pair of gpA shocks magically appeared at the same time.. maybe... First layer of filler on before lunch. Had already hailed on me by this point... Sanded back some key areas, and went with the next filler.. then it hailed again... Had to put some boards on the roof and weigh them down to shelter some newly applied filler from the elements.. 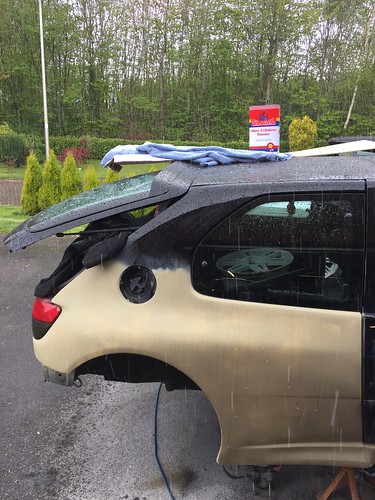 Job done.. 10mins later it was glorious sunshine. If nothing else the filler will have been exposed to lots of temp changes before I get to the point of painting it, so it should be a pretty stable base to work from. So end result from the day was this.. Some parts with dolphin glaze on (un-sanded) and some parts still kevlar bridging filler and not much else. Was just a question today of getting some small wins between the weather bombs.. Still got loads to do on this panel. 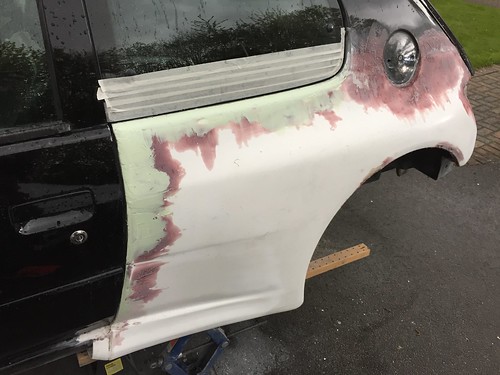 Tomorrow I'll be picking up an EZ gazebo (a couple of days late I hear you cry) and hopefully dropping my beam of with Jord924 (Andy) for refurb. |
|
|
|
|
Regular Location: Leeds Registered: 12 Feb 2011 Posts: 276 Status: Offline |
Post #73
Awesome! Is that kevlar filler hard to sand or is it just like sanding fibreglass filler?I need to invest in a pop up gazebo as well. Wanting a nice clean area when spraying instead of my dusty, cramped garage. ________________________________________ Ph1 Cossack 6' |
|
|
|
|
Regular Location: Northwich Registered: 03 May 2016 Posts: 353 Status: Offline |
Post #74
That kevlar filler is bloody hard to sand! It's solid stuff when it's set. It took ages just to sand back a small area today, yet once a bit of regular filler is on, it's plain sailing, so you really notice the difference. |
|
|
|
|
Regular Location: Northwich Registered: 03 May 2016 Posts: 353 Status: Offline |
Post #75
No nice piccies today, heh heh!But I did collect an EZ up, and also drop off my beam with Jord924. My trailing arms are with Allan at Bridgecraft for the maxi track width spacers and a spruce up, so I'm aiming for those to go direct to Andy and when he's ready he can complete the beam re-build. What Andy doesn't know about those beams isn't worth knowing so I'm in good hands there. So after covering over 150miles today and doing am and pm school runs and a swim session with my little lad, I must confess to still getting a little sanding and filling session in after tea.. Gives me a head start tomorrow. I'm hoping to finish up the NSR panel the same as the other side in filler primer. I would say 'weather permitting' but I haven't just bought an EZ up for nothing Q for you rally types out there.. Anyone fitted a hydraulic handbrake and retained the normal handbrake? I'm interested to see where you've put it and how it's mounted. Cheers Iain |
|
|
|
The Peugeot GTi-6 & Rallye Owners Club - ©2024 all rights reserved.

Please Note: The views and opinions found herein are those of individuals, and not of The Peugeot 306 GTi-6 & Rallye Owners Club or any individuals involved.
No responsibility is taken or assumed for any comments or statements made on, or in relation to, this website. Please see our updated privacy policy.