Post #26
Looks like a great base for a project!


|
| Author | Subject: 306 Maxi project |
|
Seasoned Pro 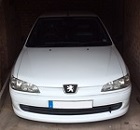 Location: Worcester Registered: 02 Aug 2014 Posts: 1,025 Status: Offline |
|
|
|
|
|
Regular Location: Northwich Registered: 03 May 2016 Posts: 353 Status: Offline |
Post #27
Ok update time!Been away with work for nearly two weeks, but now have a bit of time off to get cracking. Inevitably peeling back some of the layers has created jobs I hadn't bargained on, so now I just need to get going on some jobs and make the most of the time I have. My brother is doing the calliper adaptors for me, so with 330mm brakes in the offing I needed a bigger master cylinder. I am fitting a bias valve and hydraulic handbrake too. I think it was Devere off here, plus another that found the VW transporter T4 master cylinder fits. It's 25.4mm too. Just needs some tweaking due to the outlets being on the opposite side but that's not a problem. 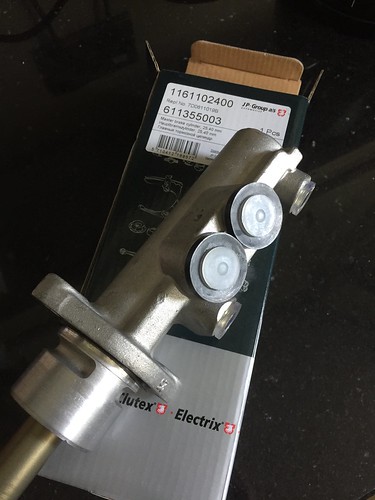 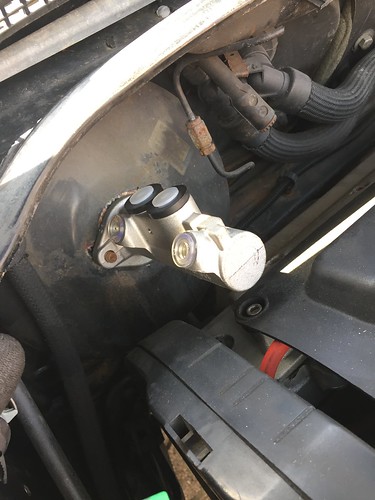 So with breaking a hard pipe trying to disconnect a flexi hose at the junction in the front arch, I thought sod it - out it all comes - the whole rear brake compensator can go, so out came all the hard pipes, all the and wiring. I just ripped into it. Takes 5mins with a cutting disc  Made a decent little pile on the floor. About 5kg in total I reckon. Of course a few lines need to go in their place though. Made a decent little pile on the floor. About 5kg in total I reckon. Of course a few lines need to go in their place though.Half the motivation for getting the abs unit out the way and the associated wiring was the need to de-rust and repaint that whole chassis rail section where the battery went and into the top of the inner arch below the fuse box. That was looking pretty crusty and needed doing. I would have rather done without the extra jobs, but now's the time. There's still a few bits further along the bulkhead I want to attend to, but that can wait for the day when the engine comes out as I'm sure it will at some point in the future. This is enough for now.. So I got busy with various attachments and made a decent impression. Before: 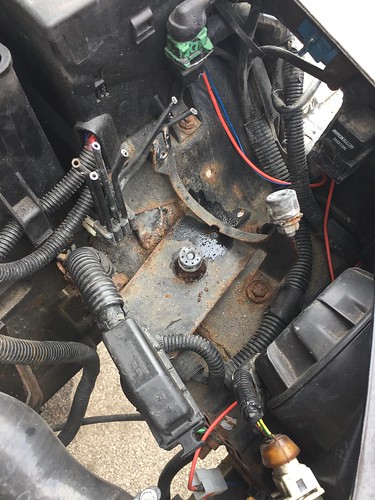 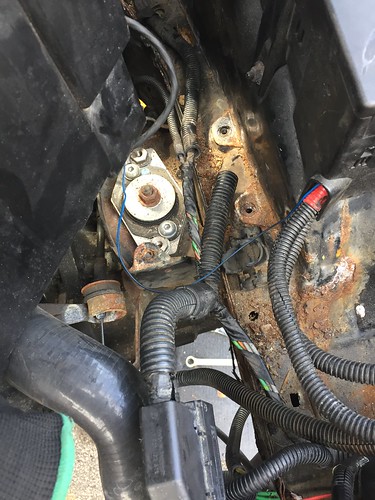 After: 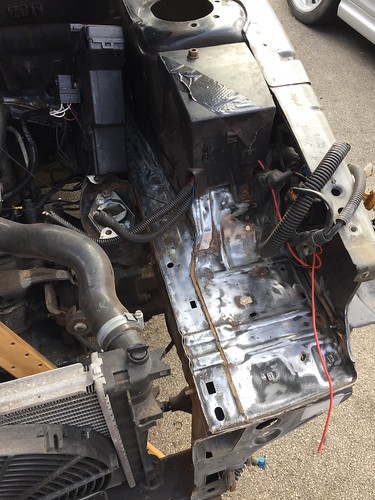 Now then I've got some questions for you pro's out there; Can I strip back all this of this wiring from the abs unit - is it a standalone loom? There's a large trunking of wiring along the chassis rail which looked abs only, leaving the large connector on the side of the unit itself, which leads to this little green connector on the side of the fuse box - is this still abs? 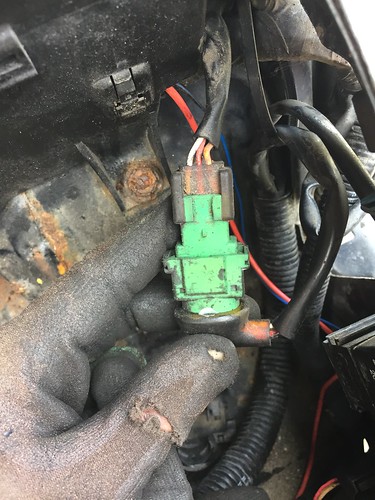 The other question I have it's what's all this crap behind the front bumper in the NSF arch? looks like I have two horns, and some control unit. Is it alarm stuff - how much can I rip out? I only need a horn for the well, horn...  I need to tidy up the metal work behind here and in the arch so if I can chop loads of this crap out I will. If I need to carefully remove.. well that's another matter. I'm more of a cutting disc and snips kinda of a dismantler. So that was basically yesterday's progress. Today I'll be treating the metalwork I cleaned up with Bilt hamber and will be doing more metal work cleaning under the front arches, as well as dropping out the old beam and looking at what I need to do for the paint work/metal work in the boot floor. Mercifully it looks a lot better than the front. Oh, my extended driveshafts reappeared back from driveline. Reasonable bill too. Not sure what to do on CV's though. Is there anyway of telling if they're good or bad from visual inspection? Don't want to replace the CV's for the sake of it, but because they were spares, I don't know their condition... I'll keep you posted on day 2 later.. Cheers Iain |
|
|
|
|
Regular Location: Northwich Registered: 03 May 2016 Posts: 353 Status: Offline |
Post #28
Oh and I still need some of those front subframe mounting cups. Any about? |
|
|
|
|
Capt Pedantic  Location: Bigend, Wales. Registered: 27 Mar 2007 Posts: 25,817 Status: Offline |
Post #29
abs is standalone yes, will have a power and earth plus ignition and warning light and obd, will sll unbolt/unplug easy________________________________________ need a part number? get on here - http://public.servicebox.peugeot.comBring on the Trumpets. |
|
|
|
 Location: Leeds Registered: 20 Aug 2005 Posts: 8,878 Status: Offline |
Post #30
RallyeRed wrote: Oh and I still need some of those front subframe mounting cups. Any about? either try someone breaking on here to see if they can get one off in tact or take a trip to a scrappy I think they're the same across the range although it does list a slightly different part no for Automatics on Service Box???? ________________________________________ Proud Member of the ASTOR Owners Club |
|
|
|
|
Capt Pedantic Location: Bigend, Wales. Registered: 27 Mar 2007 Posts: 25,817 Status: Offline |
Post #31
auto subframes i believe are spaced down to clear the gearbox.________________________________________ need a part number? get on here - http://public.servicebox.peugeot.comBring on the Trumpets. |
|
|
|
|
Regular Location: Northwich Registered: 03 May 2016 Posts: 353 Status: Offline |
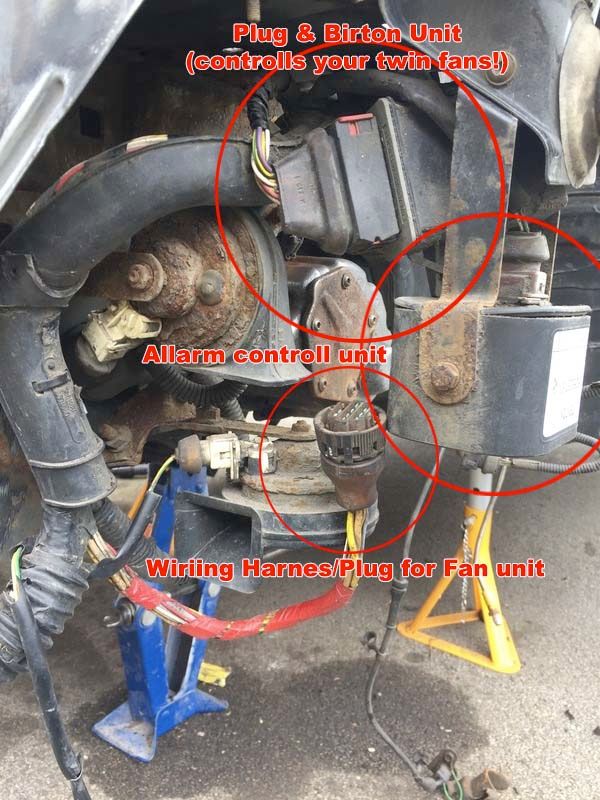
Post #32
Good knowledge! Thanks Gents.What about this load of crap? I can see two horns, some sort of module with Texton written on it; a connection box above it, and also a multi socket which was connected to nothing. 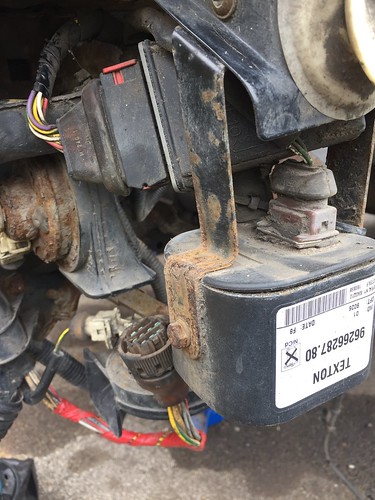  If all I want is a working horn, which one is a keeper? And if the rest is alarm or central locking related (?) can I just cut it out? |
|
|
|
|
Location: Leeds Registered: 20 Aug 2005 Posts: 8,878 Status: Offline |
Post #33
 ________________________________________ Proud Member of the ASTOR Owners Club |
|
|
|
 Location: cheshire Registered: 28 Feb 2004 Posts: 26,793 Status: Offline |
Post #34
gnrlee wrote: not bad.. a typo in every bit you added to the photo  ________________________________________ 306 rallye reproduction decals (full sets/individual decals) | 306 b-pillar textured vinyl weatherstrips306 slam panel esso stickers | 306 yellow / orange / pension fund red side door badges gti6 inlet manifold badges | 306 rear boot badges (p2/p3) winner of Extraction of toys from prams with outstanding vigour award 2009 [source: gti6 owners club] |
|
|
|
|
Seasoned Pro  Location: Leicestershire Registered: 15 Jan 2013 Posts: 2,473 Status: Offline |
Post #35
From memory, either horn will work alone if you disconnect the other. I am fairly sure I've tried this, and if I remember correctly some base models only came with one horn, someone else will confirm I'm sure.Can you not connect the battery and test the horns? ________________________________________ 61k miles Ph.1 Diablo '6 Project Thread |
|
|
|
|
Regular Location: Northwich Registered: 03 May 2016 Posts: 353 Status: Offline |
Post #36
RetroPug wrote: From memory, either horn will work alone if you disconnect the other. I am fairly sure I've tried this, and if I remember correctly some base models only came with one horn, someone else will confirm I'm sure. Can you not connect the battery and test the horns? Not at the moment I'm afraid - I'm past the point of no return in relocating battery to the boot, so terminals have been snipped and I'll be sorting out a junction box. It's just that particular job is not too high on my priority list, but now it's tricky sorting out which bits are needed as I attempt to sort rust and paint the inner arches. It's odd they have two horns - let's hope I save the right one! Cheers Iain |
|
|
|
|
Capt Pedantic Location: Bigend, Wales. Registered: 27 Mar 2007 Posts: 25,817 Status: Offline |
Post #37
not odd, high and low tone.________________________________________ need a part number? get on here - http://public.servicebox.peugeot.comBring on the Trumpets. |
|
|
|
|
Regular Location: Northwich Registered: 03 May 2016 Posts: 353 Status: Offline |
Post #38
Well it'll be a mono-horn from now on, or maybe no horn at all if I've snipped the wrong wires..Day two of the blitz continued today. Feeling more like a resto than a maxi build at the moment, but need to get the basics right first. Started with the Bilt Hamber rust treatment first. First coat, then wait 30mins, then second coat. Goes purple at first, then turns dark like this after; 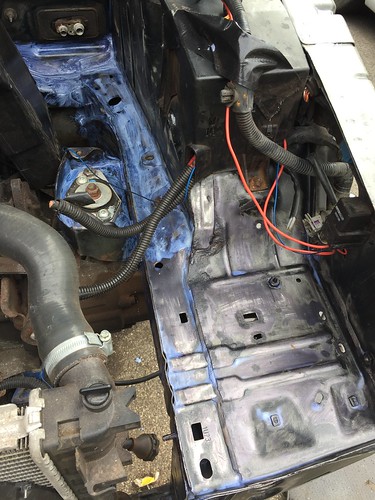 Came out fine.  I did loads of prep work under the NSF arch as well. I can't paint over the Bilt Hamber for 24hrs, so will do that and the inner arch tomorrow. Also dressed the seam back to allow a bit more tire clearance. Hopefully it will be enough. Not going to tub it yet if I can help it. Also removed the side skirts and rear beam. Discovered I hadn't left the boot unlocked before disconnecting the battery and cabling etc, so cue lots of huffing and puffing inside to get access to the beam mount bolts. Not the best time to remember you've left a gear box and a wheel inside the boot. You don't want to do that..  To get the beam out the exhaust and heat shield came off too. Inevitably all the rusty heat shield bolts all sheared off. The heat shield was pretty good on the inside, but the outside was pretty ropey. Should come up ok though. Bill hambered it again.. 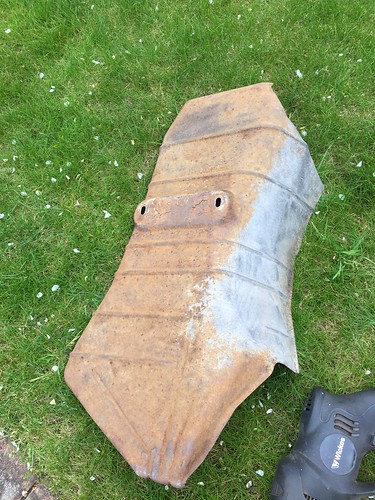 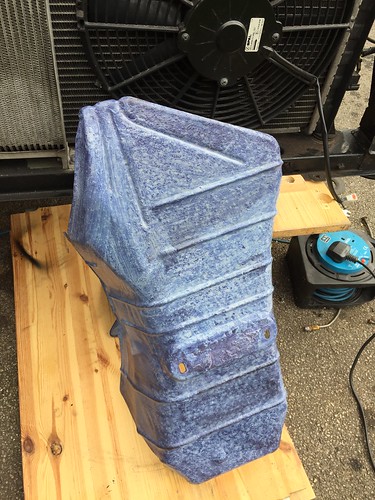 Underside pretty good though. 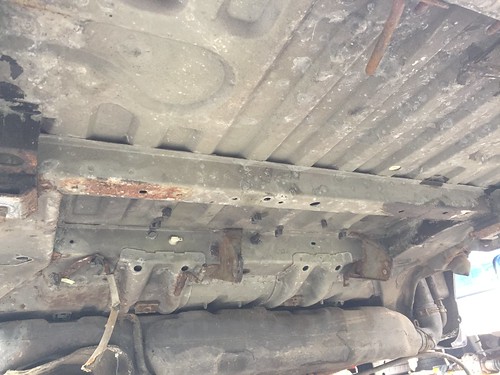 So tomorrow's jobs weather permitting, is chassis rail, inner arch paint, prep the boot floor and Bilt Hamber any flaky bits, and maybe start cutting out the rear quarters. Cheers Iain |
|
|
|
|
Senior User  Location: heswall Registered: 27 Jun 2014 Posts: 623 Status: Offline |
Post #39
RallyeRed wrote: Well it'll be a mono-horn from now on, or maybe no horn at all if I've snipped the wrong wires.. Day two of the blitz continued today. Feeling more like a resto than a maxi build at the moment, but need to get the basics right first. Started with the Bilt Hamber rust treatment first. First coat, then wait 30mins, then second coat. Goes purple at first, then turns dark like this after;  Came out fine. I did loads of prep work under the NSF arch as well. I can't paint over the Bilt Hamber for 24hrs, so will do that and the inner arch tomorrow. Also dressed the seam back to allow a bit more tire clearance. Hopefully it will be enough. Not going to tub it yet if I can help it. Also removed the side skirts and rear beam. Discovered I hadn't left the boot unlocked before disconnecting the battery and cabling etc, so cue lots of huffing and puffing inside to get access to the beam mount bolts. Not the best time to remember you've left a gear box and a wheel inside the boot. You don't want to do that..  To get the beam out the exhaust and heat shield came off too. Inevitably all the rusty heat shield bolts all sheared off. The heat shield was pretty good on the inside, but the outside was pretty ropey. Should come up ok though. Bill hambered it again..  Underside pretty good though.  So tomorrow's jobs weather permitting, is chassis rail, inner arch paint, prep the boot floor and Bilt Hamber any flaky bits, and maybe start cutting out the rear quarters. Cheers Iain moving along nicely with car iain , keep up the good work mate ,  ________________________________________ wayne mcardle |
|
|
|
|
Seasoned Pro  Location: Bristol Registered: 20 Apr 2013 Posts: 5,206 Status: Offline |
Post #40
FairPlay Iain ...keep the updates coming & I too locked my car a few years ago & it was delocked but the remote failed  |
|
|
|
|
Location: Leeds Registered: 20 Aug 2005 Posts: 8,878 Status: Offline |
Post #41
rikky wrote: not bad.. a typo in every bit you added to the photo  im Dyslexic and was in a rush to get to work you got the jist im Dyslexic and was in a rush to get to work you got the jist Day666 wrote: FairPlay Iain ...keep the updates coming & I too locked my car a few years ago & it was delocked but the remote failed sure it wasn't just a key sync issue? how many keys do you have? ________________________________________ Proud Member of the ASTOR Owners Club |
|
|
|
|
Regular  Location: West Byfleet Registered: 11 Jul 2013 Posts: 451 Status: Offline |
Post #42
Its good you are doing all the prep work, hopefully you won't need to do anything like that for many years to come. Its all the stuff that no body sees (except on here) that takes the time. Have fun cutting those quarter panels out, no going back from there. |
|
|
|
|
Regular Location: Northwich Registered: 03 May 2016 Posts: 353 Status: Offline |
Post #43
The keys were no use to me Dave as the battery and C/locking wasn't connected. Climbed in the boot and sorted it in the end..Ok day 3 of the blitz. It was a bit wet first thing so laying on my back sorting the boot floor out didn't appeal, so I thought let's go for putting on a rear 3/4 panel instead. I had it in my mind that if I got a jiggle on I could do one side from start to finish.. So first up start trimming the panel and see how it fits. Because they're Kevlar and also quite thick I couldn't keep all the retaining edges because it wouldn't sit right. Using the swage line along the centre of the panel that lines up to the bump strip on the door, I could assess what to keep and what to cut. In the event I ended up cutting the retaining edge along the door shut and window shut. I did similar with the WRC arched Impreza I'm building so it felt comfortable enough to reach for the cutting discs, but you do have to take care to keep checking and cut a little at a time. This is an early point where I was starting to move in the right direction and get a feel for where it's good and what needs work. 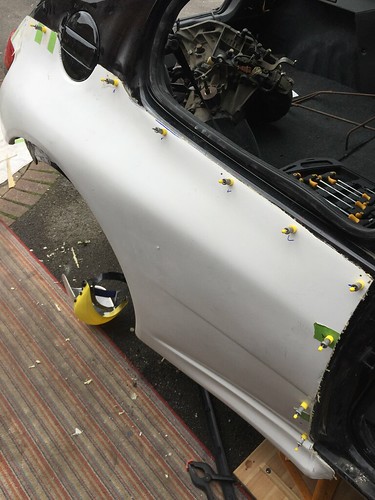 Having sorted the door shut and window edge I could see the back part would be the main challenge. 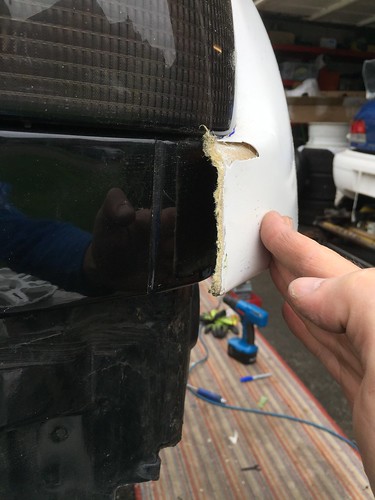 Little by little I began to figure out how I could get it to wrap around and stay close to the bodywork. If it takes too much pressure to reach it's home, it will in time crack the paint work, so it needs to feel 'relaxed' when in position.  After a bit more fettling, and removing the panel for the millionth time, it was time to start cutting the arch. I didn't want to go fully exposed like Wayne and Ryan have done and peel it all the way back. I liked the idea of the inner arch remaining joined to the outer panel roughly behind where the fuel filler sits. I figure it'll be a bit more weather proof and keep more strength in the panel. I don't think there's a right or a wrong way here, just horses for courses.  I carried on cutting until I was happy with clearance, primed it and painted the exposed edges. I did some rust treatment on the inside behind the fuel filler pipe, but all told everything was in good shape. As you can see above I then used a flap wheel to get to bare metal for a good key for the PU bonding goo. I fitted a little blacket on the back of the panel near where the bumper sits to provide a good edge for the new panel to sit against. 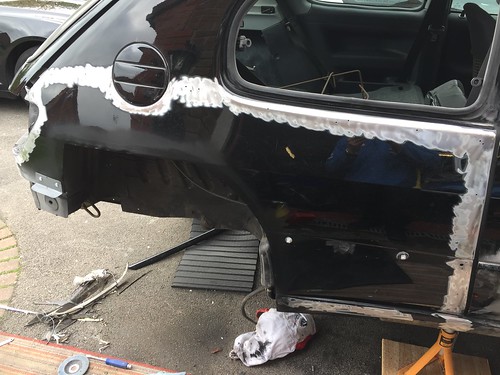 Then it was bonding time! No pics as you need to move fairly speedily at this point. But after scurrying around getting it in position and secured I got to this point; 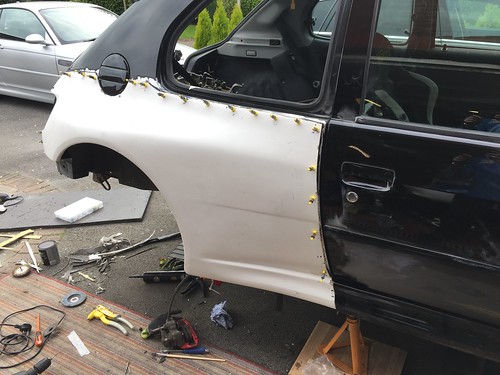  I used some great little speed clip things to secure the panel to the car. The key (so I'm told) to a good bond is in the strength of the join, and these clips are great in terms of being quick to use when mounting and checking everything, as well as making a strong join. Inevitably I ran out and had to resort to a few self tappers, but the hard work was done at that point. The original skirts were easy to cut to align with the new panel too. So that's job done for today. If the weather's kind I'll be a fair bit quicker doing the opposite side tomorrow now I know exactly how I'm tackling it. Cheers Iain |
|
|
|
|
Senior User Location: heswall Registered: 27 Jun 2014 Posts: 623 Status: Offline |
Post #44
you should be ashamed of yourself pinching my spare panels lol , really moving along with this iain , ,keep up the updates mate,just shows what you can do on limited budget if you do a lot of work yourself________________________________________ wayne mcardle |
|
|
|
|
Regular Location: Northwich Registered: 03 May 2016 Posts: 353 Status: Offline |
Post #45
Cheers Wayne - your spares went to a good home Weather looks decent today, but not so good for next week apparently so will be making hay while the sun shines.. All the time the Impreza is skulking in the luxury of the garage! Got my eye on an EZ up gazebo - can double up as my spray booth too.. Cheers Iain |
|
|
|
|
Location: Leeds Registered: 20 Aug 2005 Posts: 8,878 Status: Offline |
Post #46
The rear quarter looks a good fit too  We got the tools and the tallent  At this rate should be done by May! ________________________________________ Proud Member of the ASTOR Owners Club |
|
|
|
|
Seasoned Pro  Location: DoncastAAAAARGH Registered: 13 Jan 2008 Posts: 4,637 Status: Offline |
|
|
|
|
|
Regular Location: Northwich Registered: 03 May 2016 Posts: 353 Status: Offline |
Post #48
Cheers lads.So today was day four of the maxi attack. Had to run some errands in the morning, so didn't get on it until 11am. I wasn't too worried, thinking I know exactly how to approach it now I've done one side, but somehow managed to run it pretty close to tea time. When you have a Mrs and kids, 'playing with your car all day' doesn't quite run to a solid enough excuse to miss sitting down with the family! Anyway, I was pleased to see that the side I did yesterday has bonded well. It takes 24hrs for the bonding to fully cure, so I left the speed pins in for a bit longer, whilst I worked my way through the fitting of the the NSR panel. First up as yesterday; offer it up and see what we're looking at. With the best will in the world the panels will always have a bit of individuality about them. So far so good; 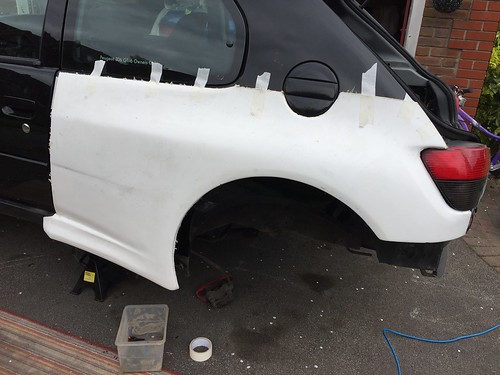 Seemed to look pretty good all round. This one fitted a bit better under the rear 3/4 where the bumper sits. (See pic below) Had a bit of panic that if I pushed that home, I would end up with the OSR wider than the NSR. Quick chat with Wayne, and I worked out what I needed to do to get it right (Cheers mate). 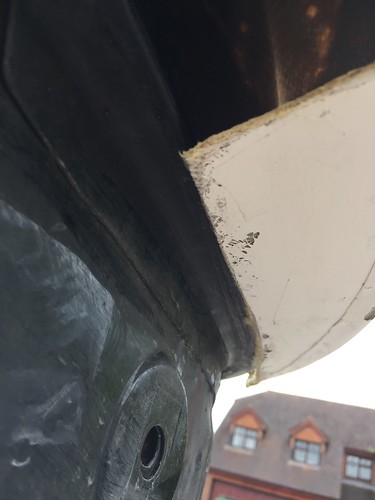 So I roughly ended up cutting back most of the retaining edges again, the same as yesterday. Again, after doing the impreza in a similar fashion I felt comfortable doing it this way. I thought I'd take a look at what clearance I'd have on offer, so I jacked a wheel up in to the arch on the one I did yesterday. I found a few tight spots which I'll cut back further another time, but it helped me figure out how much I needed to cut back on today's side. Mostly on the part where the rear bumper attaches, which is easily sorted. Looked bloody good with a wheel in the arch though I have to say.. 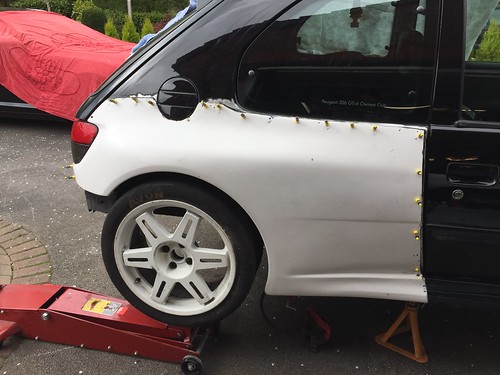 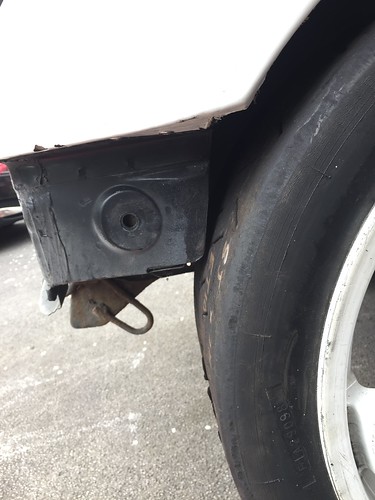 So skip forward a few hours and I've cut the arch out, deeper and longer (front to back) than yesterday Bit of zinc primer over the cut (and after this pic, some top coat). I've also keyed the parts where the bonding will adhere, and done a bit of rust treatment too. Virtually ready for the panel to go on now. 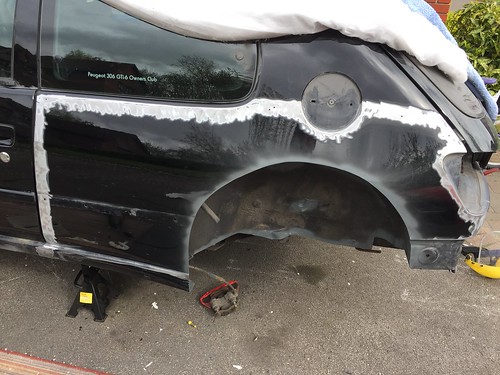 And here we are, panel on. Mostly speed pins again, plus some self tapers where a deeper gap or thickness requires it (or I just ran out of speed pins), and the odd alloy rivet out of sight. Nothing focuses the mind like putting PU on a panel and fixing it on in the right place in double quick time! 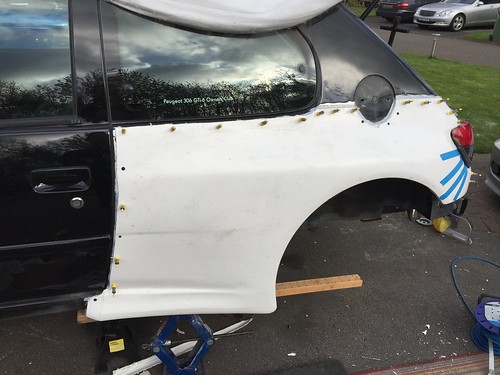 You'll notice the scissor jack and the length of wood under the skirt portion of the panel. This is to lift the underside edge fully into the bottom of the original sill panel. It's bonded here too, but I get good tension on the join using the jack, and once it's fully cured I'll follow up with some fasteners to make it extra solid. I also had to use some tape and card wedged under rear light in order to get the sort of inward tension I wanted on the trailing edge of the panel into the light aperture. It's tricky to use the speed pins or self tappers due to the angle of the bodywork underneath. So there we go. All good. The last couple of days are pretty pivotal in the project for obvious reasons - there's no going back now! I'm pretty pleased with how it looks. The panels are easily as good as the WRC stuff I bought for the Impreza, so can't say fairer than that Cheers for now Iain |
|
|
|
|
Seasoned Pro  Location: Oxford Registered: 17 Sep 2013 Posts: 1,968 Status: Offline |
Post #49
Hi what size and offset are your wheels they fill the arches nicely ________________________________________ Old pugs don't die they just get faster |
|
|
|
|
Regular Location: Northwich Registered: 03 May 2016 Posts: 353 Status: Offline |
Post #50
Mate, they're just sitting on a jack. Was supposed to be Pug CB, 8x18 ET10. Turned out to be Ford CB and ET25! Es Cos in other words. So likely I'll be moving them on. Can't go too far wrong with anything circa ET 13 @ 8". Depends on your axle width of course.. |
|
|
|
The Peugeot GTi-6 & Rallye Owners Club - ©2024 all rights reserved.

Please Note: The views and opinions found herein are those of individuals, and not of The Peugeot 306 GTi-6 & Rallye Owners Club or any individuals involved.
No responsibility is taken or assumed for any comments or statements made on, or in relation to, this website. Please see our updated privacy policy.