Post #76
Brill thanks for that! Any help is much appreciated!
I also still have original panels if people want to buy.
Bumpers wings etc....
And 2 sets of alloys


|
| Author | Subject: 306 MAXI BUILD |
|
Junior User  Location: Peckforton chester Registered: 12 Mar 2015 Posts: 80 Status: Offline |
Post #76
Brill thanks for that! Any help is much appreciated! I also still have original panels if people want to buy. Bumpers wings etc.... And 2 sets of alloys |
|
|
|
|
Regular Location: Northwich Registered: 03 May 2016 Posts: 353 Status: Offline |
Post #77
Good to catch up with you yesterday Ryan!The car's looking good. The cage is something else. Look forward to seeing how it takes shape. Iain |
|
|
|
|
Seasoned Pro  Location: Fareham Registered: 17 Dec 2006 Posts: 4,602 Status: Offline |
Post #78
Ryanennion83 wrote: Yeah flying now. The beam is ready to collect next week from Andy Williams. Had Bridgecraft do the wider rear arm Conversion solid mounts etc.... The front wider suspension has turned up at DIMMA. Got to go to RED Custom Cages next week with the seats to position them where I want them! Full steam ahead! Did you not get the mc phearson top mounts or are you planning on using adjustable ones? Do you mind telling me how much you paid for the wishbones, shafts and track rod ends? Pm me if you like  |
|
|
|
|
Seasoned Pro Location: Fareham Registered: 17 Dec 2006 Posts: 4,602 Status: Offline |
Post #79
I know you kind of answer my question previously but are the beam solid mounts standard depth or did you get shorter ones so the beam is closer to the body? |
|
|
|
|
Junior User Location: Peckforton chester Registered: 12 Mar 2015 Posts: 80 Status: Offline |
Post #80
Engines outRyanennion83 has attached the following image: |
|
|
|
|
Junior User Location: Peckforton chester Registered: 12 Mar 2015 Posts: 80 Status: Offline |
Post #81
Shot blast engine bay next!Ryanennion83 has attached the following image: |
|
|
|
 Location: Leeds Registered: 20 Aug 2005 Posts: 8,878 Status: Offline |
Post #82
________________________________________ Proud Member of the ASTOR Owners Club |
|
|
|
|
Senior User Location: Barnsley Registered: 09 May 2011 Posts: 799 Status: Offline |
Post #83
Noice!!________________________________________ 99/S Carbon Gti-5 |
|
|
|
|
Junior User Location: Peckforton chester Registered: 12 Mar 2015 Posts: 80 Status: Offline |
Post #84
pugheaven wrote: I know you kind of answer my question previously but are the beam solid mounts standard depth or did you get shorter ones so the beam is closer to the body? Off the top of my head around 900 euros for all the front suspension driveshafts etc.. Andy Williams built the beam. He's used I think a shallower solid mount. Going full adjustable on the front |
|
|
|
|
Junior User Location: Peckforton chester Registered: 12 Mar 2015 Posts: 80 Status: Offline |
Post #85
pugheaven wrote: I know you kind of answer my question previously but are the beam solid mounts standard depth or did you get shorter ones so the beam is closer to the body? Off the top of my head around 900 euros for all the front suspension driveshafts etc.. Andy Williams built the beam. He's used I think a shallower solid mount. Going full adjustable on the front |
|
|
|
|
Junior User Location: Peckforton chester Registered: 12 Mar 2015 Posts: 80 Status: Offline |
Post #86
More blastingRyanennion83 has attached the following image: |
|
|
|
|
Junior User Location: Peckforton chester Registered: 12 Mar 2015 Posts: 80 Status: Offline |
Post #87
Underside etch primed, 2k primed and ready for some 3M stone guard and top coat.Ryanennion83 has attached the following image: |
|
|
|
|
Junior User Location: Peckforton chester Registered: 12 Mar 2015 Posts: 80 Status: Offline |
Post #88
Underside etch primed, 2k primed and ready for some 3M stone guard and top coat.Ryanennion83 has attached the following image: |
|
|
|
|
Regular Location: Northwich Registered: 03 May 2016 Posts: 353 Status: Offline |
Post #89
I popped over to Ryan's (SP Automotive) today as I've dropped my better half's M3 off for some paintwork and to get our CSL boot lid fitted.Was also a good chance to have a nose around Ryan's maxi build which I've seen on a few occasions recently. It's fair to say not only is he doing a cracking job, things are also moving on nicely. With Ryan's permission I grabbed a few pics and said I'd post them up.   Both rear qtr panels are now on, and Ryan is in the process of tubbing the front inner wings as per the works cars.   You will have course noticed that this is going on when some of the car is painted, but this only stemmed from Ryan wanting to get some paint on the cage, the underside, and the interior to prevent surface rust from appearing after the fabrication. When you have your own bodyshop I guess you have plenty of options!   I think it's fair to say you're not going to see many 306's so well prepared and fabricated as this one! Along with Ryan's growing parts cupboard awaiting fitting (3 way dampers, AP's, VTS rack and more on the way) I reckon it'll be a fair weapon. Will look the part for sure. Evo 3 bumper ready to go on too. Cheers Ryan - see you in 3 weeks to pick up the M3  Iain |
|
|
|
|
Seasoned Pro 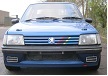 Location: Great Hockham Registered: 28 May 2013 Posts: 1,593 Status: Offline |
Post #90
Coming along well :-) I thought i recognised your name you bought the VTS Rack off me ________________________________________ 1998 Supercharged White Rallye1992 205 GTi6 205 Turbo 340bhp |
|
|
|
|
Location: Leeds Registered: 20 Aug 2005 Posts: 8,878 Status: Offline |
Post #91
Looks great!________________________________________ Proud Member of the ASTOR Owners Club |
|
|
|
|
Junior User Location: Peckforton chester Registered: 12 Mar 2015 Posts: 80 Status: Offline |
Post #92
It's a pain in the ass 1 step forward 2 back but getting there now.Geoff Turton popped in today and gave me his approval says it's spot on in terms of the work and seeing as he built the Works Maxis then that's not a bad thing at all. Bought some Baker BM top mounts which I've had to modify to move out 40mm at the top. I'll have to re-in force the strut tops themselves now to suit. |
|
|
|
|
Junior User Location: Peckforton chester Registered: 12 Mar 2015 Posts: 80 Status: Offline |
Post #93
PAINTEDRyanennion83 has attached the following image: |
|
|
|
|
Junior User Location: Peckforton chester Registered: 12 Mar 2015 Posts: 80 Status: Offline |
Post #94
BOOMRyanennion83 has attached the following image: |
|
|
|
|
Seasoned Pro  Location: Co. Durham Registered: 12 Feb 2009 Posts: 2,401 Status: Offline |
Post #95
Looks great!What is the purpose of the new front wheel arch tubs? I'm guessing the rally boys do it for wheel travel but doesn't seem necessary for a road car? ________________________________________ Team 'unintentional rat look' |
|
|
|
|
Capt Pedantic  Location: Bigend, Wales. Registered: 27 Mar 2007 Posts: 25,817 Status: Offline |
Post #96
its so you can run the big wheels and still have some wheel travel, I'd argue its even more necessary on a road car with that size wheel tbh.________________________________________ need a part number? get on here - http://public.servicebox.peugeot.comBring on the Trumpets. |
|
|
|
|
Regular  Location: Anglesey Registered: 08 Feb 2008 Posts: 108 Status: Offline |
Post #97
Looks awesome!! |
|
|
|
|
Seasoned Pro Location: Co. Durham Registered: 12 Feb 2009 Posts: 2,401 Status: Offline |
Post #98
welshpug! wrote: its so you can run the big wheels and still have some wheel travel, I'd argue its even more necessary on a road car with that size wheel tbh. Ah right, gotcha. Suppose they are big arches to fill, just haven't seen anyone else with the kit on show this being done ________________________________________ Team 'unintentional rat look' |
|
|
|
|
Seasoned Pro  Location: suffolk/norfolk Registered: 10 Sep 2004 Posts: 2,897 Status: Offline |
Post #99
so what have you done at the back of the front arches? sure that needs to be modfied too as the wheels are going to hit there too?________________________________________ Carl Chambersemail; pugnacious.peugeot@yahoo.co.uk . C.M.CHAMBERS CARS Peugeot Specialist Tel; 01379 586101 after 6.30 or 07889 082466 anytime. pugsport-racing.co.uk |
|
|
|
|
Regular Location: Northwich Registered: 03 May 2016 Posts: 353 Status: Offline |
Post #100
Looks great Ryan. Looking forward to a quick gander when I pick the M3 up Monday |
|
|
|
The Peugeot GTi-6 & Rallye Owners Club - ©2024 all rights reserved.

Please Note: The views and opinions found herein are those of individuals, and not of The Peugeot 306 GTi-6 & Rallye Owners Club or any individuals involved.
No responsibility is taken or assumed for any comments or statements made on, or in relation to, this website. Please see our updated privacy policy.