displaying posts 1 to 25 of 27

Pages (2): [1] 2

Author Subject: Pressed Ball joints removal
shabusta

Regular

Location: Australia

Registered: 10 Sep 2015

Posts: 244

Status: Offline

Post #1
Ordered new parts, wish bone comes with ball joint already attached Big grin .
put it on the car ball joint falls out Dunno turns out its 16mm not 18mm Angry

go through the pain of removing wishbone when strut brace is installed Angry
do some research Cool doesn't sound to hard drill the bolts out or grind them......


HELP!!!!! i've gotten this far i'm tired and i have probably destroyed the middle one...
how the hell do you remove theses pricks of a thing.


Posted 16th Oct 2015 at 10:50
heliosphan

Senior User

Location: UK

Registered: 14 Sep 2007

Posts: 948

Status: Offline

Post #2
What was the reason for drilling the bolts out instead of unscrewing them?

The only way forward now is to keep drilling. Use a good quality drill bit (buy a new one if you have to), go slowly and steadily on the drill and keep stopping to allow the bit to cool. Add a lubricant regularly too, this will preserve the life of the bit.
Posted 16th Oct 2015 at 11:13
shabusta

Regular

Location: Australia

Registered: 10 Sep 2015

Posts: 244

Status: Offline

Post #3
The bolts are pressed, both sides are like a flat head with no Torx or logical way to remove them.

how you see the bolts on the ball joint is how the other side looks, both sides are perfectly smooth,
no thread on the inside just a solid piece of metal.

Posted 16th Oct 2015 at 11:19
heliosphan

Senior User

Location: UK

Registered: 14 Sep 2007

Posts: 948

Status: Offline

Post #4
Oh. Shonky. So that's two parts which Peugeot designed to be independently serviceable that Meyle have decided to make as one. Unsure

Well, get drilling some more and then wrench the ball joint out from the arm. Smile
Posted 16th Oct 2015 at 11:20
shabusta

Regular

Location: Australia

Registered: 10 Sep 2015

Posts: 244

Status: Offline

Post #5
from my research it is the original or older way the wishbones where made, but the 2 original bones i took off even had Torx.

I have stopped work on this until i get a conclusive answer, the middle bolt i have gone all the way through and taken one of the bolt head off which is probably the wrong thing to do, and i have taken the heads off the other 2, and drilled half the bodies.
Posted 16th Oct 2015 at 11:31
rikky 🦔

Location: cheshire

Registered: 28 Feb 2004

Posts: 26,793

Status: Offline

Post #6
Did my HDI wishbones a couple of months ago and both sides were riveted balljoints like these. One side drilled out easy with a normal metal drill bit (made a punch mark in the centre as a pilot point) but the other side was a real pain. Ended up oxyacetylene torching the bolts off!

________________________________________

306 rallye reproduction decals (full sets/individual decals) | 306 b-pillar textured vinyl weatherstrips
306 slam panel esso stickers | 306 yellow / orange / pension fund red side door badges
gti6 inlet manifold badges | 306 rear boot badges (p2/p3)
winner of Extraction of toys from prams with outstanding vigour award 2009 [source: gti6 owners club]
Posted 16th Oct 2015 at 11:36
heliosphan

Senior User

Location: UK

Registered: 14 Sep 2007

Posts: 948

Status: Offline

Post #7
It sounds like you're mostly there to be honest. If you've knocked the heads off, just increase the bit diameter to the same size (or fractionally under) as the bolt hole to remove the remains of the rivet/bolt. If you have a pin punch of the correct diameter, try giving the remains a smack with a hammer to push them through.
Posted 16th Oct 2015 at 11:38
cully

Seasoned Pro

Location: Cullompton

Registered: 12 Jun 2013

Posts: 1,093

Status: Offline

Post #8
Riveted arms are a pain to change just the balljoints, some times its more cost effective to replace the complete arm with the 3 joints

keep drilling eventualy you will get them off
dont drill the holes too big or the ball joint will become adjustable in the arm

Posted 16th Oct 2015 at 11:39
shabusta

Regular

Location: Australia

Registered: 10 Sep 2015

Posts: 244

Status: Offline

Post #9
the ball joint currently attached is 16mm and the wrong size for my car, i already have the correct 18mm to replace it with, or you mean accidentally drilling into the arm?

used the pin punch on both the ones that still have bodies no luck, they didn't even move a millimeter.
Posted 16th Oct 2015 at 11:46
bigbadbowen

Seasoned Pro

Location: Winchester

Registered: 21 Nov 2003

Posts: 13,752

Status: Offline

Post #10
Should of bought decent arms that come with out ball joints ie lemforder from euro car parts the riveted arms tend to be crap quality and some even snap at the p bush - you have been warned - sense would of been to take them back and exchange them for the correct size ball joint type as well ?
Posted 16th Oct 2015 at 12:37
bigbadbowen

Seasoned Pro

Location: Winchester

Registered: 21 Nov 2003

Posts: 13,752

Status: Offline

Post #11
Get some decent drill bits and man up as well ! Or run a grinder through the ball joint in between the river heads and cut them off
Posted 16th Oct 2015 at 12:40
shabusta

Regular

Location: Australia

Registered: 10 Sep 2015

Posts: 244

Status: Offline

Post #12
In Australia the Pug community mostly order parts from Caravel imports, i called them today to try and sort it out and they just gave me advice on how to drill the bolts and to be careful. the ball joint was never meant to be on the bone, as i ordered the correct ones as well.

but yes now that i know of "euro car parts" and they specifically list Lemforder which is the manufacture i originally wanted for all parts, i will be doing that in the future but for now i need to get this car moving as it is now my every day drive.

So bigbadbowen if you know how to remove the bolts please have your helpful input, as logically just drilling the bolts will either damage the bone or it will leave a shaft of the bolt behind, damaging the bones is not what i want to do at all and having a metal shaft with no way of grabbing it for removal is just as big of a problem.
Posted 16th Oct 2015 at 12:46
mocinim

Seasoned Pro

Location: The Darkside of bedford :)

Registered: 09 Jan 2015

Posts: 2,307

Status: Offline

Post #13
Good tip for drilling rivits or any steel related hole cut a small pilot hole in centre then increase the bit size use two or three bits this will avoid damaging the surrounding steel and wont create as much heat
will help to keep your bits from going blunt / overheating half way through your drilling Smile

________________________________________

BLACK RALLYE - phoenix
WHITE RALLYE - valliant

http://public.servicebox.peugeot.com/

https://www.gov.uk/check-mot-history
Posted 16th Oct 2015 at 12:47
bigbadbowen

Seasoned Pro

Location: Winchester

Registered: 21 Nov 2003

Posts: 13,752

Status: Offline

Post #14
As said above increase drill bit sizes till your almost the same size as the original hole then just break the head off one side of the rivet with a hammer and chisel ? Or like I said grind though the ball joint and down inbetween the arm (side on and cut the rivet in half) you don't need the ball joint anyway
Posted 16th Oct 2015 at 12:59
welshpug!

Capt Pedantic

Location: Bigend, Wales.

Registered: 27 Mar 2007

Posts: 25,817

Status: Offline

Post #15
no need to drill, just grind the head off and bash it through with a punch.

________________________________________

need a part number? get on here - http://public.servicebox.peugeot.com

Bring on the Trumpets.

Posted 16th Oct 2015 at 13:08
mocinim

Seasoned Pro

Location: The Darkside of bedford :)

Registered: 09 Jan 2015

Posts: 2,307

Status: Offline

Post #16
welshpug! wrote:
no need to drill, just grind the head off and bash it through with a punch.


Quicker and simpler careful not to gring your bone lad!!

________________________________________

BLACK RALLYE - phoenix
WHITE RALLYE - valliant

http://public.servicebox.peugeot.com/

https://www.gov.uk/check-mot-history
Posted 16th Oct 2015 at 13:51
shabusta

Regular

Location: Australia

Registered: 10 Sep 2015

Posts: 244

Status: Offline

Post #17
all heads are off one side already just drilled them off, as seen in pics.

thank you welshpug, i assumed this bud didn't want to go to far encase i was actually doing something wrong and ended up destroying it.

any tips for the one that has one head on and has been fully drilled through?
Posted 16th Oct 2015 at 14:23
bigbadbowen

Seasoned Pro

Location: Winchester

Registered: 21 Nov 2003

Posts: 13,752

Status: Offline

Post #18
Big hammer and punch or keep drilling out until it's all done
Posted 16th Oct 2015 at 14:36
shabusta

Regular

Location: Australia

Registered: 10 Sep 2015

Posts: 244

Status: Offline

Post #19
Thought as much, thank you for the advice and the reassurance. Pugs are a rare car here in Australian and information is even rarer.

Thank you everyone hopefully i can get this done tomorrow.
Posted 16th Oct 2015 at 14:47
armzsc6

Seasoned Pro

Location: Crowborough

Registered: 22 Mar 2008

Posts: 3,445

Status: Offline

Post #20
Tried this on a pattern arm for a quick last minute fix for someone a few weeks ago and ground off the rivets on one side with an angle grinder. Didn't take to long.... thought I'd then just tap them out with a punch and hammer nice and easy change the ball joint and put bolts through simples right? Nope the rivets were clearly very much interference fit pressed in and would not budge no matter how bigger hammer I used.

As said I usually only fit decent arms TRW or Lemforder which always have bolt on ball joints and are much better quality.

Cheap wishbones the Rubber boots on the ball joints perish after a few months to a year and the ball joint then fails. The P bush rubber splits very quickly too and have been known to sheer off completely due to poor welding in factory.

Buy cheap buy twice.

________________________________________

Black power baby! SUUUUUPERCHARGED Superman
Seat Leon FR TDI 190BHP 300lbft daily gti-6 killer :p
12x 306's owned so far

Cambelts, clutches, service work carried out on All makes and models, Peugeot Citroen / mitsubishi specialist.
Pug planet / Citroen Lexia diagnostics / code reads available.
Posted 16th Oct 2015 at 21:43
bigbadbowen

Seasoned Pro

Location: Winchester

Registered: 21 Nov 2003

Posts: 13,752

Status: Offline

Post #21
Then you will have to drill them right out till you get to m10 I think ?
Posted 16th Oct 2015 at 22:12
shabusta

Regular

Location: Australia

Registered: 10 Sep 2015

Posts: 244

Status: Offline

Post #22
Moving forward, all heads removed insides drilled out and no movement what so ever...

i'm over it, new options:

1 - due to time restraints go back to Caravel Imports and rush a delivery of the same part without ball joint (Meyle / Swag).

2 - order Ocap / Lemforder part from Euro car part and hope it arrives in time.

3 - put old worn wishbone back on, and wait for new parts, just to get back on the road.

4 - order new wishbone however possible, order full set of Lemforder for when they ware out in the near future supposedly (10% off and discounts on parts ATM, supposedly).

5 - mix of the above to get back on the road, and order a whole new set of Lemforder parts.


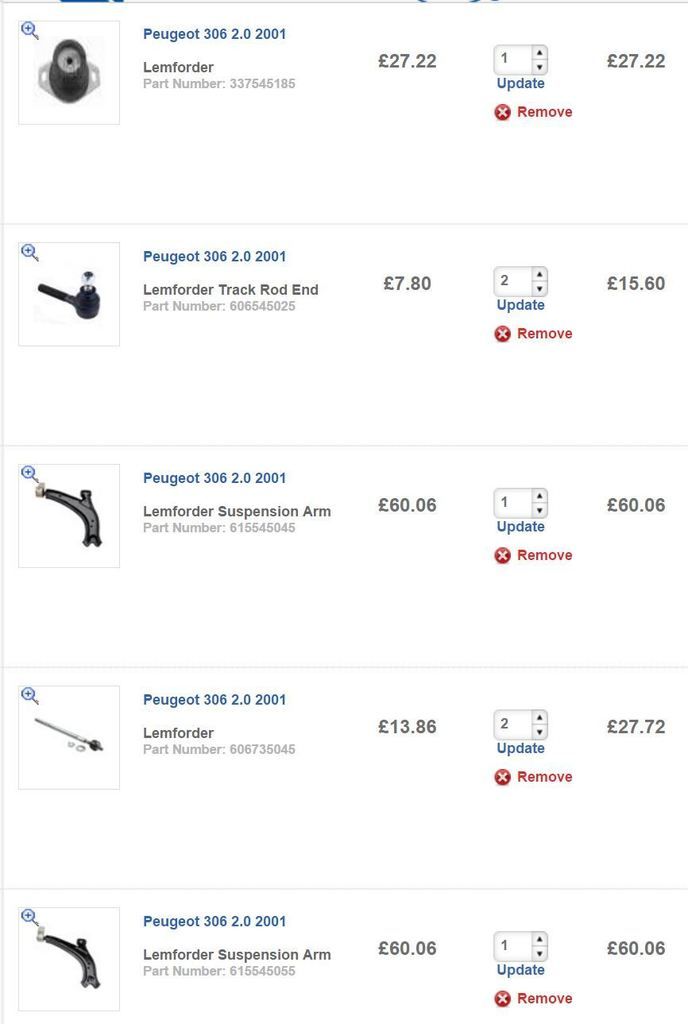
The current order if i go down this path is as pictured, does anyone have anything that should be added, anything and everything is considered, currently front suspension and brakes all round have been replaced with Meyle and Sasic. apart from that everything is OEM from factory, looking for upper right engine mount from Lemforder but it is not listed.

just to reiterate, the problem encountered was simply a bolted on lower ball joint that was not ordered, it came as a whole, all other parts were requested and ordered by a local mechanic.


Posted 18th Oct 2015 at 08:21
bigbadbowen

Seasoned Pro

Location: Winchester

Registered: 21 Nov 2003

Posts: 13,752

Status: Offline

Post #23
Put old stuff back on order new lemforder parts !
Posted 18th Oct 2015 at 09:03
dangti6

aka JKshooter

Location: Taunton, Somerset

Registered: 15 Jun 2006

Posts: 10,305

Status: Offline

Post #24
Have you put the arm in a vice and knocked the joint to move it?

________________________________________

  • Senior Test Automation Engineer for the 306GTi6 Owners Club Forum Wizard


  • Posted 18th Oct 2015 at 09:49
    shabusta

    Regular

    Location: Australia

    Registered: 10 Sep 2015

    Posts: 244

    Status: Offline

    Post #25
    Yea tried everything, i think i have damaged the bone enough in the process to just order another or go for a lemforder order. Im thinking of just getting another then doing a lemforder order when they wear out, ill need the rear end and engine mounts soon anyway.
    Posted 18th Oct 2015 at 09:56

    Pages (2): [1] 2

    All times are GMT. The time is now 19:53

    The Peugeot GTi-6 & Rallye Owners Club - ©2024 all rights reserved.

    Please Note: The views and opinions found herein are those of individuals, and not of The Peugeot 306 GTi-6 & Rallye Owners Club or any individuals involved.
    No responsibility is taken or assumed for any comments or statements made on, or in relation to, this website. Please see our updated privacy policy.