displaying posts 1 to 25 of 61

Pages (3): [1] 2 3

Author Subject: 205 GTi6 build (pic heavy)
rikky 🦔

Location: cheshire

Registered: 28 Feb 2004

Posts: 26,793

Status: Offline

Post #1
I thought I'd finally start a project thread on the 205 I've been building for the past couple of years. I've had 205's before - a friend bought a Miami blue 1992 GTi brand new and sold it us after a couple of years so I got hold of that (was 2nd owner, now dead; dad drove it home without oil), plus a super low mileage champagne 205 Gentry (now sold).

It all started one night when I decided to sell my 306 GTi6 due to buying a 4th car (406 v6 coupe). However instead of selling it I ended up breaking it for spares and kept a few goodies, namely the healthy engine it had in it, brakes, and anything I could transfer to a 205, and decided to go down the 205 GTi6 conversion route.

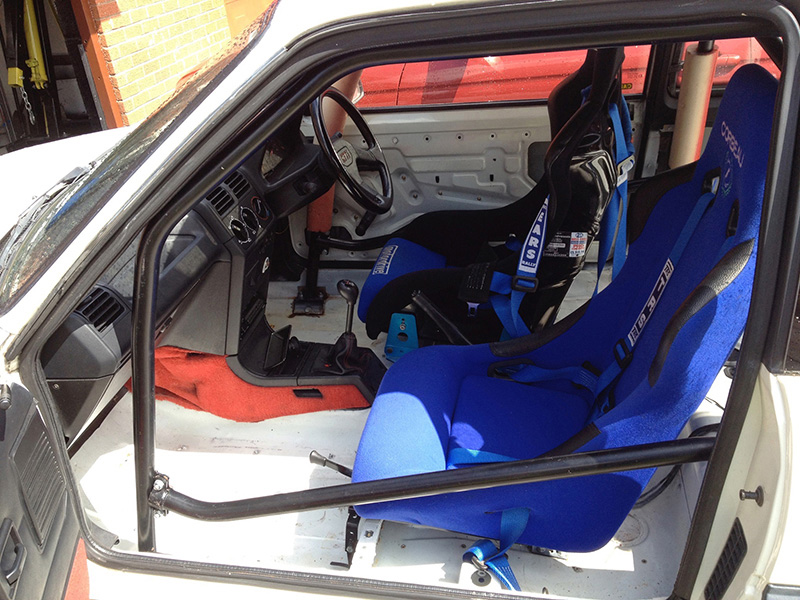
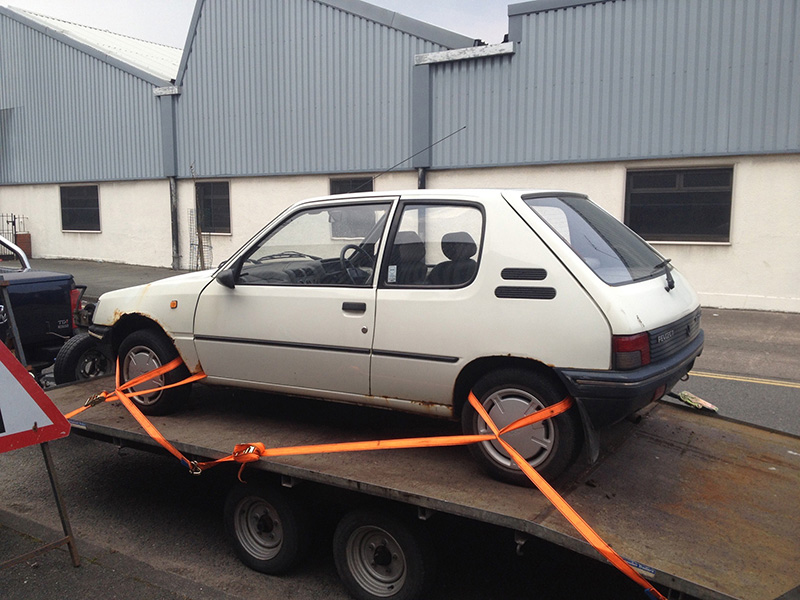
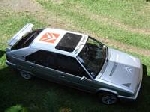
I looked around for the right 205, the criteria being rust-free bodyshell and non-sunroof. I didn't see much as you can imagine, but then one night at 1am I saw a genuine 80k-mileage trackday 205 1.6 GTi going for £650 within 10 miles of me, which had done about 10 laps of Oulton Park in the past 10 years and not moved since. It had a Safety Devices cage, TRS harnesses and some decent buckets in it. Oh, and no rust apart from on the wing, which I was going to tear off anyway. I wish I had a photo of my mrs' face when I brought it home, but it was a bit like this:


Laugh my ass off

When I went to collect it, it wouldn't start, despite the owner saying it ran absolutely fine. Trailered it home anyway and stuck it on the drive. The ignition barrel was dodgy so hotwired it and it was fine after that, but the pump was the culprit. Tried my Gentry one and it ran fine after that. Didn't matter anyway as it was being totally stripped to a bare shell and rebuilt into a standard road car, bar engine change.

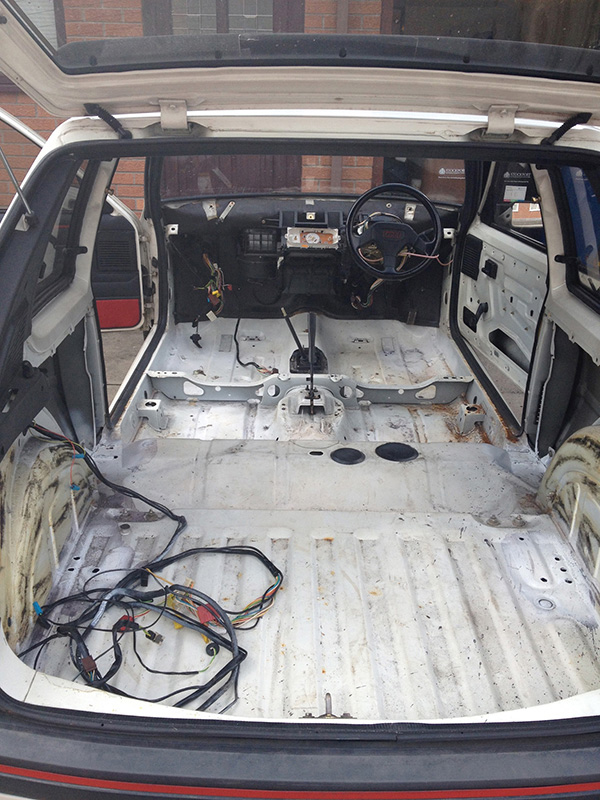
This is how it looked:


Started gutting the car, sold the SD cage and bucket seats with harnesses for what I paid for the car, and ended got the whole car free in essence Smile

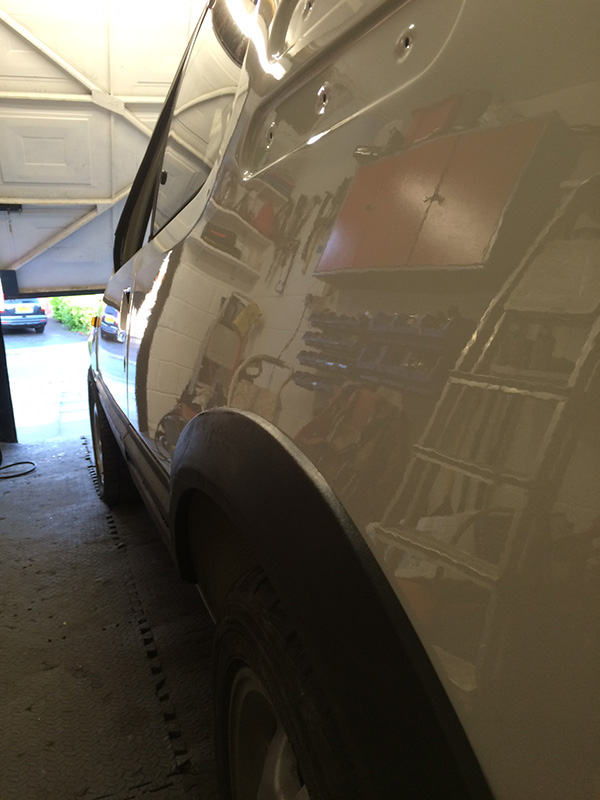
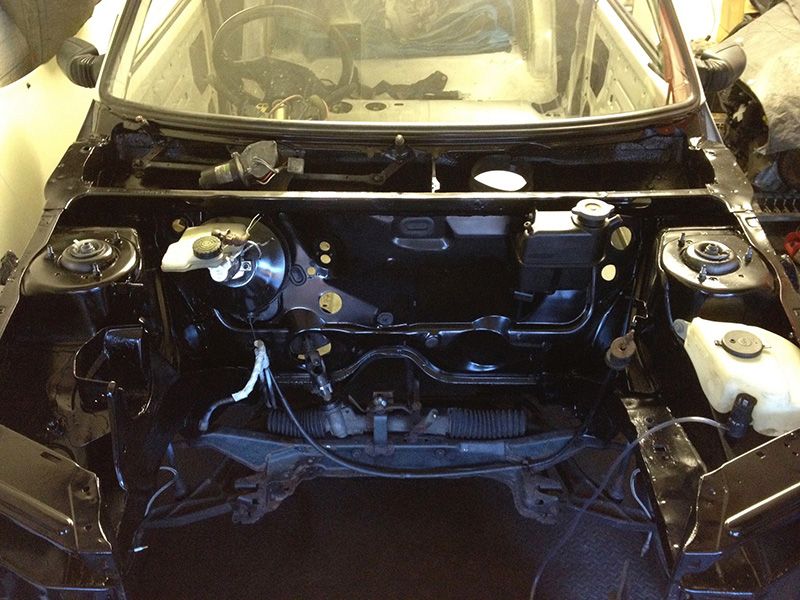
I wanted it "right", meaning paintwork spotless and engine bay nice and tidy. It's going to be used, so not concourse, but what happens when I start removing stuff is that I don't like putting worn or scabby used parts back on, so end up spending way more and taking longer.

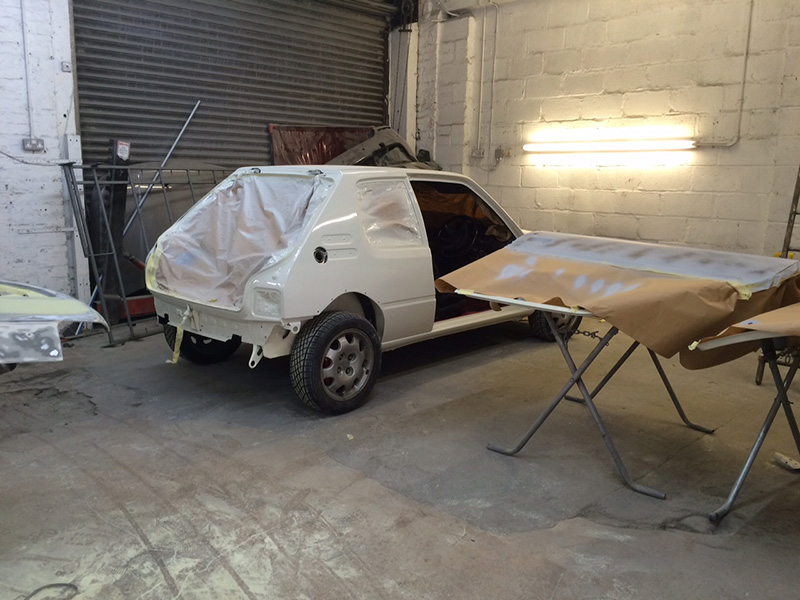
Stripped the car as much as possible to keep it rolling but so I could give it a quick blast off with the hot steamer and the bay a good scrub down before anything else.


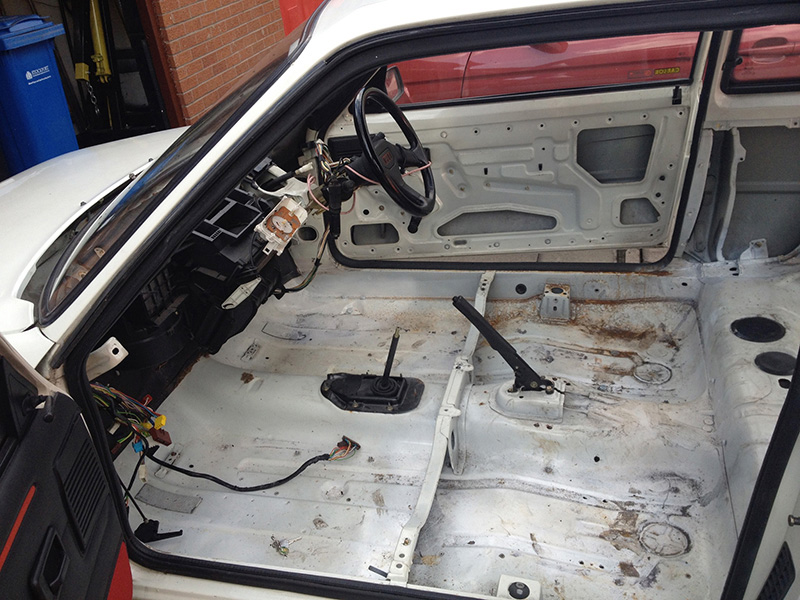
(all that brown is just grinder swarf from cage removal)


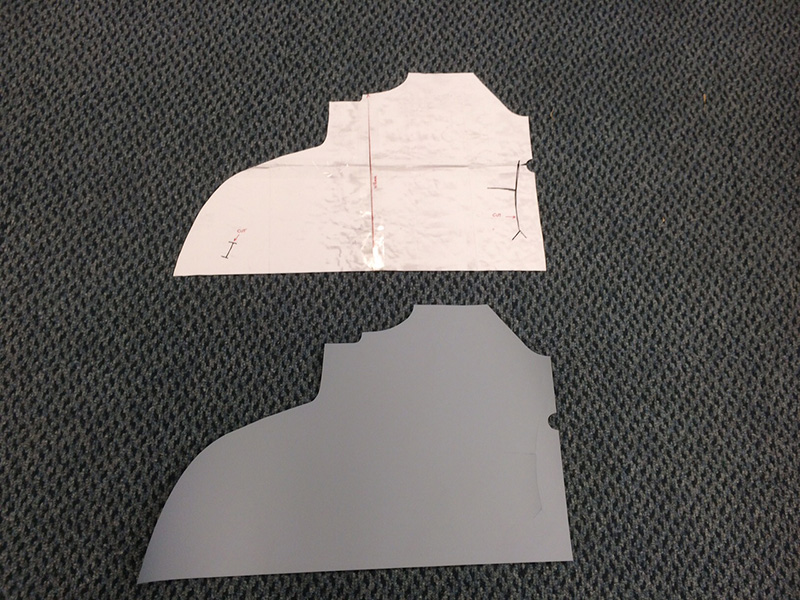
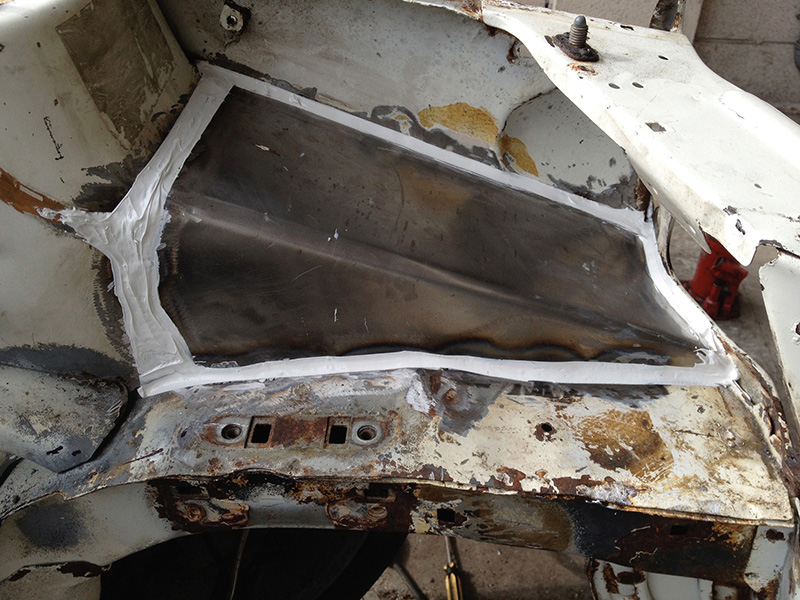
Passenger side inner wing was the only rusty area so cut the old panelling out and made new ones up, refitted, cleaned up and seam-sealed in place, ready for a good prep and paint session in the bay.


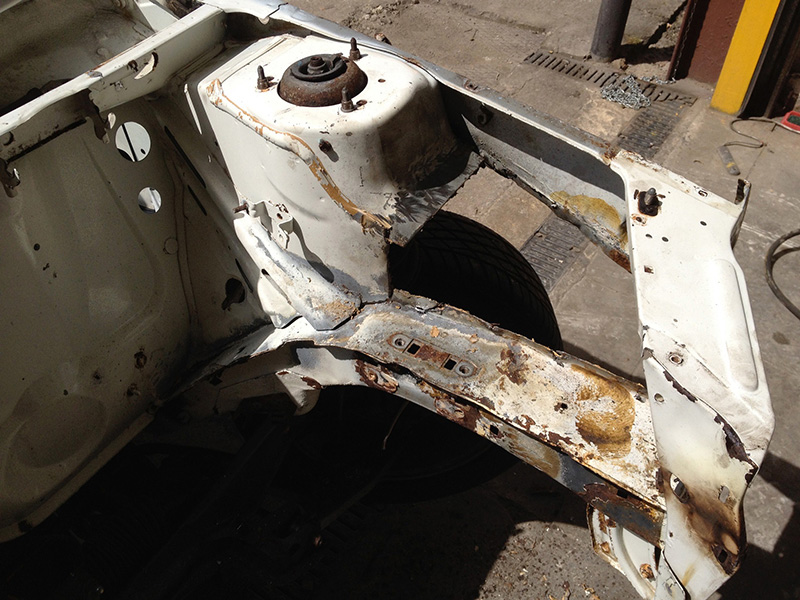
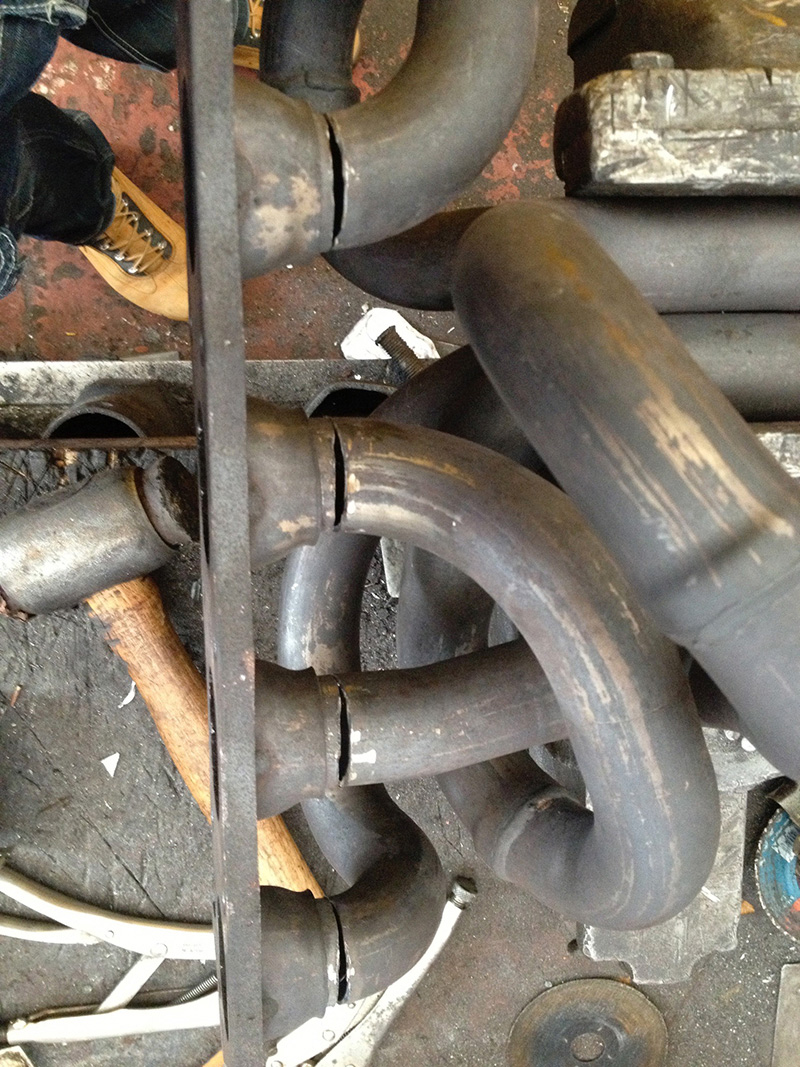
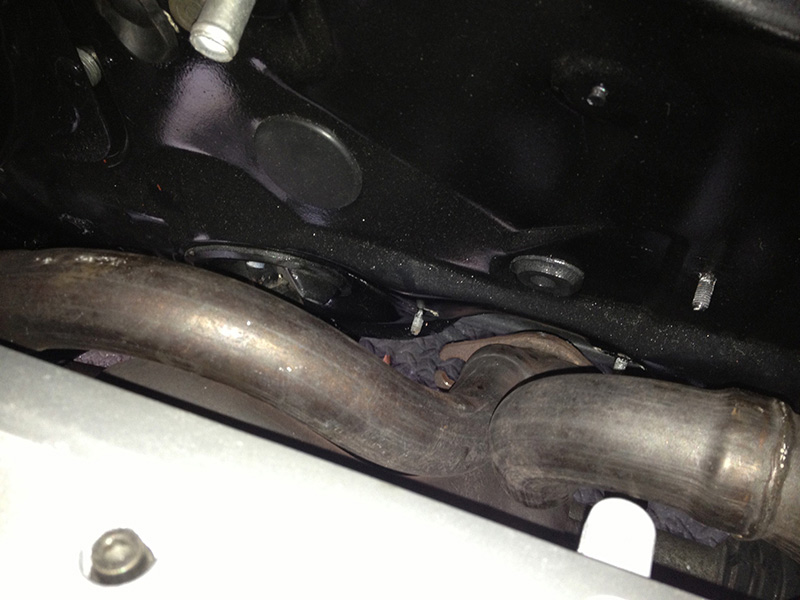
Whilst the welder was out, the exhaust manifold was slit, reangled, re-welded, measured on a workbench to see if it looked suitable and then tested for leaks. I was happy with it, and decided to leave it and see how it faired up when the time came to put the engine in.


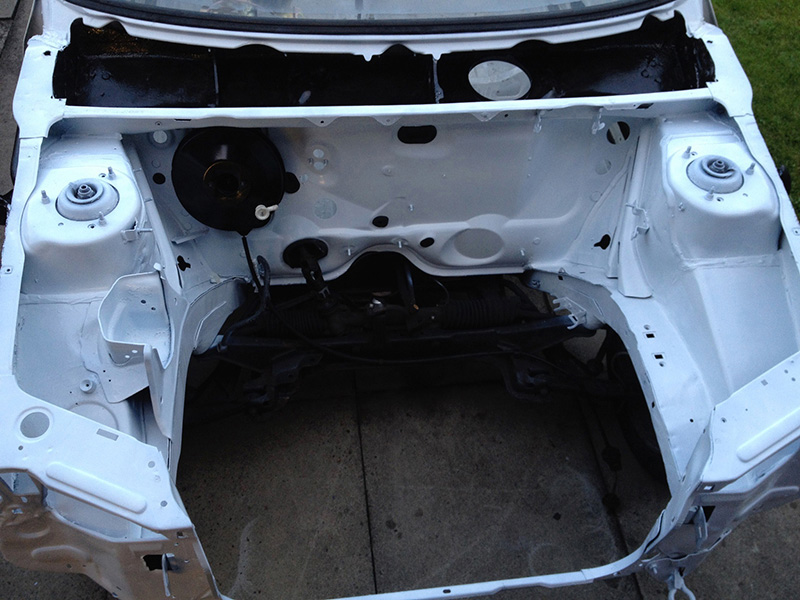
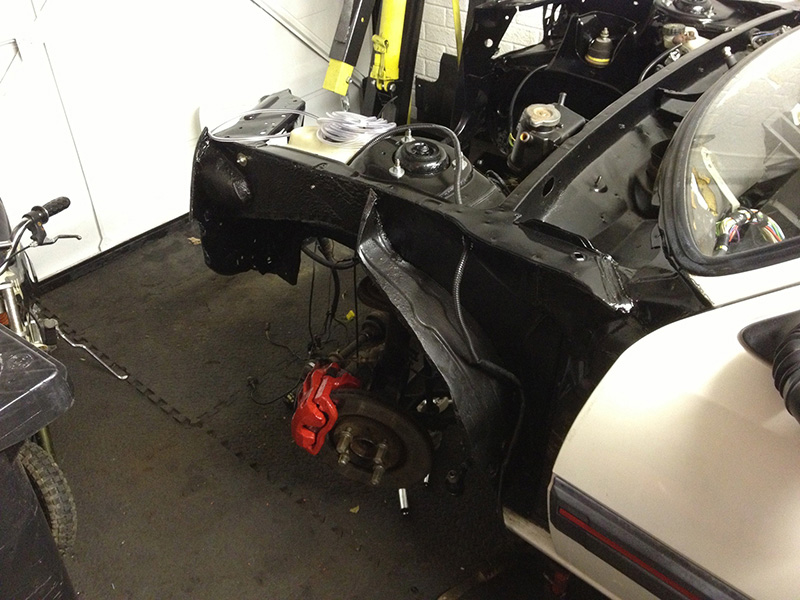
I chucked pretty much everything from the engine bay in the bin and bought brand new stuff again because everything looked manky and worn out. I re-angled the pedal box slightly for master cylinder clearance against the GTi6 cam cover to try and get a better chance of it fitting. I had the bay all painted nicely white first of all but wasn't happy with the finish, so did it all again from scratch, but this time in gloss black.


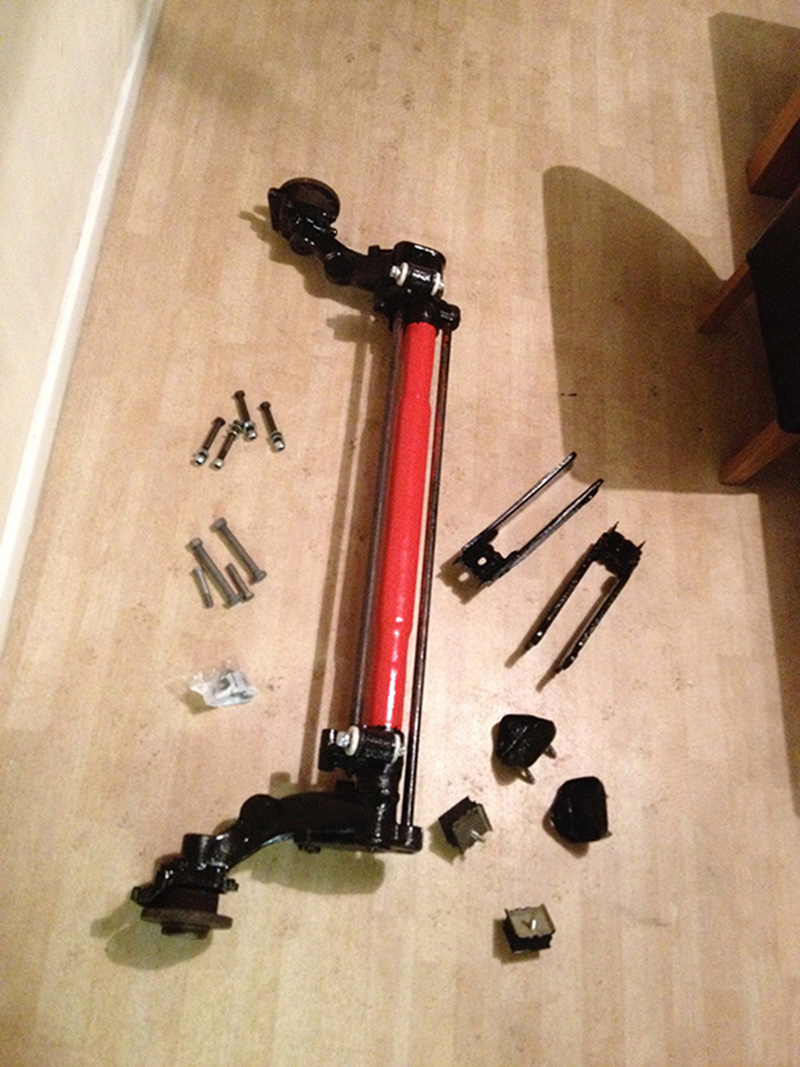
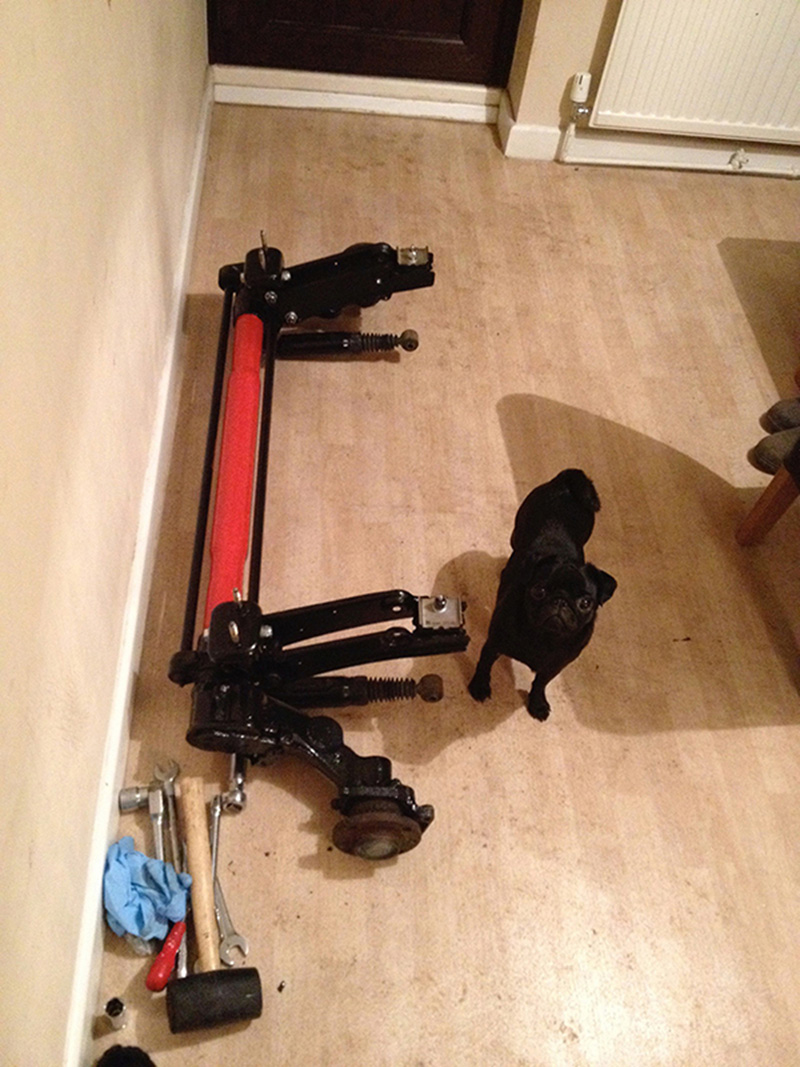
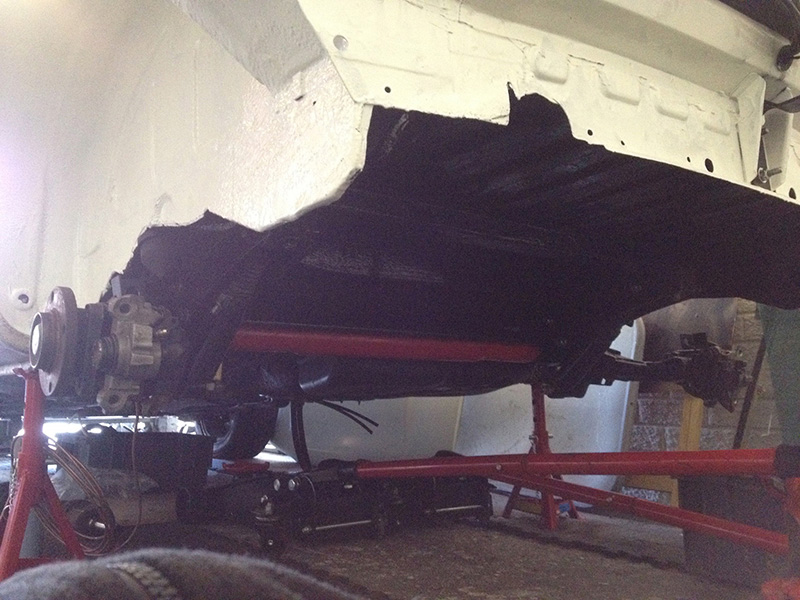
After this I tackled a few things at once over a period of what felt like forever, a combination of slow progress and needing parts. I got a disc rear beam in good order, tidied it up and threw a set of BBM solid mounts on the rear, and rebuilt the brakes all round to accompany the new rear beam.


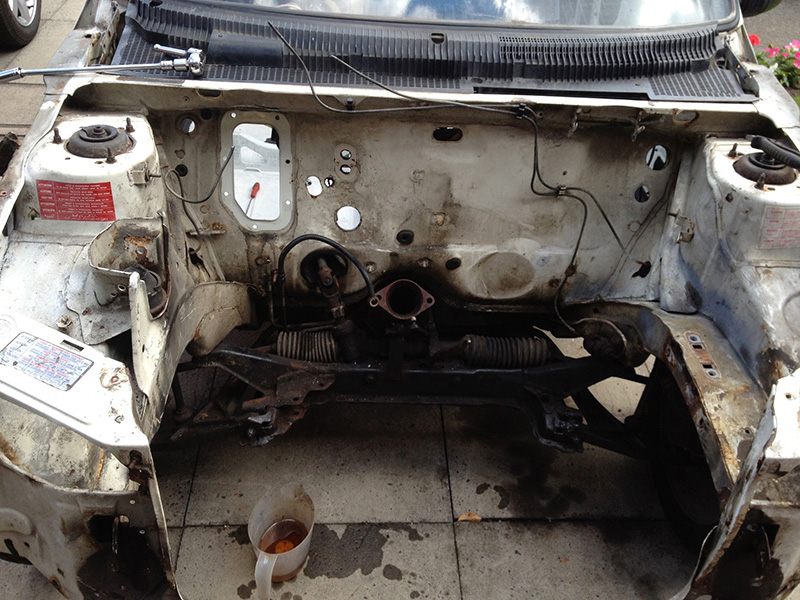
All the underneath of the car was stripped back to metal and tidied, painted and stone chipped again. With the fuel tank off, I binned the entire car's fuel and brake pipework, and ran a new pipework behind the tank for the brakes, just so I had a headstart when I came to tackle brakes later on in the project. My photos aren't the best but it's really, really tidy under there. I don't want it TOO tidy though or I'll end up not wanting to drive it; it's going to be driven, not looked at underneath.


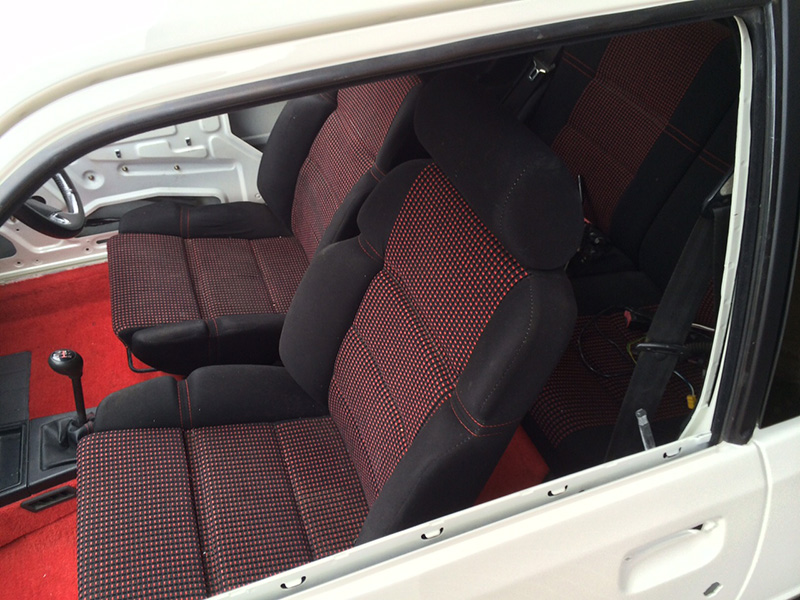
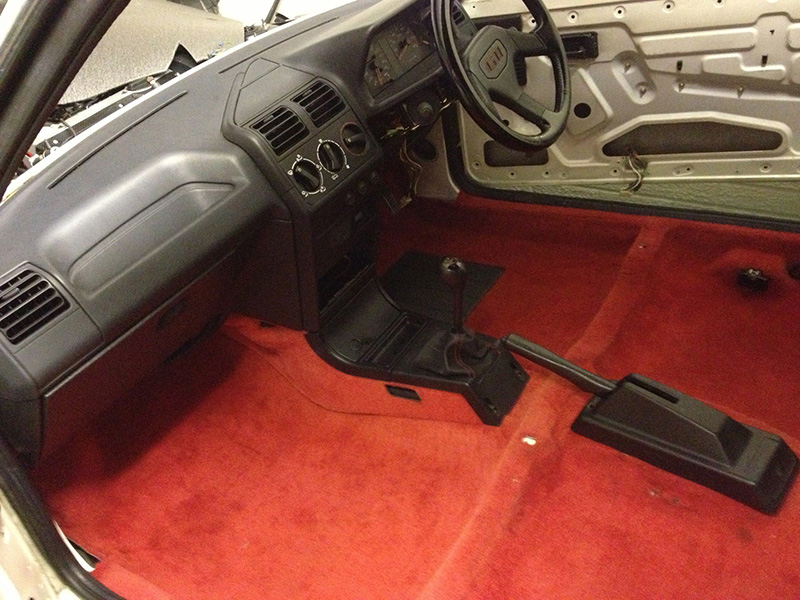
I rebuilt the full interior, which involved buying some really black late cloth seats (the leather ones I kept buying I was never happy with and decided the cloth ones felt more buckety!), made up a load of new floor sound deadening, new red carpet, interior trim, everything really and fitted the electric window setup using donor parts and spares.

Put all new heater matrix in and reassembled it.


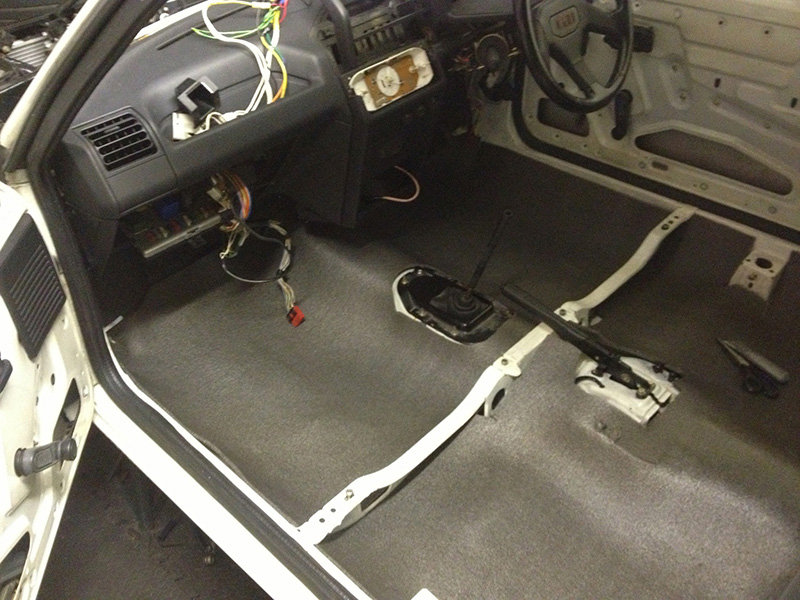
Left seats out for now for access.

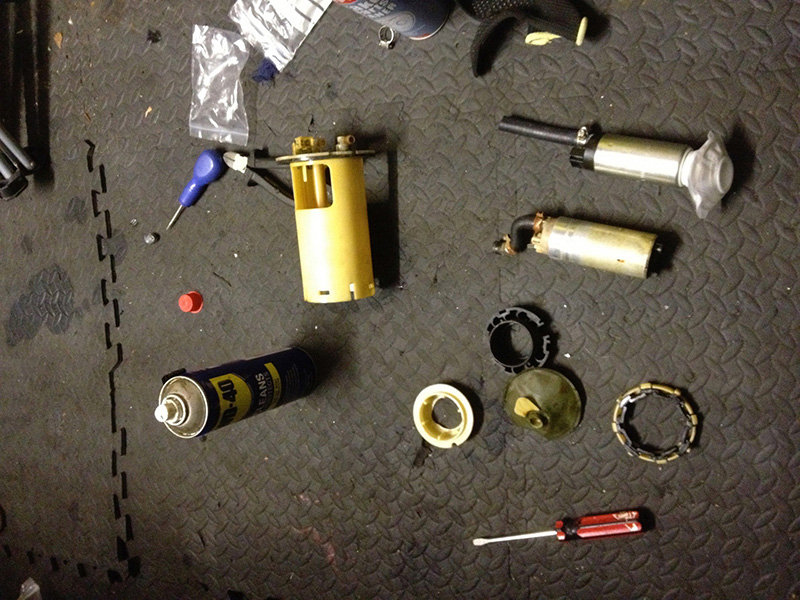
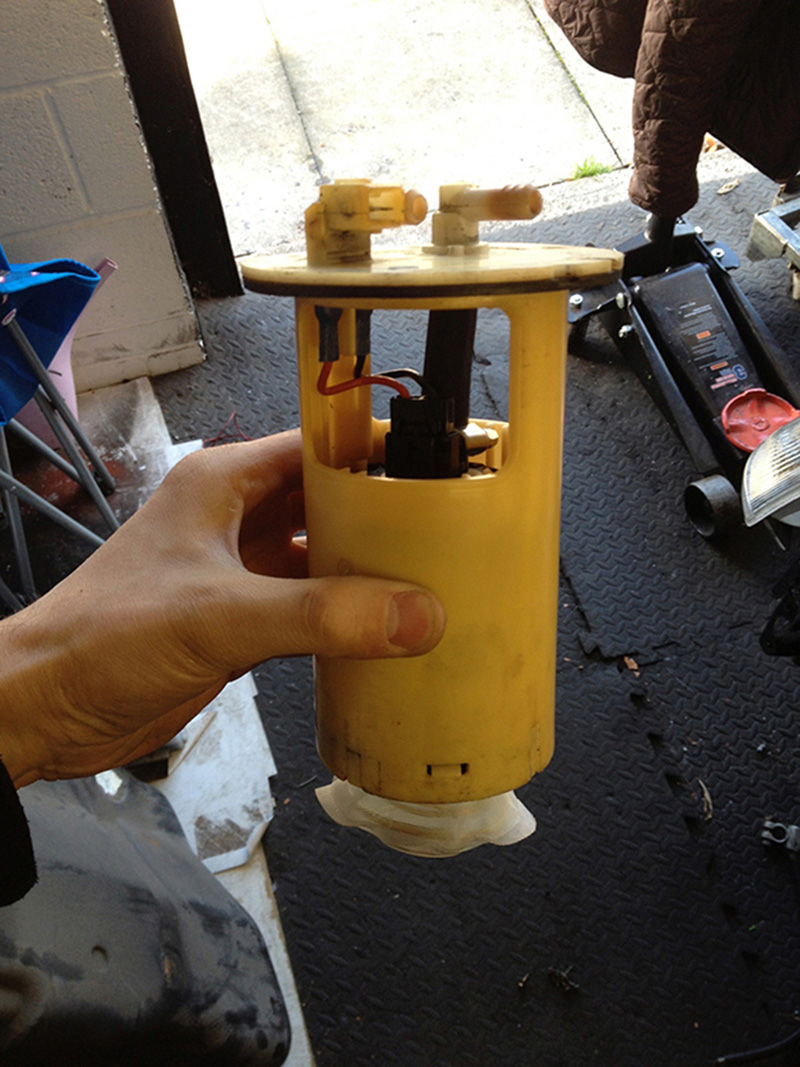
I also put a new Walbro proper lift fuel pump in and fitted in into the existing pump housing because the OEM one was playing up after sitting in stale fuel for months.


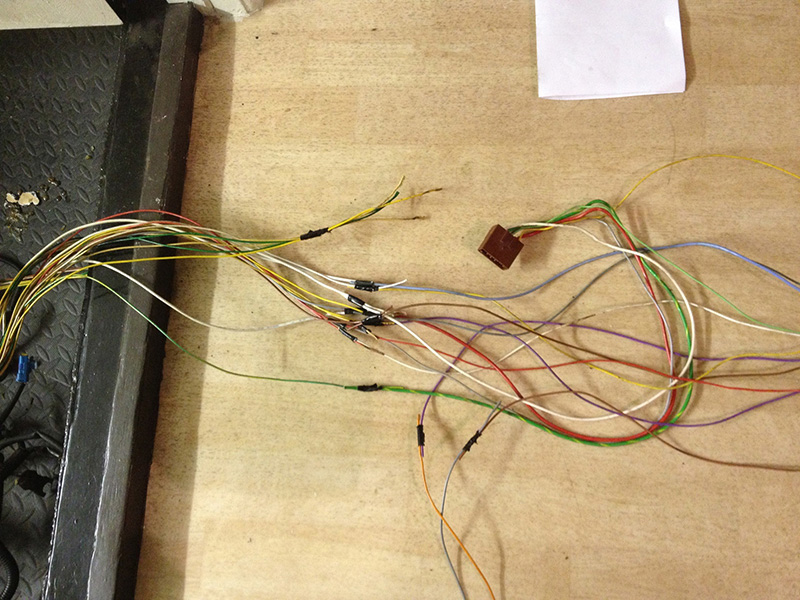
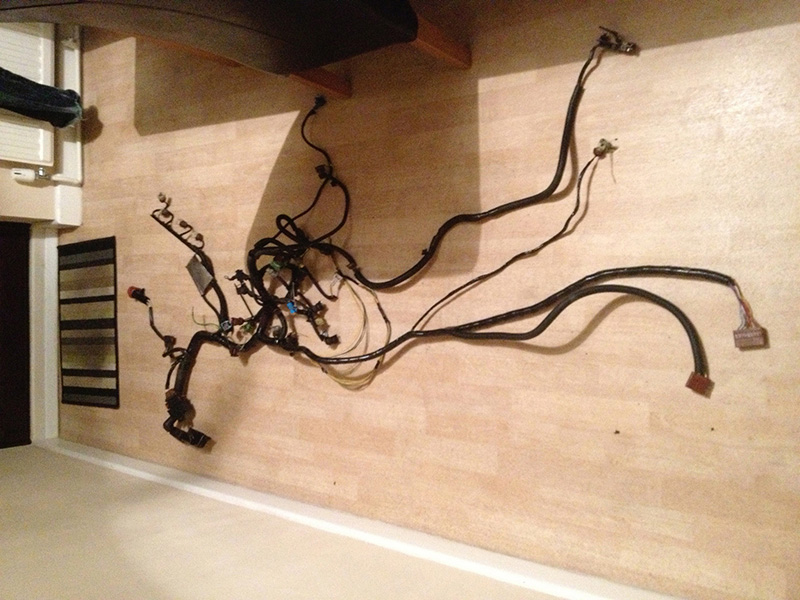
Next step was to get the engine in and see how it was going to line up, so I decided to tackle the engine looms and made up the correct loom. I decided to put my loom going under the expansion tank using a new hole and sourced numerous tidy grommets for the new route. Looks really tidy and standard if I'm honest.


Checked it about 4 times, all soldered and heat-shrunk together, fitted it all to the dash and hoped for the best.


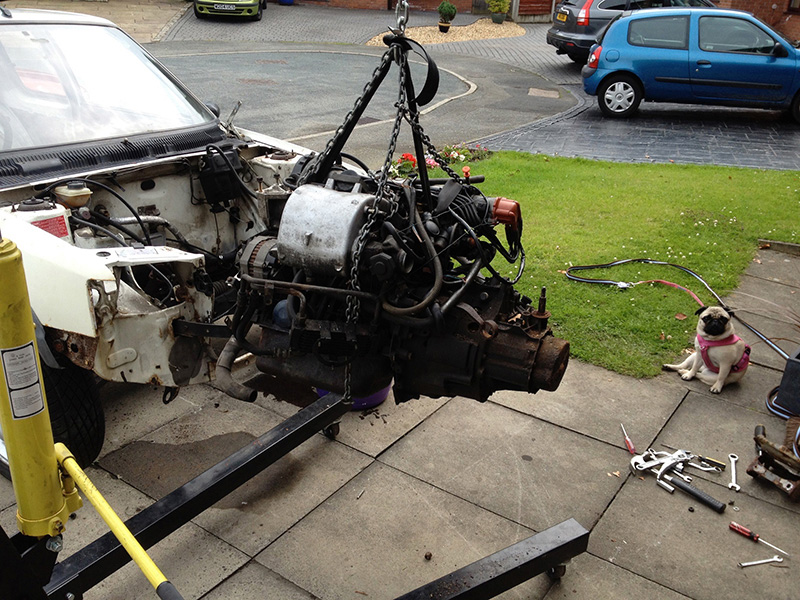
With the engine tidied up, I fitted new timing kit, solid lower pulley, clutch, seals, combined with all new BBM solid mounts, leaving me to trial fit the engine. I've used the 5-speed 1.6 BE3 box off the old engine, rebuilt with new fork bushes, seals, etc Smile


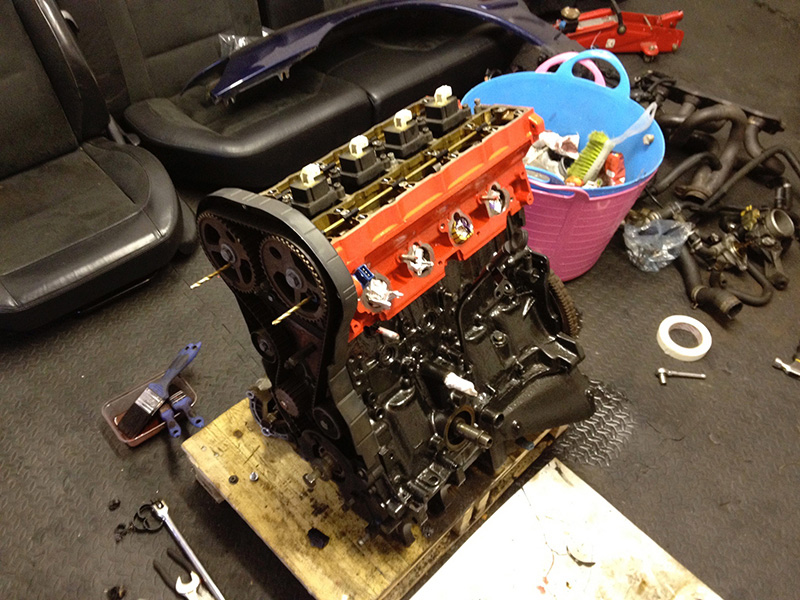
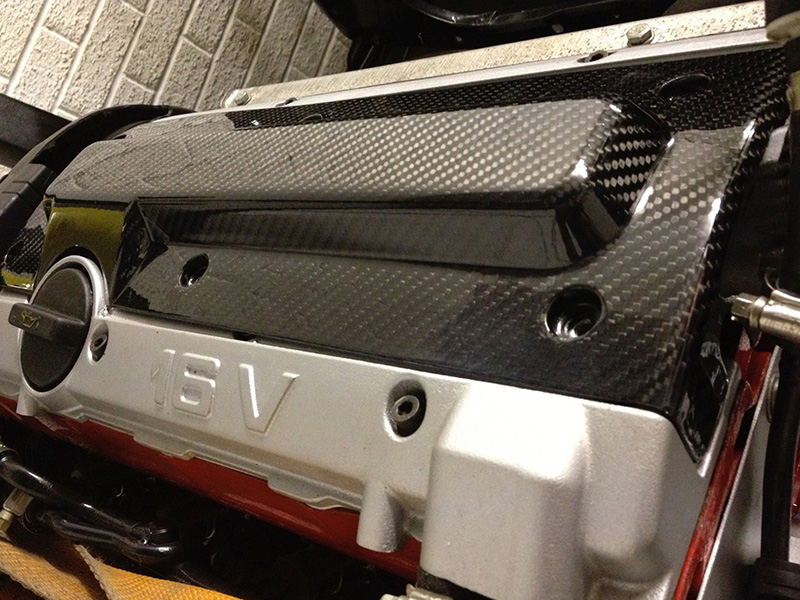
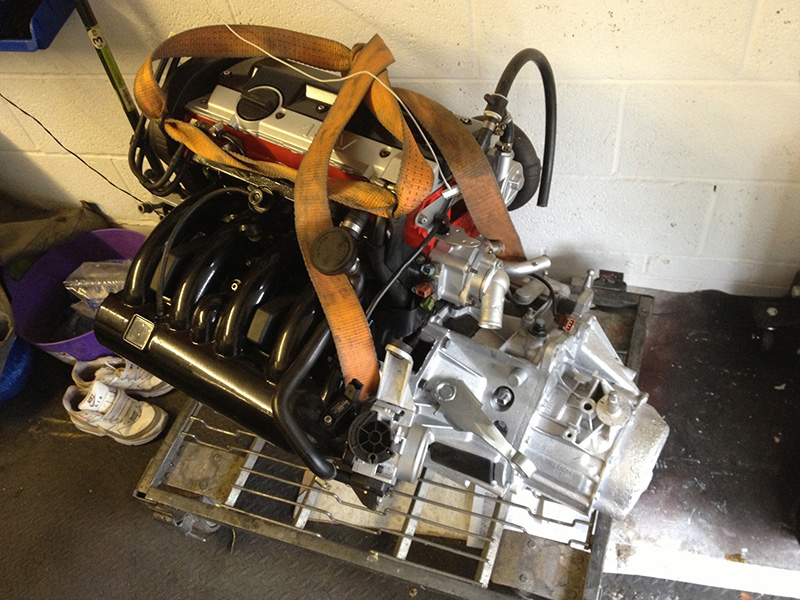
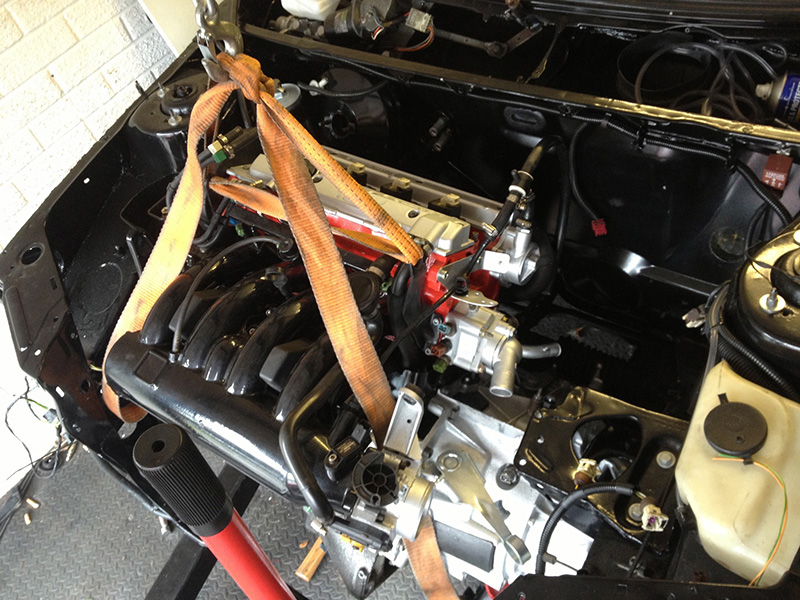
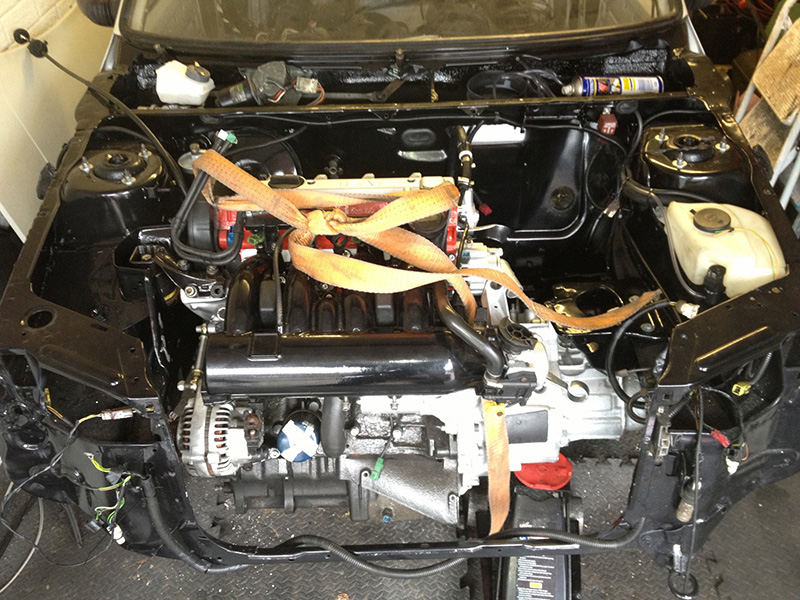
The engine fit absolutely bang on first time, with my DIY re-angled manifold, so was very happy. Only downside was needing to trim my brand new carbon fibre coilpack cover a tiny amount next to the timing casing to just give the master cylinder a bit of breathing space, but it's still retained all the bolts and looks the part.

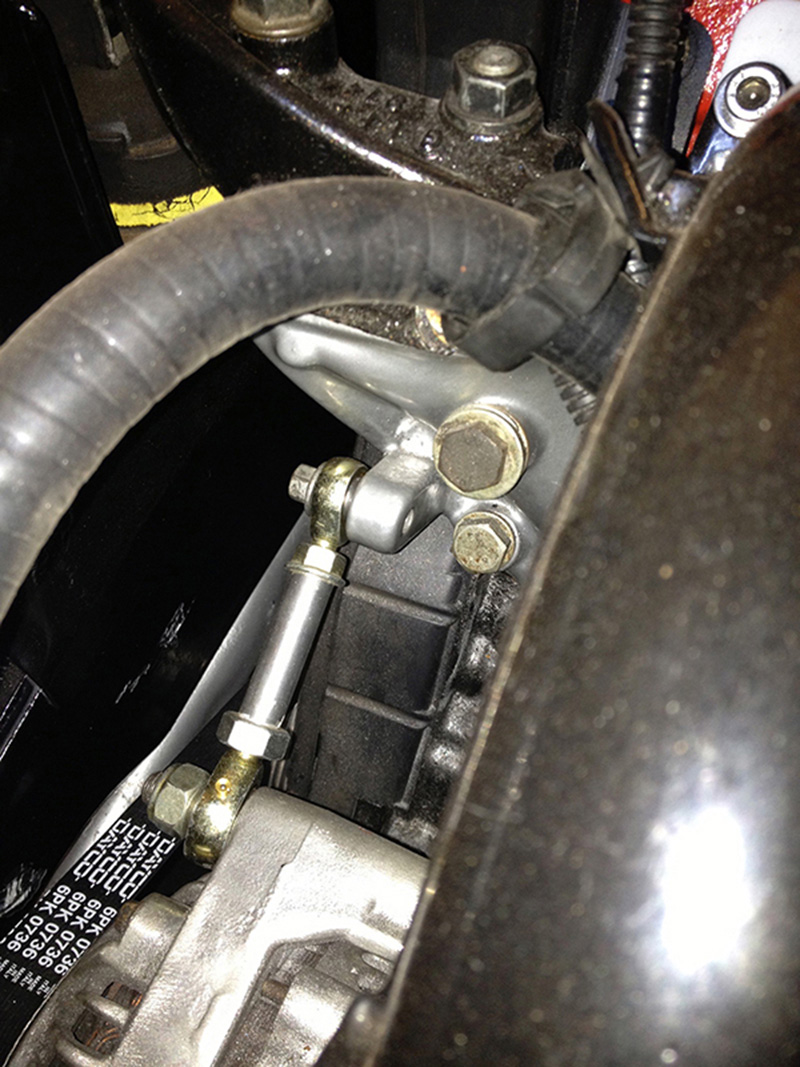
I also fabricated the alternator mount and tensioner system based on how my old 306 one was using Colin Satchell's mounts, and it's worked out perfectly by using a machined and threaded rod with rod-ends, and a portion of the GTi6 engine mount to mount the alternator with, combined with an S16 top block mount section with the tension eyelet.

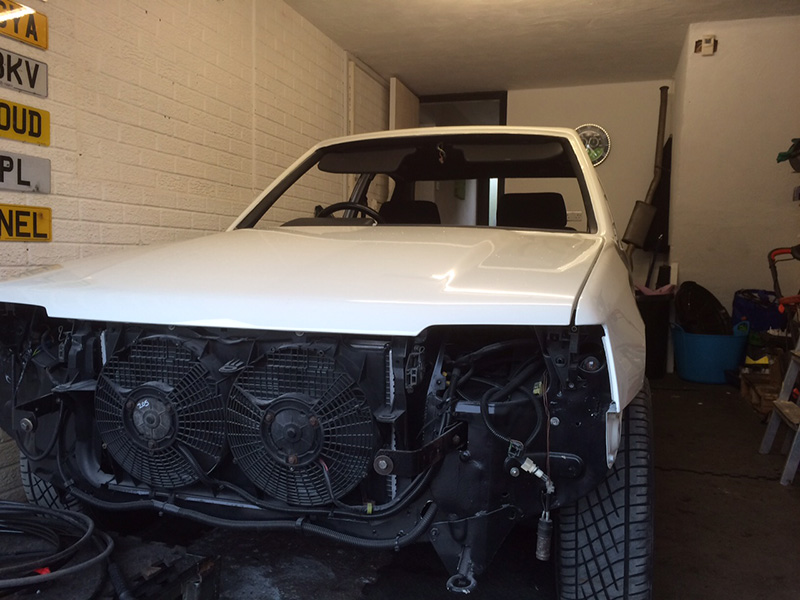
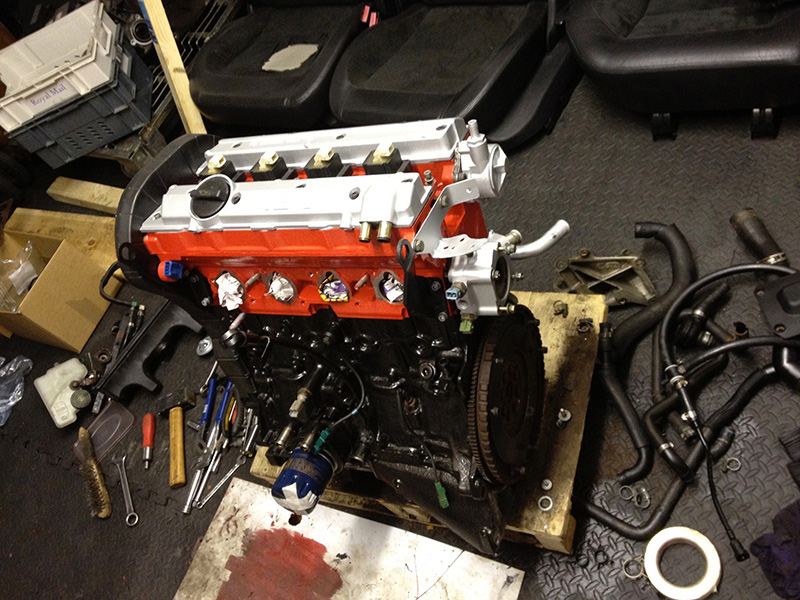
Radiator was fouling on the slam panel which I knew would happen anyway. Did a lot of fettling about getting the radiator cowling right, and cut the lip on the underside of the slam panel as usual to clear the inlet a touch. Same with the circular cutout for the pipework going to the throttle body. Very happy so far with it and how it's come along.


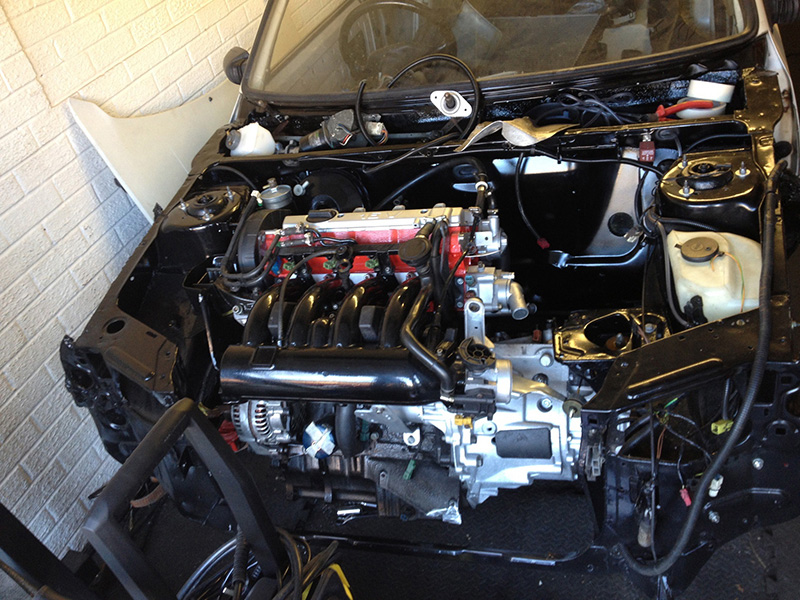
Next up was buying all the BBM hoses for the conversion and thermostat adapter, amongst many other bits whilst working in the engine bay - including all new suspension, 1.9 hubs and shafts, rebuilt the steering rack, new everything basically.


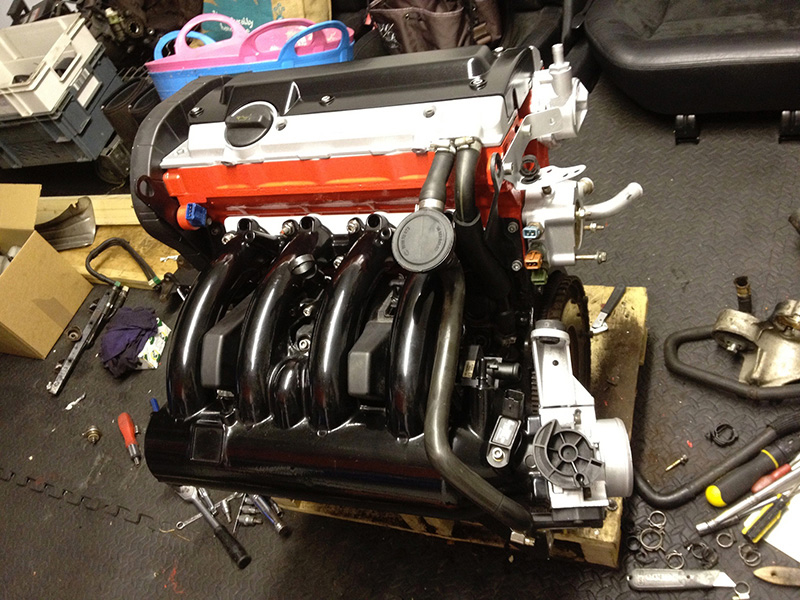
Fast forward a couple of months and with it ready to add coolant to and test it's water-tightness, I decided to roll it out of my garage and fire it up for the first time.

... it leaked a tiny bit from the thermostat housing due to my own error, which I fixed easily enough. But it kept fusing when I tried to start it. Which really really wound me up as I'd been super careful with all my looms, earths, tidying all the wiring up and replacing any rotten cabling. Needless to say I was furious and called it a day

My mate came down the next day with some electric testing tools, and we had a full day at it and had all the looms and fusebox back out. The short story is that I'd plugged the heater's 2-pin brown plug from under the dash into the fusebox when I shouldn't, and that's all it was.

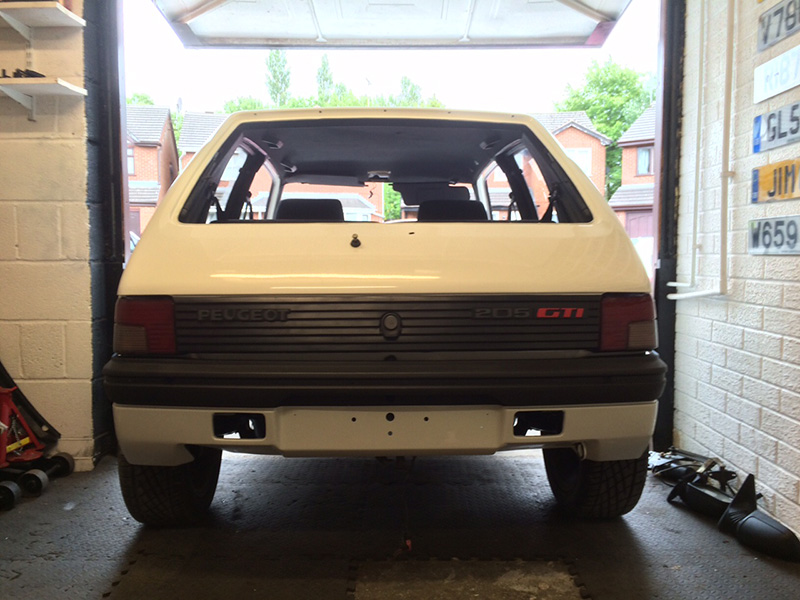
Given there was no exhaust fitted, I didn't run the car, but it fired into life and all my gauges worked properly Smile

Ultimately, it was going to be repainted entirely again properly, and I wanted an Auto bonnet in all honesty but couldn't find one cheap enough local.

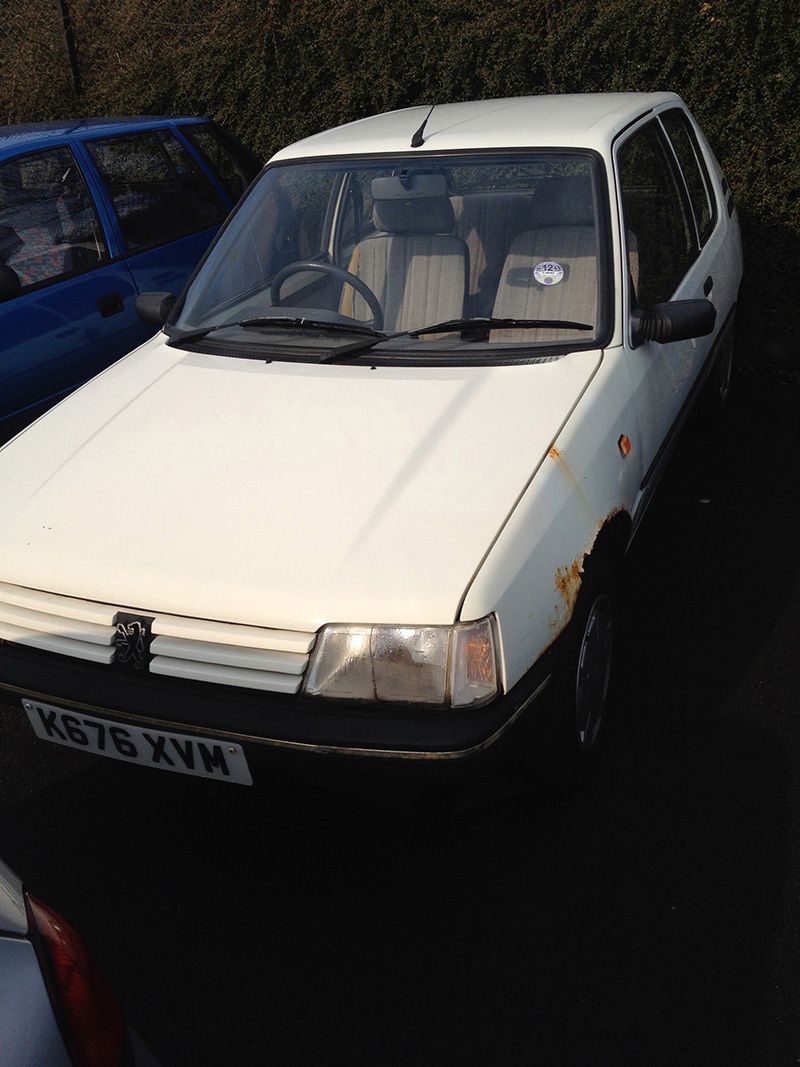
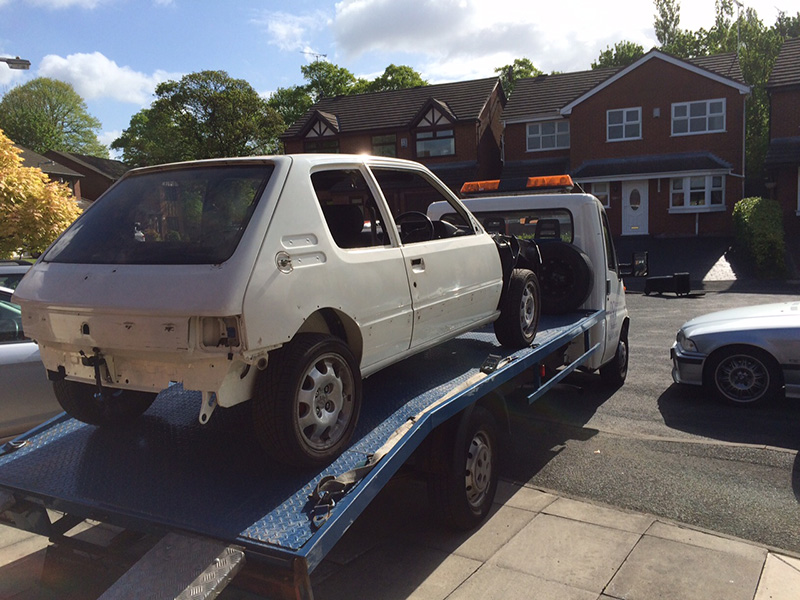
Then one night at my mum's whilst sat the the table eating tea, a full non-sunroof 205 1.6 Auto XL popped up for £175 (!!!) with bonnet and everything intact. I went and picked it up the next day (Friday) at 9am, whilst acting like I wasn't overly keen on it to try and get them to discount it even more LOL Took it anyway and parked it up at my mates work, pending imminent death. The car ran, had MOT and tax, and seemed fine too which was a bonus as it was moveable.

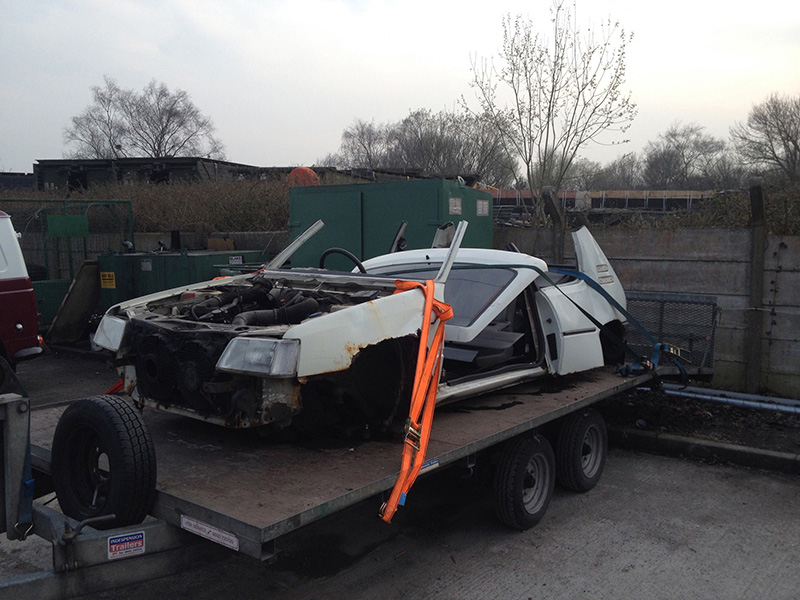
Next day, we gutted the car in a space of about 6 hours. I took every single thing off that I needed or was sellable to recoup cash. I kept various clips, a full matching lock set, glovebox blank, and the auto bonnet. Most of the car apart from the doors had some rust on it, so it was never going to be for anything other than salvaging bits off.

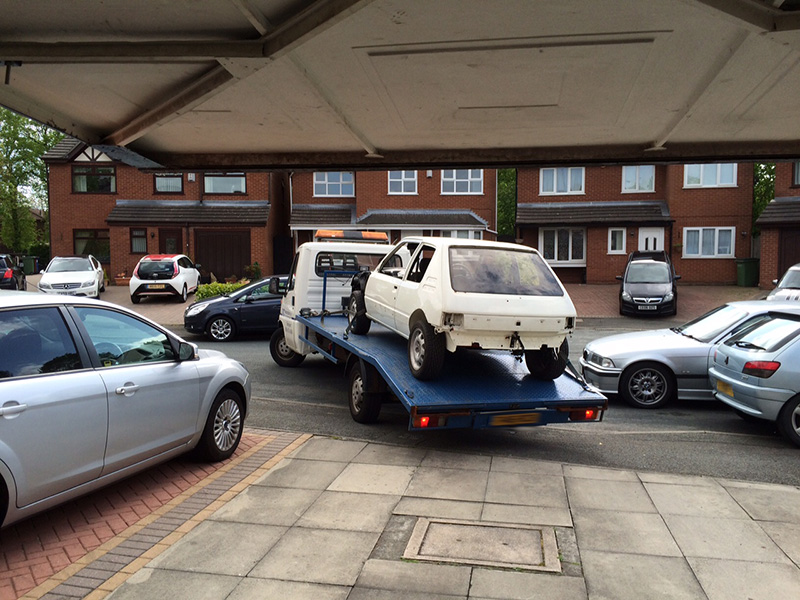
Allenallen had the doors and some other bits, the two guys from Dimma had the nonsunroof skin, and I sold the beam to Alastair, and scrapped the rest the next day.


... and exactly 24 hours later it looked like this:


So now I had my auto bonnet, a few other spares and matching lock set on one key to go with my good stuff back at home. Combined with new wings and stripped down bumpers it should look the part when all built back up.

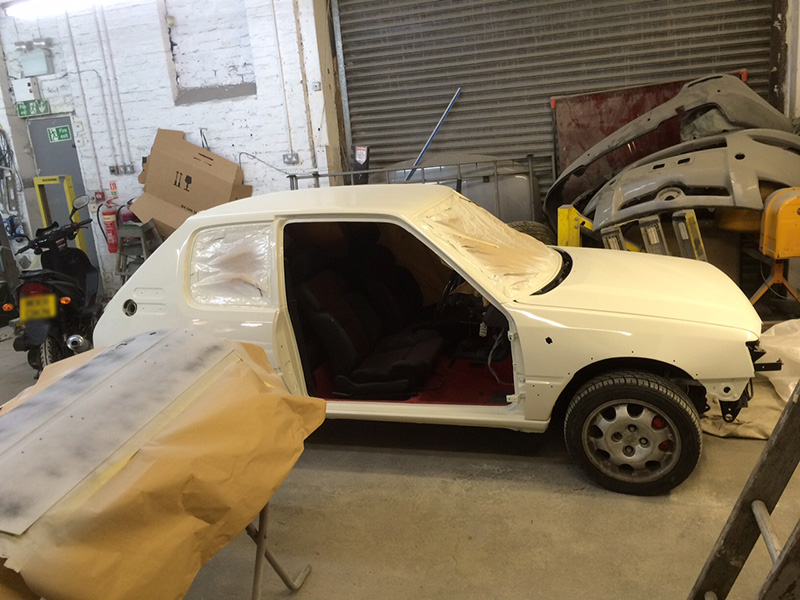
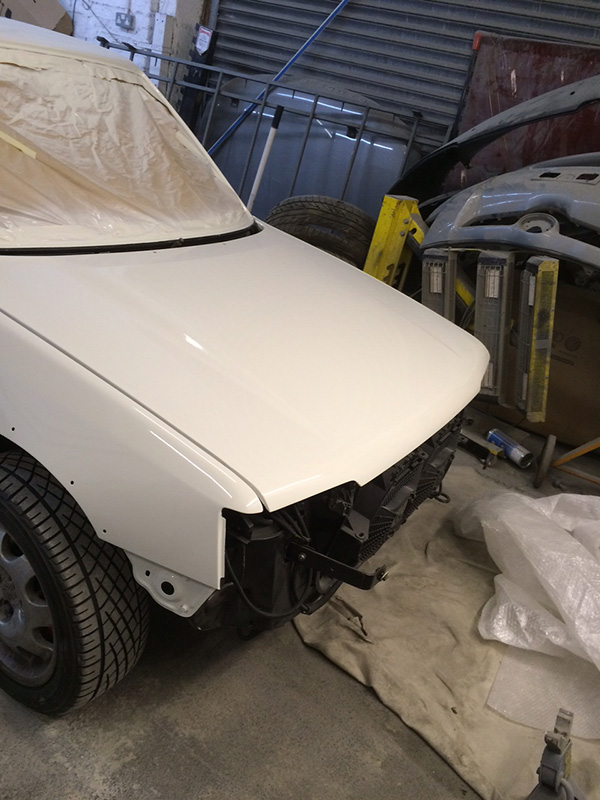
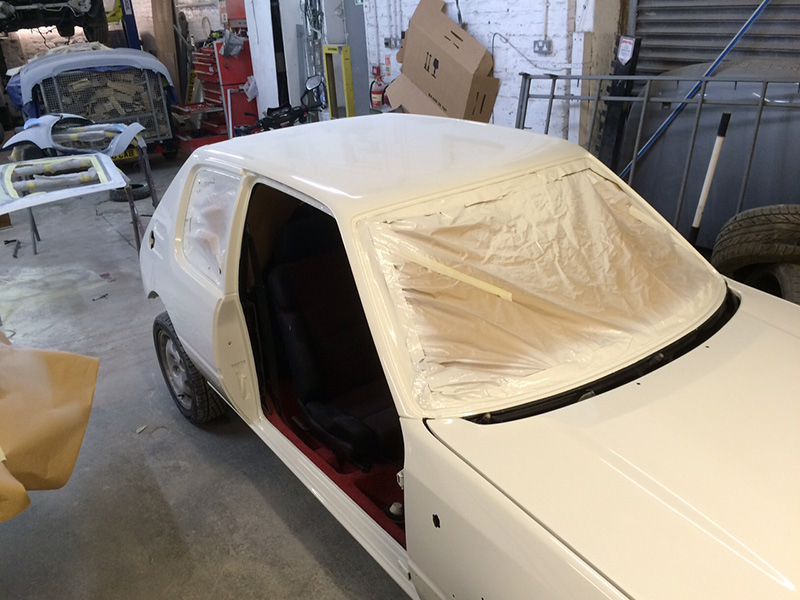
I started stripping the car back down as it was going to the bodyshop for painting so I figured any labour I do removing trim and parts is money saved ultimately.

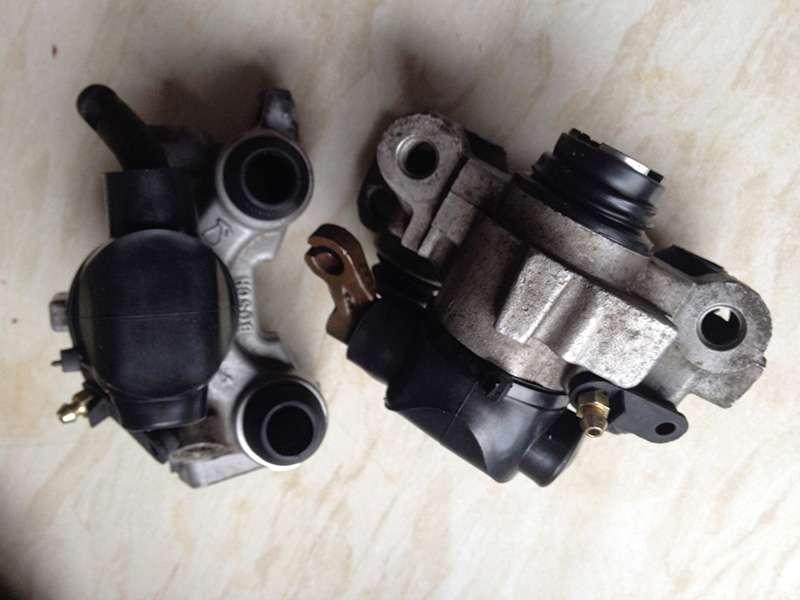
The next step is the brakes, and I've bought new rear flexi's, made up new caliper solid lines for the rear, and got some of Miles' extended front hoses. I'll probably throw all this lot on after it's been painted because it's part of the reassembly phase in my mind.

There's still a few things to tackle like new headlights and buying all new clips for the trim refitting, but this can wait until I'm ready to start bolting stuff back on.

And that's all for now folks.. next step is paint, so it's practically stripped right down again ready to be painted and have the bodywork made mint again Big grin

It's taken a while because I've had about 4 cars inbetween all this, got another dog, and practically built a house.

________________________________________

306 rallye reproduction decals (full sets/individual decals) | 306 b-pillar textured vinyl weatherstrips
306 slam panel esso stickers | 306 yellow / orange / pension fund red side door badges
gti6 inlet manifold badges | 306 rear boot badges (p2/p3)
winner of Extraction of toys from prams with outstanding vigour award 2009 [source: gti6 owners club]
Posted 8th May 2015 at 11:50
RetroPug

Seasoned Pro

Location: Leicestershire

Registered: 15 Jan 2013

Posts: 2,473

Status: Offline

Post #2
Glad you posted it up, great read so far!

________________________________________

61k miles Ph.1 Diablo '6 Project Thread
Posted 8th May 2015 at 09:57
rikky 🦔

Location: cheshire

Registered: 28 Feb 2004

Posts: 26,793

Status: Offline

Post #3
decided that i'm not waiting anymore for no reason and booking it in for painting and bodywork final bits today, best part of £2k but it'll make it mint again Hyper

________________________________________

306 rallye reproduction decals (full sets/individual decals) | 306 b-pillar textured vinyl weatherstrips
306 slam panel esso stickers | 306 yellow / orange / pension fund red side door badges
gti6 inlet manifold badges | 306 rear boot badges (p2/p3)
winner of Extraction of toys from prams with outstanding vigour award 2009 [source: gti6 owners club]
Posted 8th May 2015 at 11:01
demondriverdan

Seasoned Pro

Location: Londinium

Registered: 29 Nov 2010

Posts: 2,665

Status: Offline

Post #4
Great read! How is the auto bonnet on a 205 different from others?

________________________________________

Rallye Race Car
Posted 8th May 2015 at 12:59
rikky 🦔

Location: cheshire

Registered: 28 Feb 2004

Posts: 26,793

Status: Offline

Post #5
the bulge is more prominent and looks miles better IMO

________________________________________

306 rallye reproduction decals (full sets/individual decals) | 306 b-pillar textured vinyl weatherstrips
306 slam panel esso stickers | 306 yellow / orange / pension fund red side door badges
gti6 inlet manifold badges | 306 rear boot badges (p2/p3)
winner of Extraction of toys from prams with outstanding vigour award 2009 [source: gti6 owners club]
Posted 8th May 2015 at 13:00
jimmyrallye

Seasoned Pro

Location: portsmouth

Registered: 19 Apr 2008

Posts: 3,144

Status: Offline

Post #6
Excelent read and good skills working on the car .. This will look awesome when its painted

________________________________________


"Police arrested two kids yesterday, one was drinking battery acid, the other was eating fireworks. They charged one and let the other one off."
Posted 8th May 2015 at 13:26
rallyestyle

Seasoned Pro

Location: London

Registered: 23 Jul 2003

Posts: 14,990

Status: Offline

Post #7
Looking forward to reading this when i can actually see the pics Yes Thumbs up Bloody work blocks them all Doh

________________________________________

Just Drive It
Posted 8th May 2015 at 13:31
RallyeP6

Regular

Location: West Byfleet

Registered: 11 Jul 2013

Posts: 451

Status: Offline

Post #8
Lots of hard work, well done!. You even managed to paint the white dog black along with the beam.
Posted 9th May 2015 at 00:50
yippeekayay

Seasoned Pro

Location: wilts

Registered: 27 Oct 2008

Posts: 4,144

Status: Offline

Post #9
stop it rikky... got 3 205s being built at the moment and slacking on them all. good efforts. looking very tidy.... now youve got the rip off plastics and trim clips to mortgage your house on if your going the whole hog!! unless farmer is your mate.

________________________________________

306 less for first time in nearly 7 years. Lets keep it that way... please refuse any offers i make to buy your 306 ( doctors letter supplied by request)

Marmite and cheese sandwiches anyone???

Burns and Mcrae will be forever missed.
x box "yippeekayaymofo"
Posted 9th May 2015 at 01:47
welshpug!

Capt Pedantic

Location: Bigend, Wales.

Registered: 27 Mar 2007

Posts: 25,817

Status: Offline

Post #10
Fail


clutch release bearing wont last long and the pedal will be a bit stiff with mismatched clutch fork bushes.

________________________________________

need a part number? get on here - http://public.servicebox.peugeot.com

Bring on the Trumpets.

Posted 9th May 2015 at 06:39
rikky 🦔

Location: cheshire

Registered: 28 Feb 2004

Posts: 26,793

Status: Offline

Post #11
they are identical to the ones removed in colour and came as one kit with the arm and fork from NeatCarParts

all the parts within the box had never been changed before

i know about the yellow vs white ones being off-centre hole etc as i saw the diagrams. i have bought what was in there to start with and replaced like for like. my understanding was the prongs on the fork being longer for a certain type of bush. if there's a problem i can sort it no problem. my fork is from the same kit as the bushes

http://www.neatcarparts.co.uk/clutch-fork-kit-for-peugeot-205-306-309-405-406-605-806-expert-partner-211525-26117-p.asp

________________________________________

306 rallye reproduction decals (full sets/individual decals) | 306 b-pillar textured vinyl weatherstrips
306 slam panel esso stickers | 306 yellow / orange / pension fund red side door badges
gti6 inlet manifold badges | 306 rear boot badges (p2/p3)
winner of Extraction of toys from prams with outstanding vigour award 2009 [source: gti6 owners club]
Posted 9th May 2015 at 10:33
prism7guy

Seasoned Pro

Location: DoncastAAAAARGH

Registered: 13 Jan 2008

Posts: 4,637

Status: Offline

Post #12
Nice project. Thumbs up

________________________________________

Goldie the track car.
Posted 9th May 2015 at 10:55
eddy_gti6

Seasoned Pro

Location: Durham

Registered: 20 Oct 2008

Posts: 8,716

Status: Offline

Post #13
This still getting built. Looks good the black bay on white car Thumbs up

________________________________________


Clicky: [url =http://www.306gti6.com]click here[/url] remove the space between [url & =
Posted 9th May 2015 at 11:23
rikky 🦔

Location: cheshire

Registered: 28 Feb 2004

Posts: 26,793

Status: Offline

Post #14
i've not touched it since xmas 2013 pretty much! done very little on it, cos i bought a 406 v6, then a 1series and another m3 evo coupe and just abandoned this LOL i've got too many cars really Doh kept looking at it this week in the garage and it's just needing paint so no excuse to just not get it sorted really. waiting on bodyshop to give me a time to take it there

i'd paint it myself at the bodyshop at my mates work but wouldn't be happy. i want it right

the question now is - do i paint it standard colour or something entirely different? i was thinking estoril blue like the M3's or astor grey but part of me says keep it alpine white as standard

________________________________________

306 rallye reproduction decals (full sets/individual decals) | 306 b-pillar textured vinyl weatherstrips
306 slam panel esso stickers | 306 yellow / orange / pension fund red side door badges
gti6 inlet manifold badges | 306 rear boot badges (p2/p3)
winner of Extraction of toys from prams with outstanding vigour award 2009 [source: gti6 owners club]
Posted 12th May 2015 at 08:59
welshpug!

Capt Pedantic

Location: Bigend, Wales.

Registered: 27 Mar 2007

Posts: 25,817

Status: Offline

Post #15
if its as per the neat autos pic and the pic above then itll wear the release bearing prematurely, its just wrong!

________________________________________

need a part number? get on here - http://public.servicebox.peugeot.com

Bring on the Trumpets.

Posted 12th May 2015 at 11:45
rikky 🦔

Location: cheshire

Registered: 28 Feb 2004

Posts: 26,793

Status: Offline

Post #16
the arm fork prongs are the longer ones though, compared to the other measurements where there were shorter ones. i think that it was too short for the bearing originally wasn't it? mine was a good 6mm longer than the short ones from memory (measurements posted on Drivers forum thread, think i queried it before i reassembled box). i realise the skew of the arm will be out but not taking box back off now, certainly not until it's back from painting. if it dies, atleast i'll know the issue

http://forum.205gtidrivers.com/index.php?showtopic=117011

my understanding is it's the fork length that's the actual issue (if it's not perfectly central, it's still gonna get the RB with longer prongs)

________________________________________

306 rallye reproduction decals (full sets/individual decals) | 306 b-pillar textured vinyl weatherstrips
306 slam panel esso stickers | 306 yellow / orange / pension fund red side door badges
gti6 inlet manifold badges | 306 rear boot badges (p2/p3)
winner of Extraction of toys from prams with outstanding vigour award 2009 [source: gti6 owners club]
Posted 12th May 2015 at 12:30
rikky 🦔

Location: cheshire

Registered: 28 Feb 2004

Posts: 26,793

Status: Offline

Post #17
it got picked up today so off for a few weeks for bodywork sorting Big grin

literally so excited to have it back that i could poo just thinking about it

don't think the neighbours were overly happy about a winch and lowloader ramps clattering around going at 8.30am but nevermind Whistle


________________________________________

306 rallye reproduction decals (full sets/individual decals) | 306 b-pillar textured vinyl weatherstrips
306 slam panel esso stickers | 306 yellow / orange / pension fund red side door badges
gti6 inlet manifold badges | 306 rear boot badges (p2/p3)
winner of Extraction of toys from prams with outstanding vigour award 2009 [source: gti6 owners club]
Posted 16th May 2015 at 12:55
walker_texasranger

Seasoned Pro

Location: Sunny Retford

Registered: 26 Jan 2008

Posts: 2,502

Status: Offline

Post #18
Awesome thread, so full of WIN Cool

Love the interior Love was it hard to do? Did you get new OE carpet or form it all yourself? Need to get the rear of the rallye re done properly at some point as its currently covered in some s**tty spray mounted yak hair Doh

________________________________________

Almost standard 1999 Bianca Rallye
Hilux InvincibleX daily

306 No.13 Doh

Carp and specialist Anglers Click here
Posted 17th May 2015 at 13:02
Day666

Seasoned Pro

Location: Bristol

Registered: 20 Apr 2013

Posts: 5,209

Status: Offline

Post #19
Amazing work & great Thread Thumbs up
Posted 17th May 2015 at 13:59
rikky 🦔

Location: cheshire

Registered: 28 Feb 2004

Posts: 26,793

Status: Offline

Post #20
Small update - I decided to get a template (thanks Farmer / MrFirepro) for the rear interior arch covers / liners, and am in the process of remaking them from new cloth


But more importantly, the car is pretty much fully painted so it's looking good I can pick it up next week and begin reassembling. Went down today and it's been moved into the corner of the workshop for now until next week, but wings are fitted, hatch and doors all prepped and the majority of the car painted Big grin Can't wait to get it back now!


Glad I went for the auto bonnet now, looks miles better than standard

________________________________________

306 rallye reproduction decals (full sets/individual decals) | 306 b-pillar textured vinyl weatherstrips
306 slam panel esso stickers | 306 yellow / orange / pension fund red side door badges
gti6 inlet manifold badges | 306 rear boot badges (p2/p3)
winner of Extraction of toys from prams with outstanding vigour award 2009 [source: gti6 owners club]
Posted 6th Jun 2015 at 11:45
yippeekayay

Seasoned Pro

Location: wilts

Registered: 27 Oct 2008

Posts: 4,144

Status: Offline

Post #21
Looking great , mines been out of paint for a month and still not finished fitting it up!! good luck... carry on with the great work!!


________________________________________

306 less for first time in nearly 7 years. Lets keep it that way... please refuse any offers i make to buy your 306 ( doctors letter supplied by request)

Marmite and cheese sandwiches anyone???

Burns and Mcrae will be forever missed.
x box "yippeekayaymofo"
Posted 7th Jun 2015 at 01:02
walker_texasranger

Seasoned Pro

Location: Sunny Retford

Registered: 26 Jan 2008

Posts: 2,502

Status: Offline

Post #22
Any updates on this?? Hyper

________________________________________

Almost standard 1999 Bianca Rallye
Hilux InvincibleX daily

306 No.13 Doh

Carp and specialist Anglers Click here
Posted 18th Jun 2015 at 14:30
walker_texasranger

Seasoned Pro

Location: Sunny Retford

Registered: 26 Jan 2008

Posts: 2,502

Status: Offline

Post #23
Sounds good to me, looking forward to seeing how its going Thumbs up

________________________________________

Almost standard 1999 Bianca Rallye
Hilux InvincibleX daily

306 No.13 Doh

Carp and specialist Anglers Click here
Posted 18th Jun 2015 at 14:51
rikky 🦔

Location: cheshire

Registered: 28 Feb 2004

Posts: 26,793

Status: Offline

Post #24
It's back from the bodyshop now, and photos don't do it justice as you can imagine. It's had all the dents on every panel including any pin dents or minor imperfections removed, new wings, boot bonnet and doors all repainted inside and out (fully stripped back to bare panels) - basically there's not even bacteria on it Smile

I've been rebuilding it over the past few days, nowhere near complete but looking a bit like a car again. All the trims have been re-dyed black again and wheels will be refurbed in the near future in Goodwood style or black chrome style. Interior's back together mostly but just being held up now by passenger side door wiring loom being knackered and trying to source a replacement Sad


________________________________________

306 rallye reproduction decals (full sets/individual decals) | 306 b-pillar textured vinyl weatherstrips
306 slam panel esso stickers | 306 yellow / orange / pension fund red side door badges
gti6 inlet manifold badges | 306 rear boot badges (p2/p3)
winner of Extraction of toys from prams with outstanding vigour award 2009 [source: gti6 owners club]
Posted 18th Jun 2015 at 14:53
walker_texasranger

Seasoned Pro

Location: Sunny Retford

Registered: 26 Jan 2008

Posts: 2,502

Status: Offline

Post #25
Looks the fakking tits!! Love

Whats the crack with the door loom then? Is yours a late one or something?

________________________________________

Almost standard 1999 Bianca Rallye
Hilux InvincibleX daily

306 No.13 Doh

Carp and specialist Anglers Click here
Posted 18th Jun 2015 at 16:48

Pages (3): [1] 2 3

All times are GMT. The time is now 11:23

The Peugeot GTi-6 & Rallye Owners Club - ©2024 all rights reserved.

Please Note: The views and opinions found herein are those of individuals, and not of The Peugeot 306 GTi-6 & Rallye Owners Club or any individuals involved.
No responsibility is taken or assumed for any comments or statements made on, or in relation to, this website. Please see our updated privacy policy.