displaying posts 1 to 25 of 381

Pages (16): [1] 2 3 .. last

Author Subject: Satchshift brief fitting guide
pugheaven

Seasoned Pro

Location: Fareham

Registered: 17 Dec 2006

Posts: 4,602

Status: Offline

Post #1
First of all sorry for the craps pictures!

Alot of this will depend on how you are supplied the kit, I was confused at the start due to it all being slaved together incorrectly!

First thing you want to do is remove:
Your exhaust from manifold back
All of the standard gear lever, linkages and pivot post from the subframe
Remove all the heat shields from the gear lever area forward

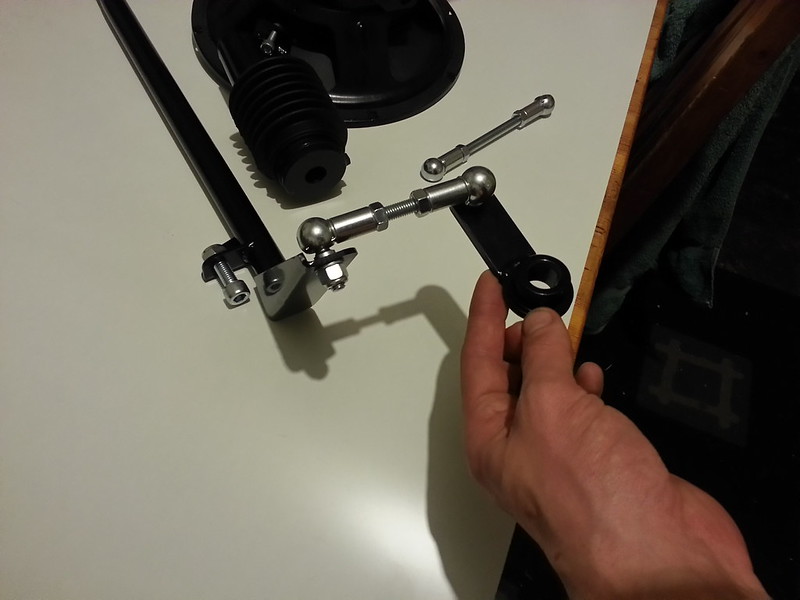
First thing I did was to get the stack up right on the new pivot post upright

Undo the bolt with the green arrow, remove the 2 straps and the bellcrank
Now that you have a bare pivot post you need to put it all back together in the correct order where the blue arrow is

One of the stays has a larger diameter slotted hole, with the pivot post upright place this stay with the larger slotted hole facing down... This bolts to where the old pivot post was on the subframe.

The next stay with the thinner slotted hole needs to point upwards, this bolts to the stud for the heat shield that you removed (passenger side)

I then placed the washer on top of the two stays, then the bell crank another washer and then the bolt.

Now undo the passanger 16mm bolt that secures the power steering rack to the subframe, place the new pivot upright, the bolt goes where I have circled red and then back into the rack and subframe


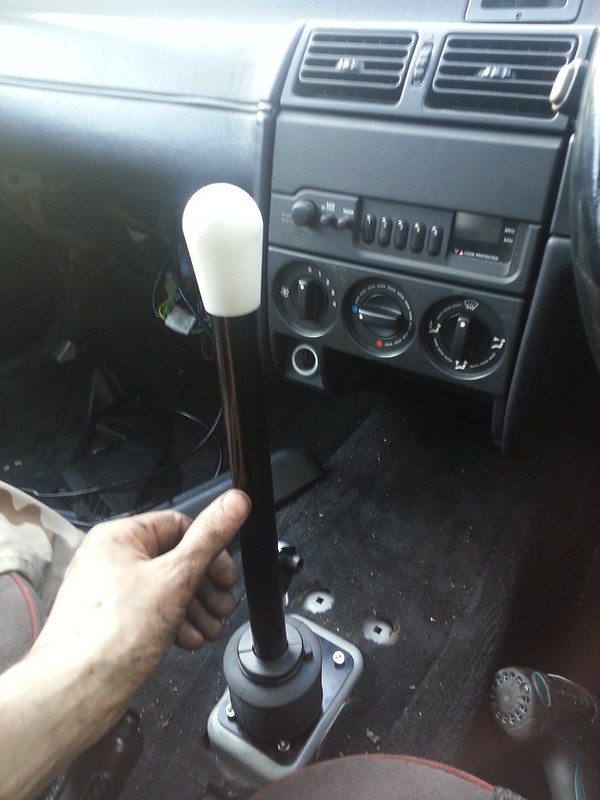
Next I installed the new gearstick surround, the big plate goes inside the car with the big hole aft.
The little plate with the eye end goes under the car
Tighten the two bolts marked white but don't do the yellow ones up yet just wind the nuts on by hand


Now you need to swap the gear linkage pivot bolt round on the main linkage upright
Take the little linkage bar off that is marked with a red arrow, hold the pivot ball end with an 11mm spanner and undo the 13mm but, swap this lot over onto the opposite side of the upright and do it all back up


Undo the bolt with the blue arrow, this now goes to the upright pivot post eye end

Now to connect the other end to the gear stick bracket, undo the brown bolt and connect the rod to the eye end we left loose, once that is done up you can now tighten the two nuts and bolts you left hand tight


Now you can fit the gear lever, undo the bolt with the yellow arrow and connect it to the gear linkage under the car with the yellow arrow


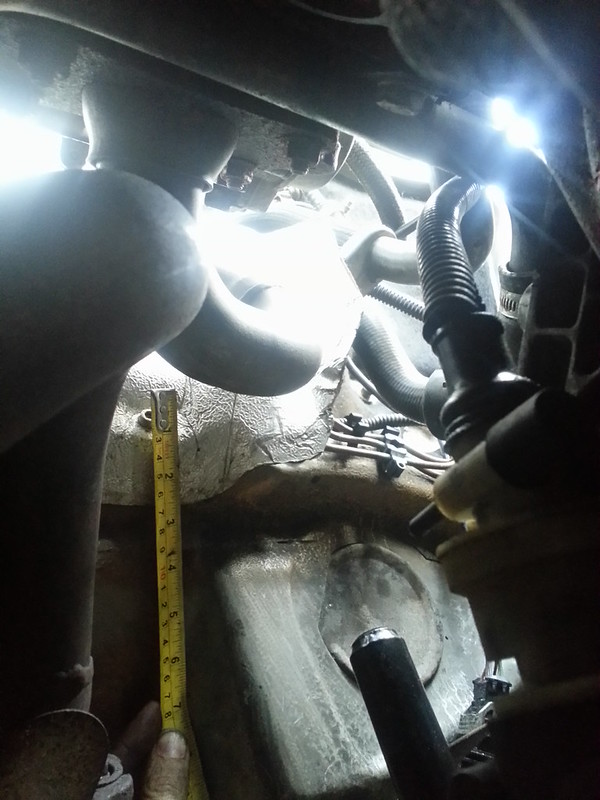
The next bit is the tricky bit, cut the paper template out and from under the car place it in the exhaust tunnel on the park that angles up towards the manifold (I found this pretty vague as it can move around a lot and could still look right)
The way I did it was to drill in the centre of the oval on the template, open the hole up to 30mm

I then fitted the upper linkage bar to the gear stick

The end with the right arrow is the end that connects up to the gear stick

I then took the rubber boot (green arrow) off the tube (blue arrow)
I then removed the plastic end (white arrow) from the boot and taped it in the end of the tube.
From the engine bay side I then slid the tube and plastic grommet over the upper linkage bar and then connected that to the eye end on the pivot post.

Now if you push the tube towards the bulk head you will now have the correct location as to where it needs to go!
I bolted mine to the bulkhead at this point removed the upper linkage and opened up the hole from inside (no dash or heater fitted)

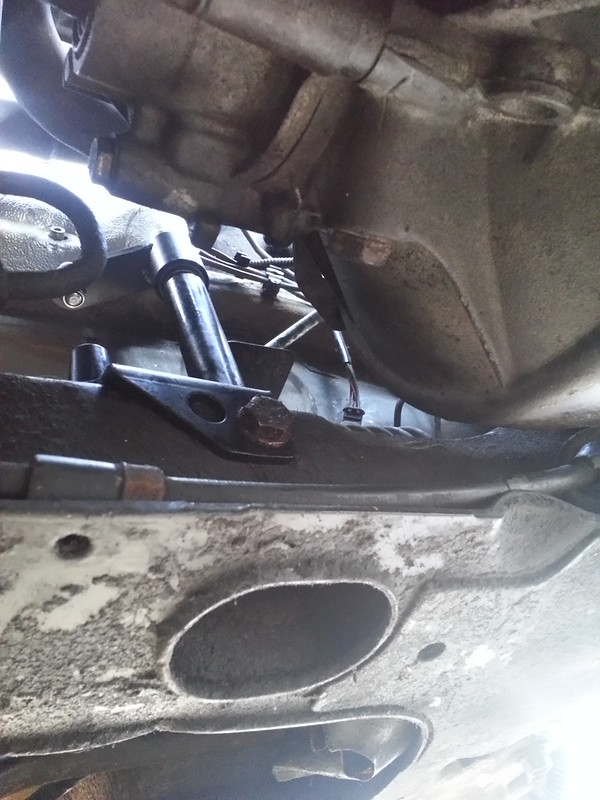
Last thing to do is to swap the lever arm over from the standard one to the new one

take the roll pin out, remove the arm and place the new arm on with the larger diameter part against the gear box casing (the green arrow)


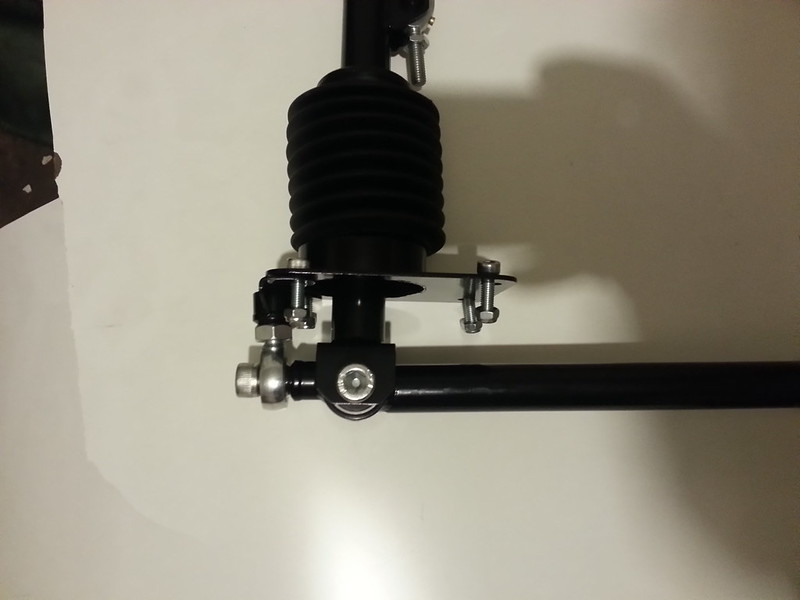
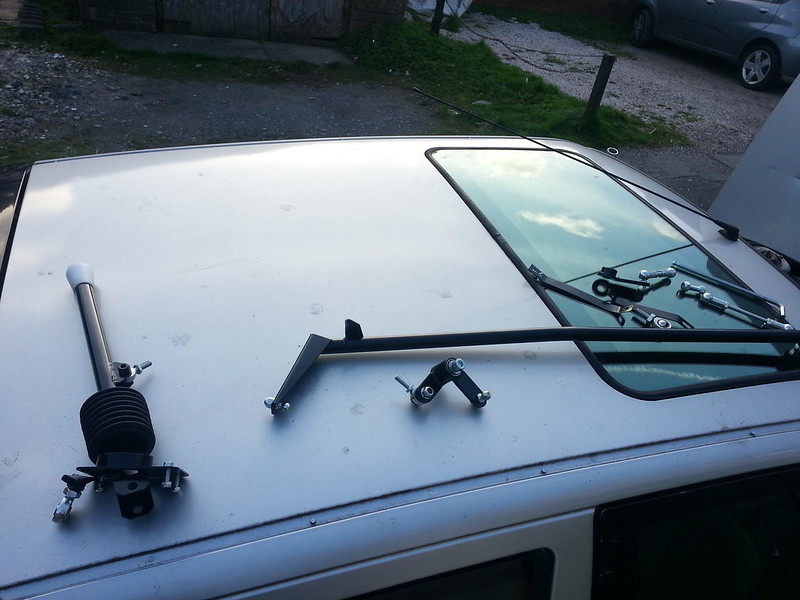
Here are some pics of mine fitted


Looking from the top down


The stay from the pivot post to the heatshield stud


Hope this helps lol it will be easier to understand when you try to fit it all
Posted 2nd Apr 2015 at 13:00
welshpug!

Capt Pedantic

Location: Bigend, Wales.

Registered: 27 Mar 2007

Posts: 25,817

Status: Offline

Post #2
HOLY PIXELATOR LOL

try these Razz


________________________________________

need a part number? get on here - http://public.servicebox.peugeot.com

Bring on the Trumpets.

Posted 2nd Apr 2015 at 14:59
pugheaven

Seasoned Pro

Location: Fareham

Registered: 17 Dec 2006

Posts: 4,602

Status: Offline

Post #3
Much better!
Posted 2nd Apr 2015 at 15:08
welshpug!

Capt Pedantic

Location: Bigend, Wales.

Registered: 27 Mar 2007

Posts: 25,817

Status: Offline

Post #4
not bad off a phone eh LOL

let me know if theres any specific detail pics of it you want me to get.

________________________________________

need a part number? get on here - http://public.servicebox.peugeot.com

Bring on the Trumpets.

Posted 2nd Apr 2015 at 15:57
rikky 🦔

Location: cheshire

Registered: 28 Feb 2004

Posts: 26,793

Status: Offline

Post #5
welshpug! wrote:
HOLY PIXELATOR


Laugh my ass off

________________________________________

306 rallye reproduction decals (full sets/individual decals) | 306 b-pillar textured vinyl weatherstrips
306 slam panel esso stickers | 306 yellow / orange / pension fund red side door badges
gti6 inlet manifold badges | 306 rear boot badges (p2/p3)
winner of Extraction of toys from prams with outstanding vigour award 2009 [source: gti6 owners club]
Posted 2nd Apr 2015 at 16:37
dangti6

aka JKshooter

Location: Taunton, Somerset

Registered: 15 Jun 2006

Posts: 10,305

Status: Offline

Post #6
Baby WELSHPUG complete with bobblehat.

dangti6 has attached the following image:

________________________________________

  • Senior Test Automation Engineer for the 306GTi6 Owners Club Forum Wizard


  • Posted 2nd Apr 2015 at 17:29
    welshpug!

    Capt Pedantic

    Location: Bigend, Wales.

    Registered: 27 Mar 2007

    Posts: 25,817

    Status: Offline

    Post #7
    err, no, that was my Grandfather LOL

    ________________________________________

    need a part number? get on here - http://public.servicebox.peugeot.com

    Bring on the Trumpets.

    Posted 2nd Apr 2015 at 18:27
    pugheaven

    Seasoned Pro

    Location: Fareham

    Registered: 17 Dec 2006

    Posts: 4,602

    Status: Offline

    Post #8
    In a rush and just took pics, edited them on paint and took a pic of the laptop with my phone.....
    Posted 2nd Apr 2015 at 19:51
    Day666

    Seasoned Pro

    Location: Bristol

    Registered: 20 Apr 2013

    Posts: 5,209

    Status: Offline

    Post #9
    Well done you Two any Pics are a great help Thumbs up

    Any Pics you can post I'm great full x
    Posted 2nd Apr 2015 at 23:45
    bigbadbowen

    Seasoned Pro

    Location: Winchester

    Registered: 21 Nov 2003

    Posts: 13,752

    Status: Offline

    Post #10
    Ollie you just volunteered to fit all these kits as I have absolutly no idea what the ball sack you are talking about ? Looks the muts nuts though !
    Posted 3rd Apr 2015 at 00:11
    jaredboy

    Regular

    Location: Drammen

    Registered: 24 Sep 2006

    Posts: 156

    Status: Offline

    Post #11
    I have to say that this is brilliant and very helpfull, my kit should arrive sometime next week.

    Is there a template out there for where you cut the hole?
    I do se the pictures that have been taken but i guess you need to be very accurate.

    Thanks!

    ________________________________________

    ZX 16V
    Posted 3rd Apr 2015 at 15:27
    welshpug!

    Capt Pedantic

    Location: Bigend, Wales.

    Registered: 27 Mar 2007

    Posts: 25,817

    Status: Offline

    Post #12
    yes there is a template, you hold it against the bulkhead and up against the seam, if you bolt the quadrant down you'll see where the hole has to go anyway, just directly back from the rose joint.

    ________________________________________

    need a part number? get on here - http://public.servicebox.peugeot.com

    Bring on the Trumpets.

    Posted 3rd Apr 2015 at 15:48
    fatlapit

    Seasoned Pro

    Location: STOCKSFIELD

    Registered: 02 Nov 2010

    Posts: 3,040

    Status: Offline

    Post #13
    Wish i could have one

    ________________________________________


    Posted 3rd Apr 2015 at 16:12
    Chr1sch

    Seasoned Pro

    Location: Worcester

    Registered: 02 Aug 2014

    Posts: 1,025

    Status: Offline

    Post #14
    Fantastic thanks again guys!!
    Posted 3rd Apr 2015 at 18:12
    jaredboy

    Regular

    Location: Drammen

    Registered: 24 Sep 2006

    Posts: 156

    Status: Offline

    Post #15
    welshpug! wrote:
    yes there is a template, you hold it against the bulkhead and up against the seam, if you bolt the quadrant down you'll see where the hole has to go anyway, just directly back from the rose joint.


    Thanks!

    Guess i'll wait with the cutting then til the kit is here.

    ________________________________________

    ZX 16V
    Posted 3rd Apr 2015 at 19:42
    welshpug!

    Capt Pedantic

    Location: Bigend, Wales.

    Registered: 27 Mar 2007

    Posts: 25,817

    Status: Offline

    Post #16
    right, I got this far today...


    Ollie, any chance you could get this dimension from the heatshield bolt down along the bulkhead to the centre of the hole?


    From what I could figure out, the main pivot post is in line with the side of the exhaust tunnel, so just 60mm from the side will line up with the fore/aft pivot, just need the height.

    ________________________________________

    need a part number? get on here - http://public.servicebox.peugeot.com

    Bring on the Trumpets.

    Posted 11th Apr 2015 at 19:50
    pugheaven

    Seasoned Pro

    Location: Fareham

    Registered: 17 Dec 2006

    Posts: 4,602

    Status: Offline

    Post #17
    I'll take a Jack round my parents tomorrow as that is where the car is now, take it that's the bottom of the manifold heat shield? If so I'll measure from the centre of the lower bolt to the centre of the linkage bar Thumbs up
    Posted 11th Apr 2015 at 19:58
    pugheaven

    Seasoned Pro

    Location: Fareham

    Registered: 17 Dec 2006

    Posts: 4,602

    Status: Offline

    Post #18
    You could just put the bell crank on and have it at the right orientation for the linkage to connect to the box/linkage rod, have the eye end facing towards the bulk head and have it so that it's straight on the bearing put a rule across and that will give you the height.

    I'll still measure it for you tho
    Posted 11th Apr 2015 at 20:02
    welshpug!

    Capt Pedantic

    Location: Bigend, Wales.

    Registered: 27 Mar 2007

    Posts: 25,817

    Status: Offline

    Post #19
    I did have it on and tried to mark with a sharpie but I can't get in there with the coolant pipes and battery box in the way!

    Can't see s**t from underneath as its only a foot off the floor :/

    ________________________________________

    need a part number? get on here - http://public.servicebox.peugeot.com

    Bring on the Trumpets.

    Posted 11th Apr 2015 at 20:18
    pugheaven

    Seasoned Pro

    Location: Fareham

    Registered: 17 Dec 2006

    Posts: 4,602

    Status: Offline

    Post #20
    I know what you mean mate, even with the matrix pipes and battery box out the way it was still a pain!

    Good luck with cutting the hole with it only a foot of the ground!
    Posted 11th Apr 2015 at 20:31
    welshpug!

    Capt Pedantic

    Location: Bigend, Wales.

    Registered: 27 Mar 2007

    Posts: 25,817

    Status: Offline

    Post #21
    I had a thought,. measuring down to the bolt holding the bulkhead seal carrier on will suffice, as that is central.

    not been anywhere near the car today!

    ________________________________________

    need a part number? get on here - http://public.servicebox.peugeot.com

    Bring on the Trumpets.

    Posted 12th Apr 2015 at 21:47
    pugheaven

    Seasoned Pro

    Location: Fareham

    Registered: 17 Dec 2006

    Posts: 4,602

    Status: Offline

    Post #22
    The what?? Lol
    Sorry mate, been moving house all weekend and not had chance to get to the car!

    So we are all on the same page I am using the lower linkage as a datum (this will be the same on all cars), with a rule sat on top of the lower bar it's 80mm to the centre of the top linkage bar
    Posted 13th Apr 2015 at 18:35
    Day666

    Seasoned Pro

    Location: Bristol

    Registered: 20 Apr 2013

    Posts: 5,209

    Status: Offline

    Post #23
    pugheaven wrote:
    The what?? Lol
    Sorry mate, been moving house all weekend and not had chance to get to the car!

    So we are all on the same page I am using the lower linkage as a datum (this will be the same on all cars), with a rule sat on top of the lower bar it's 80mm to the centre of the top linkage bar


    We are talking lower linkage of new kit ?
    Posted 14th Apr 2015 at 07:34
    pugheaven

    Seasoned Pro

    Location: Fareham

    Registered: 17 Dec 2006

    Posts: 4,602

    Status: Offline

    Post #24
    Yup
    Posted 14th Apr 2015 at 07:36
    Day666

    Seasoned Pro

    Location: Bristol

    Registered: 20 Apr 2013

    Posts: 5,209

    Status: Offline

    Post #25
    pugheaven wrote:
    Yup


    Thank you Ollie I was 99% sure 1% is a lot though !!

    Just been told mine might not be here this wk Dunno
    I wanted it fitted for 25th of this month for Coombe ???
    Posted 14th Apr 2015 at 08:45

    Pages (16): [1] 2 3 .. last

    All times are GMT. The time is now 20:03

    The Peugeot GTi-6 & Rallye Owners Club - ©2024 all rights reserved.

    Please Note: The views and opinions found herein are those of individuals, and not of The Peugeot 306 GTi-6 & Rallye Owners Club or any individuals involved.
    No responsibility is taken or assumed for any comments or statements made on, or in relation to, this website. Please see our updated privacy policy.