Post #51
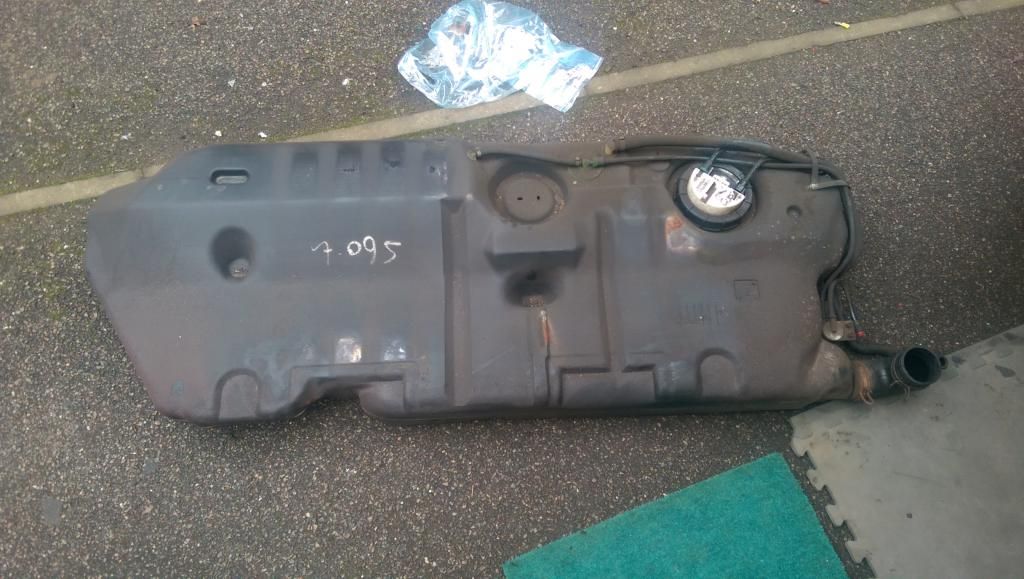
How thoughtful of Peugeot to write your radio code on top of the fuel tank for safe keeping.
________________________________________


|
| Author | Subject: Red Rallye S529 OAN |
|
aka JKshooter  Location: Taunton, Somerset Registered: 15 Jun 2006 Posts: 10,305 Status: Offline |
Post #51
How thoughtful of Peugeot to write your radio code on top of the fuel tank for safe keeping. ________________________________________ |
|
|
|
|
Formerly gpm  Location: Lutterworth Registered: 01 Sep 2007 Posts: 2,941 Status: Offline |
Post #52
Lol......I did wonder what that was when I took the tank off. No idea what it means....________________________________________ Cherry Red Rallye .... On going OEM spec restoChina Blue GTi6 .... Weekend toy Black 208 GTi .... Wife's car now Silver BMW 550i.... The executive missile |
|
|
|
|
Formerly gpm Location: Lutterworth Registered: 01 Sep 2007 Posts: 2,941 Status: Offline |
Post #53
Not that it was the greatest day for it at all, but I headed out this morning and got on with it.Slowly but surely its coming....I've probably done about 2/3 of one side of the chassis. Its really not a pleasant job at all. There are places where the underseal is pretty thick and still very soft underneath. That tends to get splattered everywhere. Then there is the job of going back and removing the seam sealer that's 2-3mm thick in places. Coupled with it being cold and pouring with rain and the fact there isn't much room despite it being on axle stands and I have to stop every so often as my goggles steam up, its not a great experience.....still, it will be worth it when I'm done and I'm learning a fair bit about the car by taking it apart as I go. I'm glad I'm doing it as well as I'm finding patches of surface rust as I go which really need dealing with So, some pics. Apologies for the poorness of them. Trying to take pics under the car is a swine!!     Hopefully the weather will be better tomorrow ________________________________________ Cherry Red Rallye .... On going OEM spec restoChina Blue GTi6 .... Weekend toy Black 208 GTi .... Wife's car now Silver BMW 550i.... The executive missile |
|
|
|
|
Formerly gpm Location: Lutterworth Registered: 01 Sep 2007 Posts: 2,941 Status: Offline |
Post #54
Better weather day today. Bad tool day though. Grinder was playing up from the off. Not running at full speed, sounding odd. Took it apart and looks like the brushes have gone, at least one has. More ordered. Borrowed a 110v Bosch one and power pack from a mate and back in business. Had a hospital appointment this afternoon so got back on it for an hour before football. Did about 50 mins and my work light popped its bulb. I gave up for the day at that point.Not before I found this though   Looks like it's been jacked up just to the left of the jacking point (it's the drivers side front jacking point, so the side towards the rear of the car). From what I can see, it's split the seam open like a manky banana skin splits. (Sorry, best description I can give). That may yet need cutting out and replacing. Removal of the underseal is going well. Almost cleared one half of the chassis, just a little more to do at the front. Then the seam sealant needs removing. Finding bits of surface rust as I go, but nothing major yet....... Just waiting for my Scorpion exhaust to turn up now.... ________________________________________ Cherry Red Rallye .... On going OEM spec restoChina Blue GTi6 .... Weekend toy Black 208 GTi .... Wife's car now Silver BMW 550i.... The executive missile |
|
|
|
|
Formerly gpm Location: Lutterworth Registered: 01 Sep 2007 Posts: 2,941 Status: Offline |
Post #55
Better day all round today. Tools behaved, goggles didn't fog up every two minutes and I got loads done. I know have one entire half of the chassis back to bare metal.Bit difficult to get pictures of the whole thing but.....   Couple of interesting bits found.... Patch on the chassis leg. Looks to have been done pretty well. Metal shaped ok, welds good, drain hole added.....can only assume it was due to rust. Some of the surrounding metal has some pretty decent putting....  And then this.....Better pics of the bit I was trying to describe last night. Clearly been jacked with a trolley Jack in the wrong place....seam is split wide open and I suspect it's going to need cutting out and replacing. Joy.   ________________________________________ Cherry Red Rallye .... On going OEM spec restoChina Blue GTi6 .... Weekend toy Black 208 GTi .... Wife's car now Silver BMW 550i.... The executive missile |
|
|
|
|
Formerly gpm Location: Lutterworth Registered: 01 Sep 2007 Posts: 2,941 Status: Offline |
Post #56
Rear beam out.Was a bit of a pain as one of the handbrake cables was stuck in the caliper and one of the unions was a proper pain, requiring the mole grips but it's off.  Now need to remove the main front to rear brake lines and get busy grinding again.... ________________________________________ Cherry Red Rallye .... On going OEM spec restoChina Blue GTi6 .... Weekend toy Black 208 GTi .... Wife's car now Silver BMW 550i.... The executive missile |
|
|
|
|
Senior User Location: Darlington Registered: 04 Nov 2014 Posts: 545 Status: Offline |
Post #57
Liking the progress mate, hats off on the level of attention to detail  |
|
|
|
|
Formerly gpm Location: Lutterworth Registered: 01 Sep 2007 Posts: 2,941 Status: Offline |
Post #58
Cheers bud. I figure if it's worth doing, it's worth doing well. Might as well do it right now so it won't need doing again, ever! Too much bloody work to do it again!!Anyhow, front to rear brake pipes now disconnected and removed. Front unions were a comete pain, seized pretty good. You can see why...  Don't think they've ever been off.....coupled with the fact you've only room for about 1/8 of a turn on the spanner without dropping the subframe made it even harder. Mole grips required and I very nearly gave up and cut them off....... ________________________________________ Cherry Red Rallye .... On going OEM spec restoChina Blue GTi6 .... Weekend toy Black 208 GTi .... Wife's car now Silver BMW 550i.... The executive missile |
|
|
|
|
Seasoned Pro  Location: Leicestershire Registered: 15 Jan 2013 Posts: 2,473 Status: Offline |
Post #59
I'm definitely following this with interest. I'll hopefully do something like this as well to mine someday.________________________________________ 61k miles Ph.1 Diablo '6 Project Thread |
|
|
|
|
Formerly gpm Location: Lutterworth Registered: 01 Sep 2007 Posts: 2,941 Status: Offline |
Post #60
Thanks bud. Well worth doing on these before any surface rust gets too bad. I'm only in Lutterworth, not sure where in Warwickshire you are but come over and have a look if you want.So, anyway, busy day!! As per the above post, I got the rear beam out. Took a bit, one of the unions connecting one of the front to rear brake lines to the rear brake lines on the beam was seized. Was rounding with the spanners so out came the mole grips. Didn't take long!! I then pumped the brake pedal a few times to drain down the brake fluid in the pipes. Once done, I then got a trolley jack under the beam, undid the 6 bolts holding it to the car and lowered it down. Beam removed. Happy days. Been wanting to get that off for a while. Then set about removing the front to rear brake lines. The lines run down the passenger side of the chassis, bending up into the engine bay. Just after they bend up, there are another set of unions. They are an absolute sh!t to get to. I guess ideally you'd need tomdrop the subframe but I'm not ready to do that yet. It means you go in above the steering arm and there is enough room for about 1/8 of a turn of a spanner. Brilliant. Even more brilliant when both unions are seized. No idea how I managed to crack them off with the grips but I managed it...it then took ages going at 1/8 of a turn to undo them. Eventually got them undone. Then spent 5 mins uncliping them from the pipe clips and then finally, getting them off the car! They are big buggers and I think I'll need to remake at least one as the union is rounded etc. If I do remake them, they will be from kunifer with stainless overbraid and stainless fixings  Once that was done, I then removed all the clips from the chassis along with the wiring loom for the abs sensors on the rear beam. Job done. I then removed the rest of any bolt on fittings etc from the chassis. Everything gets bagged and tagged as I go....  So, with everything removed, and fresh from a tea and biscuit stop and with a new bulb in my work light, I cracked on. I'm glad I took the beam and the tank out. There is some serious surface rust going on that had I left it, would undoubtedly led to some fairly extensive metal replacement in the not too distant future. Side of the tank area...  Around the suspension bump stops. I'm concerned about these areas as I've not found the extent of the rust yet. There's plenty of it.   Around one of the beam mounts. Devoid of seam sealant oddly. Guess someone has been in here before....  That's not a hole to the right not the pic, just more underseal ive not yet removed. ________________________________________ Cherry Red Rallye .... On going OEM spec restoChina Blue GTi6 .... Weekend toy Black 208 GTi .... Wife's car now Silver BMW 550i.... The executive missile |
|
|
|
|
Senior User  Location: East Mids Registered: 02 Sep 2006 Posts: 860 Status: Offline |
Post #61
And this was a pretty well taken car of Rallye when you bought Id hate to think what the other 90% looks like underneath. You gonna get the entire bottom sprayed cherry when you're done with it? ________________________________________ CLUB BLACK RALLYE||B8s||60-70mm drop||Black Partner Steels||P1 VTS Rack||Refurbed Beam||Hybrid ARB||VTS Torsion Bar|| |
|
|
|
|
Formerly gpm Location: Lutterworth Registered: 01 Sep 2007 Posts: 2,941 Status: Offline |
Post #62
Tom,To be fair, it is pretty good underneath. Few bits of surface rust I'm finding but deal with those as I go. The couple of pics above are the very worst bits. It is 17 years old after all. Yep, gonna do the bottom same colour as the top! Just debating and figuring out what products to use and in which order. It's nearly stripped now. A few more hours today/tomorrow and it should be ready for the abrasive disc on the grinder to finish the prep for paint. Quite how much I'll get done this afternoon I don't know. Bloody cold and the wind keeps blowing right up the legs of my jeans! ________________________________________ Cherry Red Rallye .... On going OEM spec restoChina Blue GTi6 .... Weekend toy Black 208 GTi .... Wife's car now Silver BMW 550i.... The executive missile |
|
|
|
|
Formerly gpm Location: Lutterworth Registered: 01 Sep 2007 Posts: 2,941 Status: Offline |
Post #63
Got a bit more done today. Was chuffing cold though.Abrasive discs for the grinder turned up. Make pretty short work of any remaining paint...  Worst of the rusty areas cleaned up well...  Removed the rest of the brake line clips from under the chassis and got busy removing more underseal. Just got too cold. Bloody wind blowing everything everywhere too.... Chassis now approx 80% stripped. Try and do some more tomorrow, depending on the weather and how much beer is consumed with the curry with the fellas tonight..... ________________________________________ Cherry Red Rallye .... On going OEM spec restoChina Blue GTi6 .... Weekend toy Black 208 GTi .... Wife's car now Silver BMW 550i.... The executive missile |
|
|
|
|
Junior User  Location: Bristol Registered: 22 Nov 2014 Posts: 83 Status: Offline |
Post #64
very well done.. I wish I could do the same on mine.. |
|
|
|
|
Seasoned Pro  Location: Durham Registered: 20 Oct 2008 Posts: 8,716 Status: Offline |
Post #65
Putting some good work in on this mate. Good on you, wish i could be bothered to do the same to mine. Coming on very well ________________________________________ Clicky: [url =http://www.306gti6.com]click here[/url] remove the space between [url & = |
|
|
|
|
Formerly gpm Location: Lutterworth Registered: 01 Sep 2007 Posts: 2,941 Status: Offline |
Post #66
Thanks bud.Sometimes wish I'd not started but I know it will be worth it in the long run, both from an aesthetics point of view, plus I know the chassis will be properly protected as well for some time to come yet. Didn't do anything on it today. Didn't get out of bed until gone 11 and the weather was rubbish so quickly washed the daily and picked up a mate and spend the afternoon in the pub with a mate watching Leicester throw away two points...can't have it all I guess! ________________________________________ Cherry Red Rallye .... On going OEM spec restoChina Blue GTi6 .... Weekend toy Black 208 GTi .... Wife's car now Silver BMW 550i.... The executive missile |
|
|
|
|
Formerly gpm Location: Lutterworth Registered: 01 Sep 2007 Posts: 2,941 Status: Offline |
Post #67
Back at work this week so progress has slowed....Smaller one of the two heat shields bare metalled, kurursted and then zinc primed.  Then started on the bigger heat shield. This one is quite rusty and in a bit of a state at one end..  Abrasive wheel on a grinder makes relatively short work of things...  Am just about to order some Deox Gel, Electrox primer and epoxy mastic from Bilt Hamber, will use the deox gel and electrox on this. Not sure how the epoxy mastic stands up to heat though... ________________________________________ Cherry Red Rallye .... On going OEM spec restoChina Blue GTi6 .... Weekend toy Black 208 GTi .... Wife's car now Silver BMW 550i.... The executive missile |
|
|
|
|
Formerly gpm Location: Lutterworth Registered: 01 Sep 2007 Posts: 2,941 Status: Offline |
Post #68
Bit more tonight.Wet flatted and gave the heat shield a second coat of zinc primer.  Started bare metalling the second rear arch...  Ordered some Deox gel, some Electrox primer and Epoxy Mastic from Bilt Hamber today. That will all be here tomorrow. Tempted to give the primed heat shield a coat of the Mastic. The rusty heat shield will be getting a proper dose of the Deox gel, as will the chassis. ________________________________________ Cherry Red Rallye .... On going OEM spec restoChina Blue GTi6 .... Weekend toy Black 208 GTi .... Wife's car now Silver BMW 550i.... The executive missile |
|
|
|
|
Formerly gpm Location: Lutterworth Registered: 01 Sep 2007 Posts: 2,941 Status: Offline |
Post #69
Crappy, rusty heat shield now not so nasty at all after a good going over with the grinder and wire brush. Been sitting in deox gel all night so is properly clean and ready for paint now. Exhaust hanger the same..  Those two getting primered this morning then I'm going to try and finish up cleaning the chassis and start with the electric primer ________________________________________ Cherry Red Rallye .... On going OEM spec restoChina Blue GTi6 .... Weekend toy Black 208 GTi .... Wife's car now Silver BMW 550i.... The executive missile |
|
|
|
|
Formerly gpm Location: Lutterworth Registered: 01 Sep 2007 Posts: 2,941 Status: Offline |
Post #70
Thanks to a great wife, I had pretty much all day on the Rallye today.Got a fair bit done to the point that if the Deox gel does it's thing overnight, then I just might be in a position to start getting the Electrox primer on tomorrow. That would be useful as this damp air and bare steel is not a good combo..... First job this morning was wash off the exhaust hanger bracket and the (previously) rusty heat shield to get the deox gel off. Did a pretty good job and then both parts got hung from the underside of the garage door and primered. Then I moved onto the chassis again. Two brackets either side that amongst other things hold the ABS wiring needed some attention. I'd left them until now as they are tight up against the boot floor, difficult to get access with the grinder and on the passenger side, there is the added extra of an exhaust hanger in the way. Ended up using a small wire brush on a drill and even a screw driver to remove the horrible black stuff. I'm so glad I did.......   Plenty of surface rust hiding under there.....cleaned it up as best I could and left it for Deox-ing later. Carried on cleaning up bits of the chassis until suddenly, I was being peppered with bits off the wire brush. Stopped and could see why.....  Yep, that wire wheel is done  Carried on cleaning up the chassis, including using a screwdriver and a scraper to get into all the little corners that the wire wheels/brushes couldn't. Once that was done, I applied Deox gel to all the surface rusty patches, covered with clingfilm and left. That went on about 3pm this afternoon. Gonna let it still until tomorrow morning as its cold. I then moved onto the bits that have been really bothering me, the bump stops. A popular place for rust, mine is no exception. Managed to get quite a lot of it out using a screwdriver and some with a wire brush on a drill. It's still ugly and I won't really be able to get in there with the Deox gel so I think it's gonna get proper Kurusted and then as much zinc primer as I can get in there.... This is looking from below, straight up at the bump stop.....   Not the prettiest but about the best I can do without cutting big sections of major structural parts of the chassis out. Last thing I did was to start removing some more of the rest of the underseal stuff. Got perhaps 40% of what was left to remove done, so even less to do now......hooray! ________________________________________ Cherry Red Rallye .... On going OEM spec restoChina Blue GTi6 .... Weekend toy Black 208 GTi .... Wife's car now Silver BMW 550i.... The executive missile |
|
|
|
|
Regular  Location: Anglesey Registered: 05 Jul 2007 Posts: 443 Status: Offline |
Post #71
Doing a great job. Looking forward to the finished article. Keep up the good work mate.________________________________________ Bianca white 306 RallyeArctic blue Clio 182 FF Alpine white 205 1.9 GTI |
|
|
|
|
Seasoned Pro  Location: Winchester Registered: 21 Nov 2003 Posts: 13,752 Status: Offline |
Post #72
Remove the bump stop bud and de rust under them or it will all come back |
|
|
|
|
Formerly gpm Location: Lutterworth Registered: 01 Sep 2007 Posts: 2,941 Status: Offline |
Post #73
How do you remove the bump stop bud?________________________________________ Cherry Red Rallye .... On going OEM spec restoChina Blue GTi6 .... Weekend toy Black 208 GTi .... Wife's car now Silver BMW 550i.... The executive missile |
|
|
|
|
Seasoned Pro  Location: Dundee Registered: 24 Jun 2011 Posts: 1,408 Status: Offline |
Post #74
Prize the rubber stop out and there is a bolt under it holding the cup on, probably well seized looking at it  ________________________________________ '90 1.6 205 GTi, '98 306 GTi-6 |
|
|
|
|
Formerly gpm Location: Lutterworth Registered: 01 Sep 2007 Posts: 2,941 Status: Offline |
Post #75
Thanks......Yep, I had a feel around in the hole, I could feel the captive nut in there. Didn't feel very nice!!!!!! Oh well, no doubt another sheared something to fix later on..... ________________________________________ Cherry Red Rallye .... On going OEM spec restoChina Blue GTi6 .... Weekend toy Black 208 GTi .... Wife's car now Silver BMW 550i.... The executive missile |
|
|
|
The Peugeot GTi-6 & Rallye Owners Club - ©2024 all rights reserved.

Please Note: The views and opinions found herein are those of individuals, and not of The Peugeot 306 GTi-6 & Rallye Owners Club or any individuals involved.
No responsibility is taken or assumed for any comments or statements made on, or in relation to, this website. Please see our updated privacy policy.