displaying posts 1 to 25 of 26

Pages (2): [1] 2

Author Subject: 'Simple fix' turning to a more thorough job
DanRM

Regular

Location: Birmingham

Registered: 18 Jan 2013

Posts: 120

Status: Offline

Post #1
Ok so as some of you may know from a few previous threads, I bought a Gti-6 of a lad I went to college with on the basis that the lower ball joint and front discs needed changing. After doing these I was going to take my 205 gti off the road and begin a project on restoring it to it's former glory to the best I can. Whilst enjoying the 306 as a daily run about.

I tried to have a good look round but couldn't have a proper nose under due to being that low, but the engine sounded sweet and the body looked well looked after except a small mark on the door.

Along with the parts above I wanted to do a couple of other things just to suit my particular taste, so I decided
The exhaust would be put back to standard, (too loud)
The front tints were to be removed,
To raise the height back to standard,
To take the stupid air filter poking out the bumper and put it back in the bay


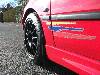
Well I went to do the front discs, removed the wheels and 2 of the threads on the hub had been cross threaded, so I ran a tap through all of them to clear them up, after posting on here for new wheel bolts, I was told that they were the wrong type (tapered) so I bought 4 brand new ones. Finally got to the brakes and they were in p**s poor condition with the N/S caliper being seized, I managed to clean the sliders up with some emery paper and WD40, re-greased the sliders and gave the caliper a good wire brushing and clean. As I put it back together I hoped the O/S wouldn't be as bad... It was worse, 3 hub wholes had been cross threaded (same reason as before) so out came the tap again, cleaned those up and a couple of days later I started on the pads and discs.

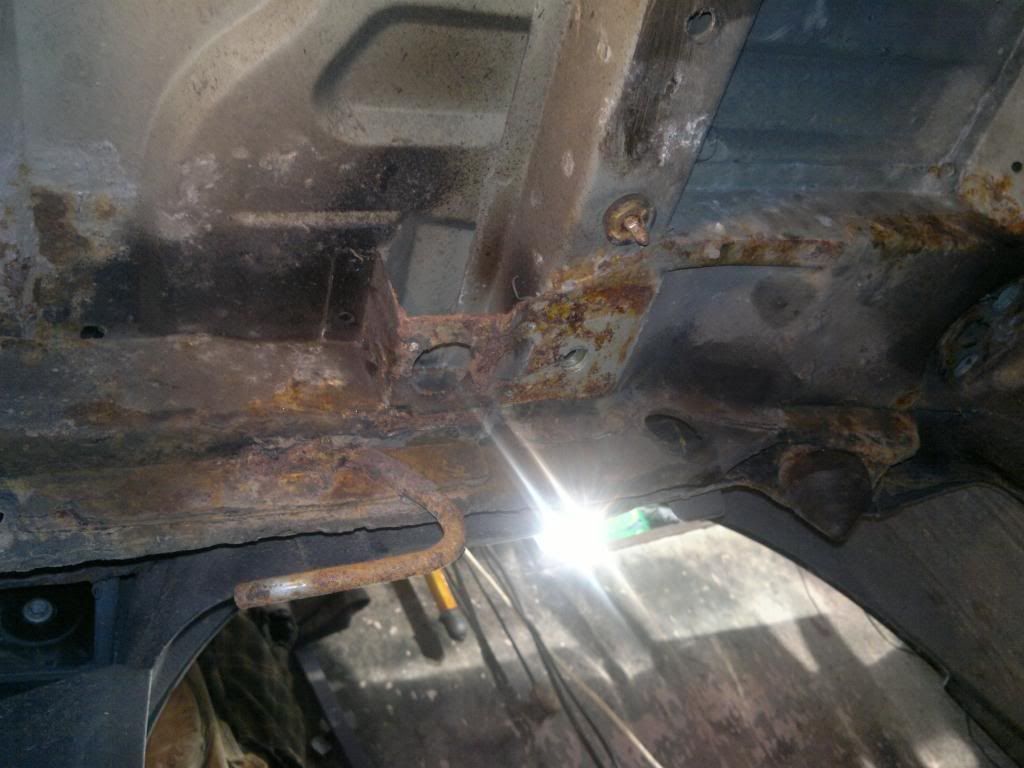
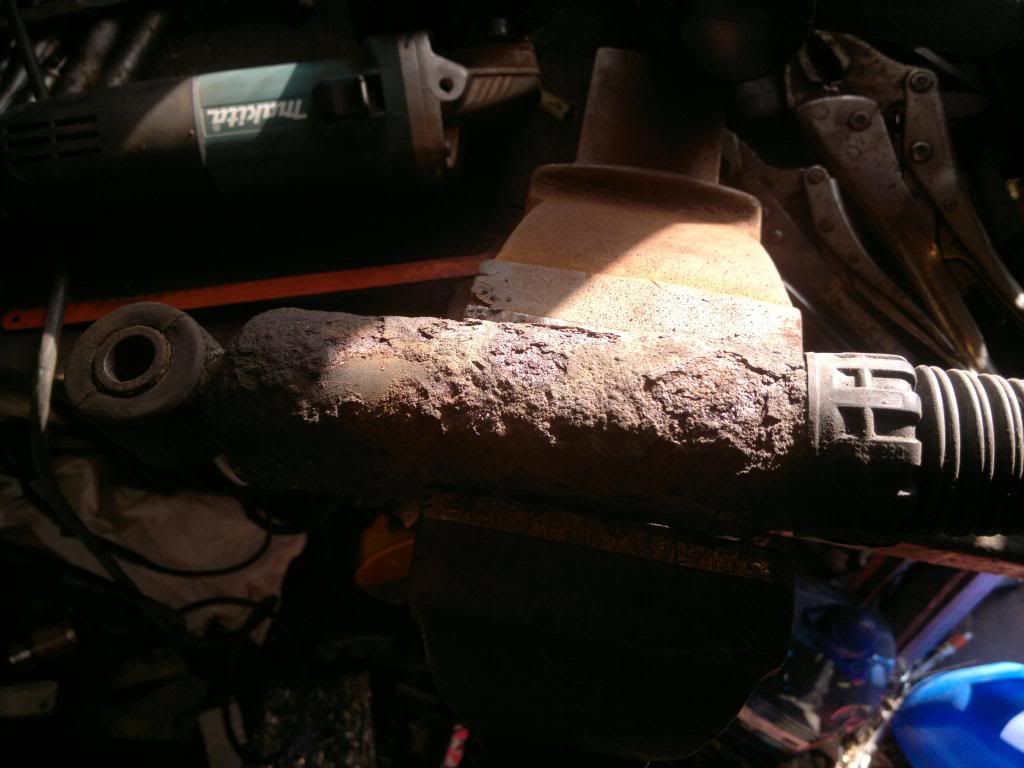
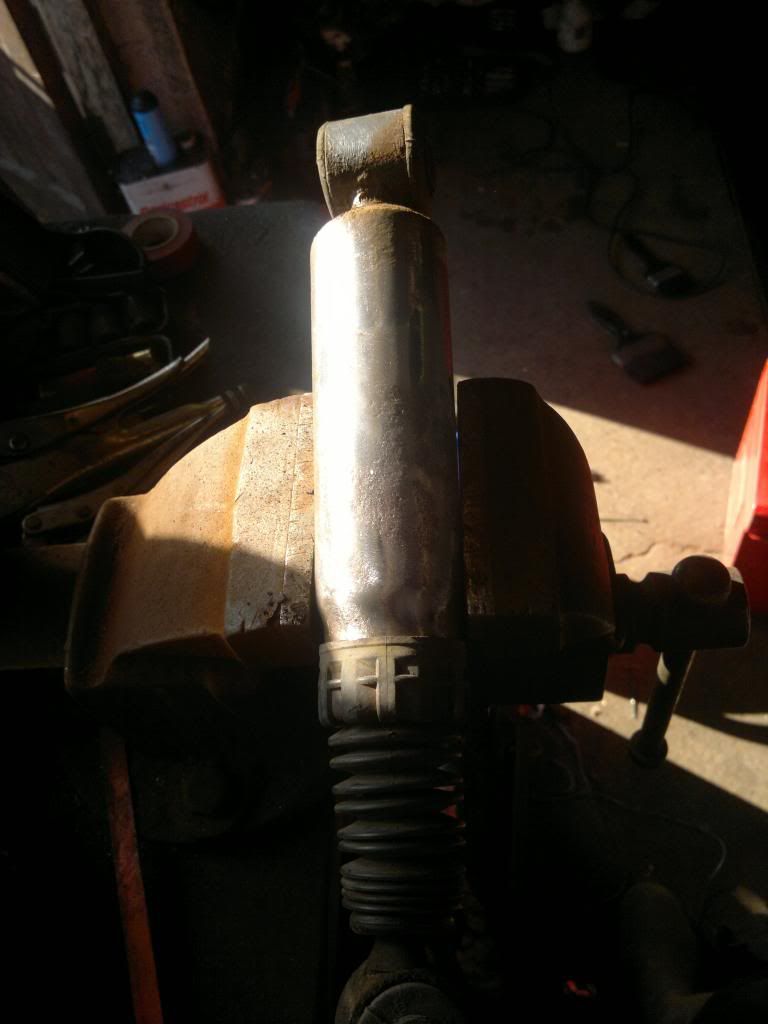
Something wasn't right when I was removing the caliper from the yoke, I couldn't work out why it was so difficult to get the caliper off compared to the other one, then with a good few whacks with a rubber mallet it budged, I then found the folllowing sliders, which were originally seized solid in there, one slider had been made up of some steel rod with a nut and stud welded on, this caused the one hole to wear to an oval. And it had snapped off in the carrier. So I ordered new sliders from Peugeot at £45 then managed to get a S/H pair of calipers off here. I've only used the one yoke from the calipers so far as I didn't want to disturb the lines.

Put the ball joint on too which he supplied but happened to be the wrong size so I had to get the right one, had a quick look round the other wheel bolts, one wheel had a mix between flat type and tapered type, and the other had 4 17mm bolts that were barely hand tight so down to I went again to get some more bolts (expensive way of doing it I know).

DanRM has attached the following image:

Posted 17th Feb 2013 at 20:01
tvrfan007

Seasoned Pro

Location: In the garage

Registered: 29 May 2005

Posts: 3,488

Status: Offline

Post #2
Epic bodge artist that you seemed to have bought the car from! Get your rear wheels checked out tbh.

________________________________________

I'm Si btw Tee hee

Night Blue VW Golf GTD
Bianca LBSC Rallye - Track/Road Slag Project Thread
Sparkling Silver Mini Cooper D - Super Dooper Superman - (The other half's wheels)
Posted 17th Feb 2013 at 20:11
DanRM

Regular

Location: Birmingham

Registered: 18 Jan 2013

Posts: 120

Status: Offline

Post #3
I took the car for a drive and the brakes seemed ok, but the knocking was still on the N/S front and I was getting a horrible shake down that side from 50MPH upwards, I wasn't happy driving it so I swapped the insurance back over to the 205 and do a proper job on this first.

I managed to get a brand new squarer type factors back box for £30ish on ebay, so I reversed the car over the pit to swap this over, at least then I won't be annoying the neighbours when I move the cars about. The scorpion back box on there has be welded on, along with 3 different types of pipe eventually getting to the cat where the cat pipe has been cut down and welded on too. I got the disc cutter and went straight up the middle so I can have a go at saving the cat.
The scorpion backbox was held on using fencing wire looped round and twisted until it was high enough, and then held on using some speaker wire on the other mounting

Got the exhaust off from the downpipe down, in 2 sections leaving plenty of space on the backbox end and the cat end in case I can do something with them. I put the cat pipe in the vice and started to cut it carefully at the weld, but doing so I noticed there's a slit along the width of it which I can't make out if it's all the way through. So now a new cat is most likely needed, I've left the lambda soaking in WD40 as this was stuck in good.
Posted 17th Feb 2013 at 20:16
DanRM

Regular

Location: Birmingham

Registered: 18 Jan 2013

Posts: 120

Status: Offline

Post #4
tvrfan007 wrote:
Epic bodge artist that you seemed to have bought the car from! Get your rear wheels checked out tbh.


Tell me about it, more soon to come Thumbs down
Posted 17th Feb 2013 at 20:16
tvrfan007

Seasoned Pro

Location: In the garage

Registered: 29 May 2005

Posts: 3,488

Status: Offline

Post #5
DanRM wrote:
The scorpion backbox was held on using fencing wire looped round and twisted until it was high enough, and then held on using some speaker wire on the other mounting


Laugh

________________________________________

I'm Si btw Tee hee

Night Blue VW Golf GTD
Bianca LBSC Rallye - Track/Road Slag Project Thread
Sparkling Silver Mini Cooper D - Super Dooper Superman - (The other half's wheels)
Posted 17th Feb 2013 at 20:20
DanRM

Regular

Location: Birmingham

Registered: 18 Jan 2013

Posts: 120

Status: Offline

Post #6
I thought I'd tackle the rear beam and have a quick look at the rear brakes after what I've seen so far.I wanted to have a go at raising it back to standard, all the bolts/screws were missing the dirt caps so I spent most of the morning cleaning out the heads with a small screwdriver and barrel brushes, then on the O/S torison bar I went to undo the Torx screw and it was loose, and the thread on it was buggered and just spinning round in the hole so i pulled it out, I put the bolt in ready for the slide hammer and it wouldn't take, I had a good look in there and the thread had been stripped a little and cross-threaded. I had a look at the dampers and they're shot, dented both sides, (not just the flat surface)I was fuming put it back to how it was and had a quick look at the rear brakes, new pads and discs needed again.

I came on here to have a bit of a rant and luckily Ash offered me a beam which I'm waiting to collect next week...

Posted 17th Feb 2013 at 20:31
DanRM

Regular

Location: Birmingham

Registered: 18 Jan 2013

Posts: 120

Status: Offline

Post #7
And now that leads me to today, I went about dropping the rear beam ready for the one I'll be picking up I started following the FAQ guide on here but then I saw the condition of the rear calipers, these too were in bad shape along with the pipes fitted to them, I thought I'd still go about not disturbing the brake lines, then the ABS sensor snapped when I tried wriggling it free with some molegrips, and the other side the allen key head had been rounded off. I unplugged that side and left it for the time being soaking in oil ready for a pair of grips. And had a look round the rear pipes to see the extent of the rust.

DanRM has attached the following image:

Posted 17th Feb 2013 at 21:15
coskev

Seasoned Pro

Location: Oswestry

Registered: 01 Nov 2009

Posts: 3,132

Status: Offline

Post #8
Surely the beam off the Rat will be coming complete with ABS sensors?Dunno

Why try to remove them as they never come out in one piece on the rearNo fronts can be knocked out quite easily thoughYes

Loving the speaker wire exhaust hangers!!!LOL

________________________________________

Red GTB1756 powered Fabia VRS daily driver,LBSC Gti6 eater........

Mac1 ZR R1 kit car build in progress.
Posted 17th Feb 2013 at 21:23
DanRM

Regular

Location: Birmingham

Registered: 18 Jan 2013

Posts: 120

Status: Offline

Post #9
I went to pull the one pipe out of one of the clips, being careful thinking i'll snap the clip, it wasn't the clip that snapped but the pipe did into 3 pieces, leaving a little still in the clip. Seeing the other pipes crumbling between my fingers and seeing the state of the compensator fittings, the thought finally came into my mind, F**k this pile of w**k and I got the side cutters out and cut the lot, there was no chance after seeing the state of the pipes that I'd be happy to drive this car until I had new pipes put on. So I will be popping round the corner tomorrow to see if the guy who did the old chaps landrover brake pipes would show me how to do mine.

I cut the pipes as close to the compensator as possible planning to knock a socket on the fittings to loosen them

DanRM has attached the following image:

Posted 17th Feb 2013 at 21:27
DanRM

Regular

Location: Birmingham

Registered: 18 Jan 2013

Posts: 120

Status: Offline

Post #10
Having got the beam off, I've taken the dampers off in the hope to clean them up a bit until I get some new ones, I've taken the calipers off which I will try and refurb in the future and keep as spares. Along with what I can get off that beam thats worth keeping. I also managed to get a socket on the compensator and release the fittings so I'll take that off and give it a good clean up and spray.

Today is where I've decided to make a decent job of it all rather than a quick get it back on the road sprint, at least then I will find out if there is any more horrible bodges the safer way. And as my mate pointed out earlier it's a practice run for the 205 when I get the chance to do it.Smile

Tomorrow I plan on going down my local Travis Perkins and get a few discounted flappy disks and wire brush attachments and start cleaning the rust off from the fuel tank back, I think I'll then put a coat of red oxide on as I have a few gallons here from Dad's Landrover restoration. Then tackle the brake pipes, I might end up using those 2'nd hand front calipers sooner than I thought if the bleed nipples on the front shear which no doubt they will, so Tuesday I think I'll clean them up a bit and the exhaust shield rather than getting too dirty under the car as I have a couple of job interviews in the afternoonSmile and generally get it ready for the replacement beam next week

DanRM has attached the following image:

Posted 17th Feb 2013 at 21:54
DanRM

Regular

Location: Birmingham

Registered: 18 Jan 2013

Posts: 120

Status: Offline

Post #11
coskev wrote:
Surely the beam off the Rat will be coming complete with ABS sensors?Dunno

Why try to remove them as they never come out in one piece on the rearNo fronts can be knocked out quite easily thoughYes

Loving the speaker wire exhaust hangers!!!LOL


Yeah I'm pretty sure there will be the sensors on the new beam as he said everything except the dampers IIRC.


But I've been brought up to save what I can, so I was planning on taking the sensors off and keeping them as spares, I'm slowly building up as much as I can whilst I canCrazy

DanRM has attached the following image:

Posted 17th Feb 2013 at 22:06
coskev

Seasoned Pro

Location: Oswestry

Registered: 01 Nov 2009

Posts: 3,132

Status: Offline

Post #12
If you have got space to store spares go for itThumbs up

One thing to check is if the replacement beam has got the brake compensator fittings on the shock hanger,later Ph3 Gti6's did not have the compensator set-up,so you might need to swap the shock hangers overWink

________________________________________

Red GTB1756 powered Fabia VRS daily driver,LBSC Gti6 eater........

Mac1 ZR R1 kit car build in progress.
Posted 17th Feb 2013 at 22:38
tvrfan007

Seasoned Pro

Location: In the garage

Registered: 29 May 2005

Posts: 3,488

Status: Offline

Post #13
Fair play to you for persevering, not sure if i'd have continued with the horrors or just scrapped it. Seems your 'mate' was in fact a complete and utter f**knugget. Yes

________________________________________

I'm Si btw Tee hee

Night Blue VW Golf GTD
Bianca LBSC Rallye - Track/Road Slag Project Thread
Sparkling Silver Mini Cooper D - Super Dooper Superman - (The other half's wheels)
Posted 18th Feb 2013 at 07:58
DanRM

Regular

Location: Birmingham

Registered: 18 Jan 2013

Posts: 120

Status: Offline

Post #14
coskev wrote:
If you have got space to store spares go for itThumbs up

One thing to check is if the replacement beam has got the brake compensator fittings on the shock hanger,later Ph3 Gti6's did not have the compensator set-up,so you might need to swap the shock hangers overWink


Ahh right thanks for the info, I'll have to see if it needs a swap.
Posted 19th Feb 2013 at 18:37
DanRM

Regular

Location: Birmingham

Registered: 18 Jan 2013

Posts: 120

Status: Offline

Post #15
So yesterday I started grinding the rust off whilst the beam was off and give it a good clean up underneath.


I was going to do the whole floor but it didn't seem that bad so I cleaned up the loose stuff


Then one coat of Red Oxide, going to give it another tomorrow I think.


Posted 19th Feb 2013 at 18:51
DanRM

Regular

Location: Birmingham

Registered: 18 Jan 2013

Posts: 120

Status: Offline

Post #16
And today I cleaned up the dampers and exhaust shield ready to put back on.


This is the only "bodge" I plan to do to this, only until I can afford a new set of dampers, but in all fairness they didn't come up too bad after I ran a disk over it and as far as I can tell they work ok.


And I've left them with a coat of hammerite for now


I forgot to take a picture of the exhaust shield before I started on it, but it seen better days. About an hour later I got it down to this


I found a can of chrome spray paint in the back of the shed so thought I'd give it a coating for now. I don't think it'll last long at all but it'll do until I get some high temp stuff for my calipers


Tomorrow the plan is to give everything another coat and I'm going to get a spray for the boot pan. Anyone able to tell me what colour spray I need to get the original colour or similar?
Posted 19th Feb 2013 at 19:05
rich306

Seasoned Pro

Location: Portsmouth

Registered: 09 Aug 2009

Posts: 1,834

Status: Offline

Post #17
Wow, that is pretty impressive, how bad was the rust under the fuel tank? - if you took that off

________________________________________

Richies Project Rallye

Electrical work carried out in Portsmouth

jamiek_uk2000 wrote:
You'll need to throw money at the car. Not on parts. Just stand near your car and throw loose change at it, I find this increases performance for a short period of time
- Top Tip!!!
Posted 19th Feb 2013 at 23:49
DanRM

Regular

Location: Birmingham

Registered: 18 Jan 2013

Posts: 120

Status: Offline

Post #18
rich306 wrote:
Wow, that is pretty impressive, how bad was the rust under the fuel tank? - if you took that off


Thanks, No I didn't bother to take the tank off, I think I'll do that another time as it's got a full tank in it from when I picked it up so I'll empty it a few times again before I go into that much detail.
Posted 20th Feb 2013 at 00:07
coskev

Seasoned Pro

Location: Oswestry

Registered: 01 Nov 2009

Posts: 3,132

Status: Offline

Post #19
Good workThumbs up

If your running a aftermarket exhaust you might aswell leave heatshield offWink

As the back boxes are nowhere near the size of standard one, looks better without it fitted too imoThumbs up

________________________________________

Red GTB1756 powered Fabia VRS daily driver,LBSC Gti6 eater........

Mac1 ZR R1 kit car build in progress.
Posted 20th Feb 2013 at 10:15
coskev

Seasoned Pro

Location: Oswestry

Registered: 01 Nov 2009

Posts: 3,132

Status: Offline

Post #20
Good workThumbs up

If your running a aftermarket exhaust you might aswell leave heatshield offWink

As the back boxes are nowhere near the size of standard one, looks better without it fitted too imoThumbs up

________________________________________

Red GTB1756 powered Fabia VRS daily driver,LBSC Gti6 eater........

Mac1 ZR R1 kit car build in progress.
Posted 20th Feb 2013 at 10:16
DanRM

Regular

Location: Birmingham

Registered: 18 Jan 2013

Posts: 120

Status: Offline

Post #21
Yeah I might end up leaving it off in that case as the one I've got is a slightly smaller box type one. Plus I had to cut one of the studs to get it off so I'll have to drill and self tap it.

Anyway the last couple of days I've been spraying and painting, I gave it another coat of red oxide


But theres a patch about 7" long where it doesn't want to stick that well so I might grind it off again and degrease it again when/if it starts to flake off.

I took the chrome finish off the exhaust shield as it didn't look too nice once dried, this time I primed it then used a chrome look radiator paint which I'm much happier with (minus the run)


I decided after that I'll colour the underside black, So 1 can of Rustoleum Gloss black later...


Off down to B&Q this afternoon to buy a couple more cans, I think 3 will do it in total.

Posted 21st Feb 2013 at 12:20
DanRM

Regular

Location: Birmingham

Registered: 18 Jan 2013

Posts: 120

Status: Offline

Post #22
Due to Tax and MOT running out on the 205, I had to knuckle down and get things sorted, so the past 4 weeks I sorted out what was left to get the car back on the road.

Started off by putting the replacement beam I got off Ash on to get the car mobile again before putting new brake lines on. (I was planning on at least spraying the beam to tidy it up but time got the better of me)


Now with the car moveable again I then started on the bits of rust that I noticed, which soon became big holes after meeting the screw driver


Once I found the worst of it out came the welder


Not the tidiest of welds but still, had to do this on both sides so fuel lines had to be taken off.

Forgot to take a photo of the welding once tidied up and stone chipped
Posted 15th Aug 2013 at 21:30
DanRM

Regular

Location: Birmingham

Registered: 18 Jan 2013

Posts: 120

Status: Offline

Post #23
I then went back onto the front where I replaced the wishbone bushes, put the standard height struts on along with the 2nd ball joint and new drop links and seal the exhaust joints. I then decided to replace the rear pads and discs, one tyre (soon to be 3) and gave the car a good clean off. Took it to the the MOT station expecting it to fail even with all the work done, the bloke was quite impressed with it and it passed with only one advisory on the handbrake. So I left the station with a massive grin on my face.

I've driven it around the last two weeks and the only problems I have still are a wobble at around 60mph getting worse the faster I go, and a bit of smoke coming from the back of the engine. So I assume the gasket may be seeping somewhere. And I'm having the wheels balanced next week.

Well this is how it stands after a day of cleaning, I'm planning on getting it machine polished to get rid of the swirling and scratches and then the stone chips touched in. But I'm pretty pleased with the end result.

This is one from the day I bought it


And here are a few from today


Posted 15th Aug 2013 at 21:52
buzzbrightyear

Seasoned Pro

Location: hiding all receipts for car

Registered: 09 Jul 2008

Posts: 11,894

Status: Offline

Post #24
Laugh my ass off they have gone to a nice effort on the caliper sliders for what a new pair cost, seen as they didn't seem fussy why didn't they just get some factors sliders

________________________________________

andrew315rawson@live.co.uk
Moonstone phase 7 gti6
My Project thread: http://www.306gti6.com/forum/showthread.php?id=119992&page=1
Posted 15th Aug 2013 at 22:05
russbez

Seasoned Pro

Location: Inverness-Shire

Registered: 19 Dec 2005

Posts: 7,458

Status: Offline

Post #25
fair play for getting her fixed up

had a bit of welding on mine a few weeks ago

might want to check under your Side Skirts for rust
either that or never ever take them off and see how bad they can get LOL


you probably have learned this but never try and remove ABS sensors soo easy to snap them, just unplug them

________________________________________

TEAM HIGH BOOST SUPERCHARGED RALLYE

My Rallye project thread
Posted 16th Aug 2013 at 10:49

Pages (2): [1] 2

All times are GMT. The time is now 15:53

The Peugeot GTi-6 & Rallye Owners Club - ©2024 all rights reserved.

Please Note: The views and opinions found herein are those of individuals, and not of The Peugeot 306 GTi-6 & Rallye Owners Club or any individuals involved.
No responsibility is taken or assumed for any comments or statements made on, or in relation to, this website. Please see our updated privacy policy.