Post #151
Looks fantastic, you’ll notice a big difference in how rigid the car feels now.


|
| Author | Subject: 99rallye's Clubsport |
|
Seasoned Pro  Location: Bucks Registered: 25 Feb 2007 Posts: 2,437 Status: Offline |
|
|
|
|
|
Seasoned Pro  Location: Bristol Registered: 20 Apr 2013 Posts: 5,209 Status: Offline |
Post #152
Yep great looking cage  |
|
|
|
|
Regular  Location: Hitchin Registered: 26 Aug 2009 Posts: 348 Status: Offline |
Post #153
Today I experimented with some dry ice to remove the sound deadening from the foot wells. 20200613_124722 by Nick Buxton, on Flickr 20200613_124722 by Nick Buxton, on Flickr 20200613_125044 by Nick Buxton, on Flickr 20200613_125044 by Nick Buxton, on Flickr 20200613_125156 by Nick Buxton, on Flickr 20200613_125156 by Nick Buxton, on FlickrIt was very cool listening to it crack and pop. I was surprised by how brittle it made the sound proofing, which really helped remove it.  20200613_142841 by Nick Buxton, on Flickr 20200613_142841 by Nick Buxton, on FlickrYou can see on the right hand side of that pic where I ran out of ice. I didn't have enough ice for the whole section and the last bit was harder and left more tar/glue behind than the sections that had plenty of ice to freeze it. Which also made cleaning it with tar and glue remover much harder.  20200613_160517 by Nick Buxton, on Flickr 20200613_160517 by Nick Buxton, on Flickr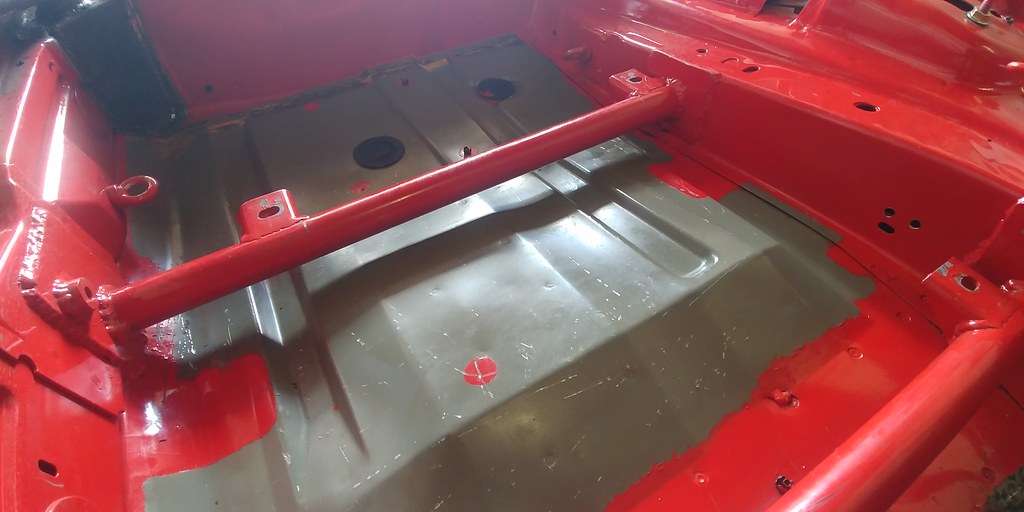 20200613_160523 by Nick Buxton, on Flickr 20200613_160523 by Nick Buxton, on FlickrI've been bagging the sound proofing as it came off and I'll weigh it once I've done both sides but I was AMAZED how heavy it was. It's a really patience testing job, but I'm pleased I'm doing it. I need to order some more ice for the passenger side now and get the remaining glue off the drivers side. |
|
|
|
|
Seasoned Pro Location: Bucks Registered: 25 Feb 2007 Posts: 2,437 Status: Offline |
Post #154
Your car looks stunning even on the floors lol That dry ice is great though almost effortless compared to chiselling/scraping away for hours |
|
|
|
|
Regular Location: Urmond (The Netherlands) Registered: 19 Sep 2013 Posts: 464 Status: Offline |
Post #155
Cool! So this is a more preferred option over blow torch? Need to get my hands on dry-ice as well then!________________________________________ My car park:'96 Sigma Blue XSi6 '98 Diablo Red GTi6 '99 Onyx Black S16 All RFS powered! Plus various other Peugeots |
|
|
|
|
Regular Location: Hitchin Registered: 26 Aug 2009 Posts: 348 Status: Offline |
Post #156
Thanks Blandy. To be honest I think it photographs well! It's not that mint in real life, to my eyes.I was in two minds about doing it but Hovis calling me out made my mind up. Thanks Hovis! I used 2.5kg of dry ice so I'd reccomend 5kg per side if you wanted to make life easy for yourself. |
|
|
|
|
Seasoned Pro  Location: Reading/parts for sale Registered: 21 Nov 2008 Posts: 4,297 Status: Offline |
Post #157
99rallye wrote: Thanks Blandy. To be honest I think it photographs well! It's not that mint in real life, to my eyes. I was in two minds about doing it but Hovis calling me out made my mind up. Thanks Hovis! I used 2.5kg of dry ice so I'd reccomend 5kg per side if you wanted to make life easy for yourself. All the weight saved  looks easier than my blow touch effort. looks easier than my blow touch effort. ________________________________________ Ph2 Black GTI 6!EX black 6 owner But now a Black caged rallye owner Hunting for Go faster bits! SEARCH click here |
|
|
|
|
Formerly gpm  Location: Lutterworth Registered: 01 Sep 2007 Posts: 2,941 Status: Offline |
Post #158
Add a load of isopropyl alcohol into the mix, which speeds the sublimation process, and as well as it looking like top of the pops from the mid 80's, it also appears things up. This is exactly how I removed the deadening from mine.https://youtu.be/_3XM6uaKN9k ________________________________________ Cherry Red Rallye .... On going OEM spec restoChina Blue GTi6 .... Weekend toy Black 208 GTi .... Wife's car now Silver BMW 550i.... The executive missile |
|
|
|
|
Seasoned Pro Location: Bristol Registered: 20 Apr 2013 Posts: 5,209 Status: Offline |
Post #159
Looking Great Ben Keep the updates and pics coming m8 |
|
|
|
|
Seasoned Pro  Location: Troisvierges Registered: 09 Mar 2009 Posts: 1,350 Status: Offline |
Post #160
Beatifull car Sir, perfect combination of carbon and that cage is just a proper bit of kit as it is supposed to. Do you mind telling us the price of the cage? |
|
|
|
|
Regular Location: Hitchin Registered: 26 Aug 2009 Posts: 348 Status: Offline |
Post #161
Hi Marco, here's the link to the cage I went with, but I paid a bit more and went with the T45 option. How's your project coming along? I really enjoy your thread.https://www.customcages.co.uk/roll-cages/peugeot-306-challenge |
|
|
|
|
Seasoned Pro Location: Reading/parts for sale Registered: 21 Nov 2008 Posts: 4,297 Status: Offline |
Post #162
dying for an update lol________________________________________ Ph2 Black GTI 6!EX black 6 owner But now a Black caged rallye owner Hunting for Go faster bits! SEARCH click here |
|
|
|
|
Senior User  Location: Glasgow Registered: 19 Jan 2005 Posts: 931 Status: Offline |
Post #163
I removed my sound deadening with a needle scaler which made short shift of it without damaging any metalwork. I still had the tarry residue to dissolve but that seems to be the case with any method of removal________________________________________ 1999 GTi-6 (china blue)1999 Rallye (black) |
|
|
|
|
Seasoned Pro Location: Bristol Registered: 20 Apr 2013 Posts: 5,209 Status: Offline |
Post #164
Ben did you get round to weighing it ? |
|
|
|
|
Regular Location: Hitchin Registered: 26 Aug 2009 Posts: 348 Status: Offline |
Post #165
Hey Damian, I don't know if that question is aimed at me? My name's Nick 😂....but I did. Just the sound deadening was 4.8kg, I would imagine there was enough adhesive to push it over 5kg in total |
|
|
|
|
Seasoned Pro Location: Reading/parts for sale Registered: 21 Nov 2008 Posts: 4,297 Status: Offline |
Post #166
99rallye wrote: Hey Damian, I don't know if that question is aimed at me? My name's Nick 😂....but I did. Just the sound deadening was 4.8kg, I would imagine there was enough adhesive to push it over 5kg in total still some behind the wiper motor and all. How you getting on with your satchell shift? I have the urg all of a sudden  ________________________________________ Ph2 Black GTI 6!EX black 6 owner But now a Black caged rallye owner Hunting for Go faster bits! SEARCH click here |
|
|
|
|
Seasoned Pro Location: Bristol Registered: 20 Apr 2013 Posts: 5,209 Status: Offline |
Post #167
99rallye wrote: Hey Damian, I don't know if that question is aimed at me? My name's Nick 😂....but I did. Just the sound deadening was 4.8kg, I would imagine there was enough adhesive to push it over 5kg in total Sorry Nick my Bad m8 Regards Damien PS guys good luck with the Satchell shifts |
|
|
|
|
Seasoned Pro Location: Reading/parts for sale Registered: 21 Nov 2008 Posts: 4,297 Status: Offline |
Post #168
update required hahaha________________________________________ Ph2 Black GTI 6!EX black 6 owner But now a Black caged rallye owner Hunting for Go faster bits! SEARCH click here |
|
|
|
|
Regular Location: Hitchin Registered: 26 Aug 2009 Posts: 348 Status: Offline |
Post #169
Ha ha ha! Thank you for calling me out Hovis! It is over due isn't it. I've got a day off tomorrow to make some progress so I'll get some pics and write a proper update 😁 |
|
|
|
|
Regular Location: Hitchin Registered: 26 Aug 2009 Posts: 348 Status: Offline |
Post #170
Firstly, apologies that my updates have been so slow recently it’s been a series of very tedious jobs that have sapped my enthusiasm for getting in the garage and cracking on. However, I feel like I’ve found some momentum so long may that continue!Finishing off the sound deadening removal was a boring job but one I’m so pleased I tackled. Not only was it good to see that there isn’t any rust underneath but it looks so much better, and the bag of sound deadening weighed just under 5kg which can help offset the weight of the cage.  IMG_20200725_162459 by Nick Buxton, on Flickr IMG_20200725_162459 by Nick Buxton, on Flickr IMG_20200725_135023 by Nick Buxton, on Flickr IMG_20200725_135023 by Nick Buxton, on FlickrWhile that was happening my M3 decided it apparently wasn’t getting enough attention and decided to throw a mechanical hissy fit. The throttle actuators failed and sent the car into limp mode so I got it booked in with Evolve to be replaced, along with the big end bearings (which are a real weak point on the S65 motor), and while it was with them I thought it was rude not to get their Stage 2 map and primary cat delete kit pipes fitted   IMG_20200821_085405 by Nick Buxton, on Flickr IMG_20200821_085405 by Nick Buxton, on FlickrEvolve did an awesome job, nice guys and great service. I’d recommend them if anyone else is looking for a BMW specialist north of London. I had a little look around the Eventuri products which look great, and I put a carbon fibre plenum for the M3 on my imaginary shopping list. You can tell the Stage 2 kit has had some proper development time, it’s given the car a new edge and urgency in every scenario but there’s no droning with the exhaust, just more noise under full throttle. I’m finding lots more excuses to drive it now! Anyway, back on the Rallye I wanted to check that the seats still fitted because the cage does protrude into the cabin space. Happily, there were no issues, and seeing the seats back in place got me motivated!  IMG_20200905_161225 by Nick Buxton, on Flickr IMG_20200905_161225 by Nick Buxton, on FlickrMy vision for the Rallye has always been that it look as much like a “factory special” as my skills and budget allow. The idea that everything looks like it belongs together, is well finished and stays true to the original design and spirit of the 306 Rallye. Which for me is both an aesthetic and practical goal, I want to be able to drive it to track days and enjoy it on the road without wanting to kill myself. When I decided that I was going to get a cage I wanted as much of the interior and dash to go back in as possible which meant that I was going to have to get creative with the Dremel!  IMG_20200912_202103 by Nick Buxton, on Flickr IMG_20200912_202103 by Nick Buxton, on FlickrI marked out where I thought the cage would need to go through the top and bottom of the dash and noted how far it needed to go back to meet the bulkhead. Which made it look like it was never going to fit!  IMG_20200912_202111 by Nick Buxton, on Flickr IMG_20200912_202111 by Nick Buxton, on FlickrI made a template from the radius of the cage so that I could slowly keep trimming where the cage ran through the dashboard. This was a very, very fiddly job of trim a bit top and bottom on one side, test fit, do the same on the other side and test fit…...  IMG_20201119_153721 by Nick Buxton, on Flickr IMG_20201119_153721 by Nick Buxton, on FlickrAfter much head scratching and trimming I was starting to get somewhere. The design of the cage has actually meant that I can retain the original location of the fuse box and bottom glovebox on the passenger side which I’m really pleased about.  IMG_20201025_171230 by Nick Buxton, on Flickr IMG_20201025_171230 by Nick Buxton, on Flickr IMG_20201119_153502 by Nick Buxton, on Flickr IMG_20201119_153502 by Nick Buxton, on Flickr IMG_20201119_153529 by Nick Buxton, on Flickr IMG_20201119_153529 by Nick Buxton, on FlickrOnce I was happy with how the dash was sitting and the gap between the sides of the dash and the outer door frame looked good I bolted it in.  IMG_20201119_153538 by Nick Buxton, on Flickr IMG_20201119_153538 by Nick Buxton, on FlickrThe next step was to see how much of the standard doors would foul on the cage. I was fully expecting that I would have to do away with everything; speakers, door winder and door card. I’d even started looking at Maxi motorsport door cards! However, after wrestling the doors on single handedly (scratching one in the process which really annoyed me) it didn’t look too far off. The winders I don’t think are going to be usable when the doors are closed, but the speaker cleared and it was just the rear bottom half of the card that was causing issues. I marked out on the doors where they needed to be trimmed with masking tape and got cracking with the Dremel.  IMG_20201119_171241 by Nick Buxton, on Flickr IMG_20201119_171241 by Nick Buxton, on Flickr IMG_20201119_182518 by Nick Buxton, on Flickr IMG_20201119_182518 by Nick Buxton, on Flickr IMG_20201119_182531 by Nick Buxton, on Flickr IMG_20201119_182531 by Nick Buxton, on FlickrAfter much fettling, I’m now pretty happy that they fit around the cage and I’m going to find a trimmer to work some magic on them so that they don’t have a great big hole in them! What putting the door cards on did show me though is that the dash still isn’t sitting quite right…  IMG_20201119_171331 by Nick Buxton, on Flickr IMG_20201119_171331 by Nick Buxton, on FlickrYou can see in this pic that the top of the dash that sweeps down and connects to the door card and eventually becomes the door handle is out of line. I’m sure the dash is sitting flush with the firewall but I think it needs to come down a bit more, so I need to trim some more off the bottom sides so that it can sit over the cage more.  IMG_20201119_183352 by Nick Buxton, on Flickr IMG_20201119_183352 by Nick Buxton, on FlickrWith those bits done I threw the seat back in to see if it still fitted and if I could get comfortable with the cage and door cards in place. I think I might need to move inboard a bit more than they were but there’s enough adjustment so it should be fine. IMG_20201119_183352 by Nick Buxton, on FlickrI still just need to find a good painter I trust to paint the cage and interior. You wouldn’t believe how many I’ve been through already!....but watch this space. |
|
|
|
|
Seasoned Pro Location: Bristol Registered: 20 Apr 2013 Posts: 5,209 Status: Offline |
Post #171
Fantastic job Nick Keep the updates coming mucker |
|
|
|
|
Seasoned Pro Location: Reading/parts for sale Registered: 21 Nov 2008 Posts: 4,297 Status: Offline |
Post #172
Looking very nice. Surprised you didn't go for flat door Cards as you could still mount the speaker flat to them. What I'm thinking at a later date ________________________________________ Ph2 Black GTI 6!EX black 6 owner But now a Black caged rallye owner Hunting for Go faster bits! SEARCH click here |
|
|
|
|
Regular Location: Hitchin Registered: 26 Aug 2009 Posts: 348 Status: Offline |
Post #173
Cheers lads. Hovis, I am still considering flat door cards. It might be too much to ask for a trimmer to repair the holes I've cut in them |
|
|
|
|
Seasoned Pro Location: Reading/parts for sale Registered: 21 Nov 2008 Posts: 4,297 Status: Offline |
Post #174
99rallye wrote: Cheers lads. Hovis, I am still considering flat door cards. It might be too much to ask for a trimmer to repair the holes I've cut in them More carbon  ________________________________________ Ph2 Black GTI 6!EX black 6 owner But now a Black caged rallye owner Hunting for Go faster bits! SEARCH click here |
|
|
|
|
Seasoned Pro Location: Bucks Registered: 25 Feb 2007 Posts: 2,437 Status: Offline |
Post #175
That looks stunning 🤩 |
|
|
|
The Peugeot GTi-6 & Rallye Owners Club - ©2024 all rights reserved.

Please Note: The views and opinions found herein are those of individuals, and not of The Peugeot 306 GTi-6 & Rallye Owners Club or any individuals involved.
No responsibility is taken or assumed for any comments or statements made on, or in relation to, this website. Please see our updated privacy policy.