Post #1
This is a FAQ for fitting the AEM Wideband Uego Gauge kit to your 306 Gti-6I advise proffessional fitting of this product and you should only use this faq as a guide. I shall not be held responsible for any damage you incur during fitting of this kit.
The instruction manual is pretty straight forward, but some may need further guidance.
So here goes.. Disconnect the battery!
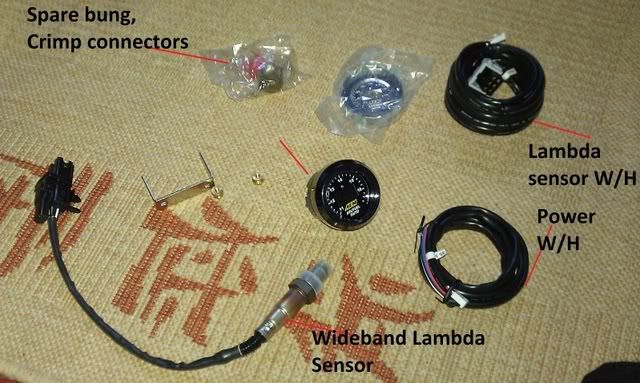
When you open the box you should be presented with this...
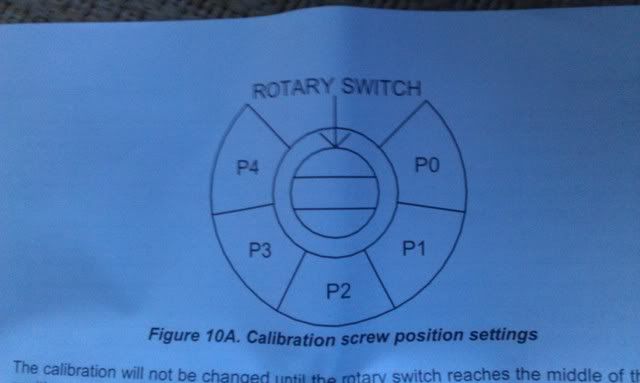
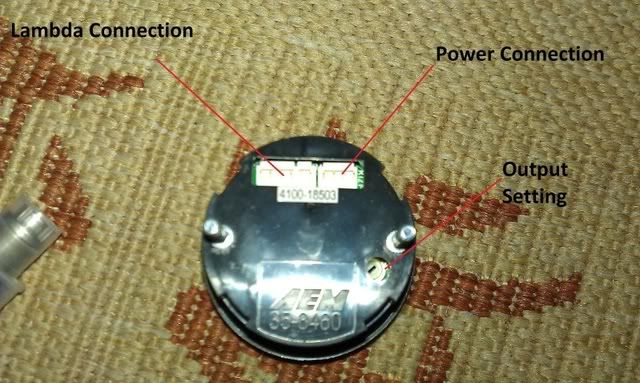
The first thing you need to do is set the GAUGE output for narrowband use, this is P4 on the switch at the back. You will need a thin flat head screw driver to do this Just twist it clockwise to P4. You will know you have set it right when the unit powers up with a flashing led of P04 before operation.
Find a suitable location to mount your gauge....
Time to wire up. There are two wire harnesses that plug into the back of the gauge.The 4pin one is the power/output harness. The other harness connects straight to the short lambda harness on the actual sensor.. more of that later.

The blue wire of the harness is only used for serial datalogging via laptop etc, so tape this out the way on installation of gauge.
For power you need a 12V supply (RED wire), the best source being the 12v at the back of the cigarette lighter easily accessed by unclipping the lower fascia. Dependant of location of gauge you may need to extend the wire.
The BLACK wire is ofcourse negative(earth) and this can be placed in any of the clean earthing points in the interior(be sure to be placed on unpainted metal surface of the car), or connected to the earth of the OE lambda harness. Which on the engine wire harness iirc is a yellow/green wire on the multiplug of the lambda sensor.
The WHITE wire is for analogue output, this connects to the engine wire harness and should give a narrowband output like the OE lambda (now that you have set the gauge to P4). Cut the solid GREEN wire from the multiplug and solder/connect the WHITE wire from the gauge.
Once you are happy with your joining, connect up the 4pin plug to the back of the gauge. and find a suitable place to locate and fit you gauge, gauge holders or a pillar mounts are the most common.
Next you need feed the main wideband lambda harness through the bulkhead, this can be taken through a grommit behind the heater unit by temporarily prising off the grey locking clip of the connector.

Or you can drill a hole in the bulkhead and feed through
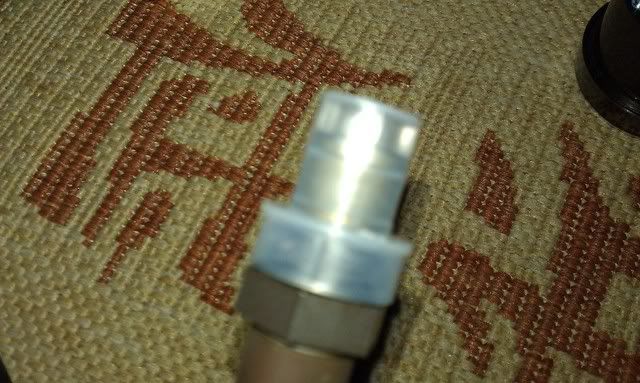
Once everything is connected on the back of the gauge and it is installed in a suitable location you can jack the car up and remove your OE lambda. The wideband lambda is the same thread spec as the oe so remove and replace with the wideband one.
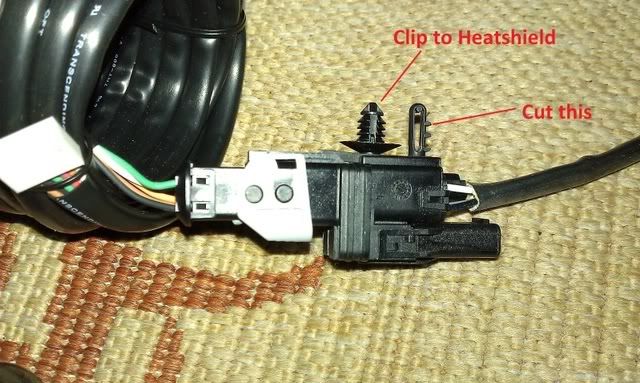
Cut off the black plastic lug as shown and clip the lambda harness to the gauge harness you fed through the bulkhead, and clip the connector into a hole in the heatshield on the n/s
Make sure your lambda sensor is fitted tight and all your wiring is tucked away with cable ties etc.
You can then reconnect your battery... turn the ignition on... notice the gauge shows p04 and does a full range before settling on - -. Start the car and let it idle, once the lambda is in operating tempartures it should show a steady 13-15 afr indicating stoich mix. Enjoy your new gauge and keep an eye on it at cruise and Wide Open Throttle.. This will show you early signs of engine failure and may be able to rectify a simple fuelling issue before devastation.
There is a possibility that the ECU might flag a temp fault with just an analogue input so it is advised to tie up your standard lambda to the back of the battery box still connected to the multiplug. You can offer a resistor to the positive and the heater wire, this value of resistor is best tested by yourselves.
________________________________________
Team Supercharged Gti-6NV Motorsport
Automotive Performance Tuning
0121 448 7515
ECU Remapping/ DPF removal
VAG/BMW Diag and Option Coding
Peugeot Planet ECU coding/transponder programming etc
www.nvmotorsport.com
Facebook Page
Project S6